Meade Instruments
Stella Wi-Fi Adapter
Users Guide
INTRO TO STELLA
Stella is a Wi-Fi adapter that allows wireless connection to your telescope
mount. It is used in combination with Meade’s StellaAccess application
which is available for purchase on the iOS and Android platform through
the iTunes and Google Play store. To fully utilize Stella, download
StellaAccess and become familiar with the app before you connect Stella
to the telescope.
BEFORE USING STELLA
Charge Stella before use! Plug in the included AC adapter into Stella’s
micro-USB port (3, Fig. 2) to charge. Stella will be fully charged once its
charging indicator LED (3, Fig. 1) turns off. Charging time will depend
on initial battery level. When fully charged, Stella’s internal rechargeable
lithium ion battery should last 4-8 hours depending on usage.
POWERING STELLA ON & OFF
To turn Stella on and off, press and release the center on/off button (2,
Fig. 1). The power LED (1, Fig. 1) will illuminate when on.
CONFIGURING STELLA
Stella’s default settings allow quick connection to the telescope without
worrying about security passwords. Just power on Stella and connect to
the “Stella” network using a phone or tablet. Stella connection will occur
without passwords using the default settings.
To enable password protection or security features, power Stella on,
connect to the “Stella” Wi-Fi network, open your web browser and go to
the following address http:// 10.0.0.1. The Stella webpage will load and
various security and firmware settings can be configured. Or from within
the StellaAccess app, go to Settings -> Setup -> Stella Wi-fi settings to
configure Stella.
CONNECTING STELLA TO YOUR TELESCOPE
Connect Stella to your telescope using the required cables.
•
For Meade AutoStar and AudioStar equipped telescopes, use the
Meade #505 Cable set. Connect the 4-pin cable side to the bottom
of the hand box and 9-pin serial side (2, Fig. 2) to Stella.
•
For AutoStar II equipped telescopes, use the Meade #507 cable
set. Connect the 6-pin cable side to the RS232 port on the
telescope control panel, and 9-pin serial side (2, Fig. 2) to Stella.
•
AutoStar III telescopes, such as the Lightswitch (LS) telescope,
will require a USB A/B cable to connect to the telescope mount.
Connect the USB-B side to the LS control panel, and USB-A side
to Stella (1, Fig. 2).
For non-Meade telescopes, consult with the manufacturer for selecting
the proper cabling.
USING STELLA
1.
Once Stella is connected to the telescope, perform a telescope
alignment on the night sky as normal. When aligned, power the
Stella Wi-Fi adapter on and open the StellaAccess app. If your
telescope hand controller reads “Press 0 to Align or Mode for
Menu”, press “Mode” to go to the default menu.
2.
In the app settings tab, navigate to the Setup page under
Telescope. Select the correct telescope model, mount type, and
Stella communications settings. Next select the Auto-detect Stella
feature to use the default connection settings.
NOTE:
If you wish to use a static IP address and port number to
configure Stella, the default IP Address is 10.0.0.1, and the default
Port Number is 4030. Or, you may select a unique IP address and port
number that matches with Stella.
3.
When you have entered the correct information, connect to the
telescope by going to the Scope tab and pressing Connect. The
sky view in the app will point to where the telescope is pointing.
4.
You can now use StellaAccess to point your telescope to any
object shown above the horizon.
5.
When finished using Stella, disconnect from the telescope and
press the center button on Stella to power off.
RESETTING STELLA TO THE FACTORY DEFAULTS
1.
Power on Stella.
2.
Press and hold the center button for 5 seconds, then release. The
data LED (4, Fig. 1) will begin to flash slowly. When Stella has
completed the reset it will flash quickly.
3.
Release the center button and Stella will power down.
4.
Stella has now been configured to its factory settings.
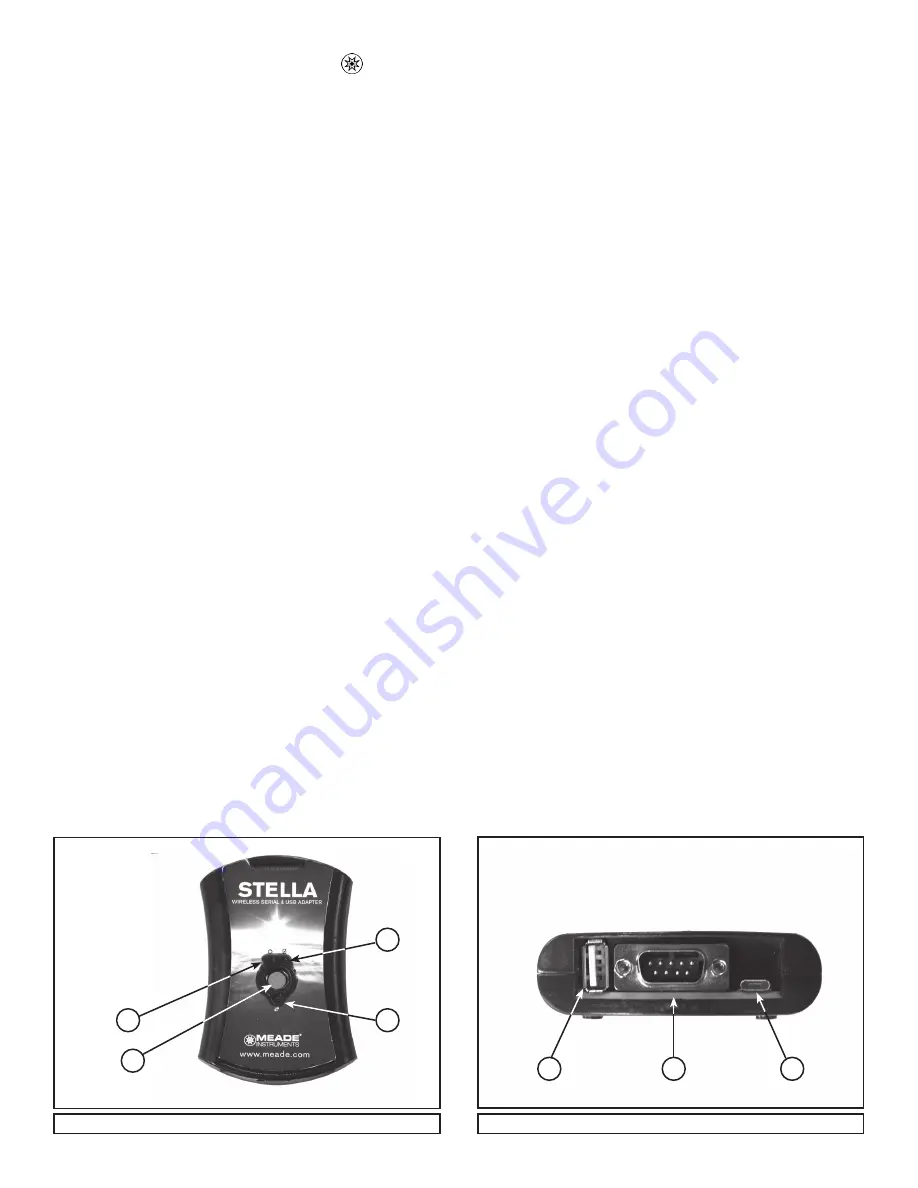
Fig. 1: Stella Wi-Fi Adapter (Top View)
Fig. 2: Stella Wi-Fi Ports (Side View)
1
2
3
4
1
2
3
(1) Power LED
(2) On/Off Button
(3) Charging LED
(4) Data LED
(1) USB-A Port
(2) DB9 Serial Port
(3) Micro-USB Port