MCS-OEM KEYPAD
Installation Instructions
5580 Enterprise Pkwy. Fort Myers, FL 33905
Office: 239-694-0089 Fax: 239-694-0031 www.mcscontrols.com
Revision 2018-12-21
Instructions for mounting without a gasket seal
Package contains the following:
MCS-KEYPAD-OEM - color black
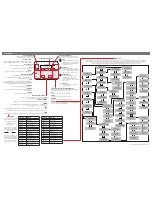
1. Cut hole in your enclosure using MCS-KEYPAD-OEM Template,
available at;
https://mcscontrols.com/micros.html#MCS-MAGNUM
2. Use the
6 holes
shown in photo to mount the keypad, 3 on each side, use #6/32 thread size x 0.500 long
bolt and Keps nut (not supplied).
3. Top-center & bottom center mounting holes on OEM keypad only to be used when water tight seal is
required.
CAUTION
When mounting this unit, please do not pinch, crease or
create sharp folds in ribbon cables.
Before installing, make sure the LCD ribbon cable is tucked in
to avoid damaging when mounting
ONLY USING THIS CENTER MOUNTING HOLE WHEN WATER
TIGHT SEAL IS NEEDED - SEE INSTRUCTIONS ON BACK
ONLY USING THIS CENTER MOUNTING HOLE WHEN WATER
TIGHT SEAL IS NEEDED - SEE INSTRUCTIONS ON BACK
1
2
3
4
5
6
Ground Tab
When mounting the Keypad, fold
over the black ground tab and
place a washer over the black
tab. Fasten the keps nut on the
Keypad back as shown below.
#6/32 thread size x
0.50 bolt and Keps
nut.
See reverse side if
you are mounting
using
gasket seal