background image

CRONUS

 1

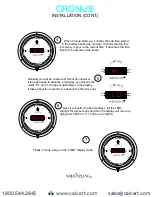
      Feed wire from A.C. Adapter through 
wall and out.   We recommend mounting
the clock on one of our pre-drilled and 
centered panels.  

CABLE-HOLE

W

L

AL

SCREW

SCREW

PANEL

FROM

A.C.

ADAPTER

PROPER INSTALLATION IS IMPORTANT.   IF YOU NEED ASSISTANCE, CONSULT  A CONTRACTOR,  ELECTRICIAN 

OR TELEVISION ANTENNA INSTALLER (CHECK WITH YOUR LOCAL BUILDING SUPPLY, OR HARDWARE STORE 

FOR REFERRALS).  TO PROMOTE CONFIDENCE, PERFORM A TRIAL WIRING  BEFORE INSTALLATION.

CALIBRATED

Removal Of Seal Voids All Warranties

Maximum, Inc.

CAL

ED

IBRA

T

emo

al Of 

 V

o

ds

A

 W

ar

ant

es

R

v

Seal

i


ll

r

i

M

ximu

, I

c

a

m

n

.

IB

A

T

D

CAL

R

E

Remo

al

fS

al

V

o

d


ar

i

s

v

 O


e


i

s

Al

W

rant

e

x

mum

n

Ma

i

, I

c.

R

W E A T H E R I N S T R U M E N T S

HANDCRAFTED

in the U.S.A.

508.995.2200  www.maximum-inc.com

This device complies with Part 15 of the
FCC Rules.  Operation is subject to the fol-
lowing two conditions: (1) this device may
not cause harmful interference, and (2)
this device must accept any interference
received, including interference that may
cause undesired operation.

A.C. ADAPTER

(NO POLARITY)

Set All

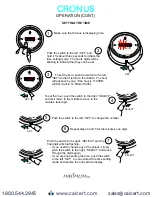
Connect the wires from the 
A.C. Adaptor cable to the contact 
posts marked “A.C. ADAPTER” on 
rear of Cronus. The polarity does
not matter so either wire can 
connect to either post.  

 2

FROM

A.C.

ADAPTER

 3

       P

l

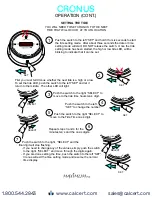
ug the A.C. Adapter into a 110Volt A.C. outlet.  

INSTALLATION

www.calcert.com

[email protected]

1.800.544.2843

0

5

10

15

20

25

30
Summary of Contents for CRONUS CSB

Page 1: ...D C A L R E R e m o a l f S a l V o d l a r i s v O e i s A l W r a n t e x m u m n M a i I c R W E A T H E R I N S T R U M E N T S HANDCRAFTED in the U S A 508 995 2200 www maximum inc com This devic...

Page 2: ...ernately on the display It takes about four seconds to advance the tide one year 5 N O U R S C R 24 Hr Date AM PM N O U R S C R 24 Hr Date AM PM N O U R S C H O U R S T O L O W H O U R S T O H I G H D...

Page 3: ...the clock for up to 10 years in the absence of AC power SETTING VALUES AND OPTIONS Cronus uses the same basic setting method for all values The value being set will be flashing Pressing the switch to...

Page 4: ...r is 11 00PM 23 00 it will to 12 00am 00 00 4 To set the hour push the switch to the right SELECT and let it return to the middle to move to the minute s tens digit E D I T W LO SE O T T A S U EC L T...

Page 5: ...digit will advance by one 4 To set the one s digit of the month push the switch to the right SELECT and let it return to the middle to move to the month s one s digit E D I T W LO SE O T T A S U EC L...

Page 6: ...ve through the digits again If you are done setting the time push the switch to the left SET Cronus will exit the time setting mode and resume the normal time display E D I T W LO SE O T T A S U EC L...

Page 7: ...tions to go to the next function Note the daylight saving changes follow the North American standard Time is advanced one hour at 2 00AM on the second Sunday of March and set back one hour at 2 00AM o...

Page 8: ...or low tide is not really a point in time but a condition that exists over a period of time If for some reason you require exact tide information you should always refer to a current tide table The pu...

Page 9: ...and off switching of large electrical appliances such as refrigerators or clothes dryers can create damaging fluctuations This is especially true with sensitive weather recording devices Yourself Are...

Reviews: