background image

Product Overview

Features

Video - Screen Formats and Frame Rates

Electrical Specifications

Mechanical Specifications

Operational Setup

Connectors

Faceplate Cleaning

Optional Accessories

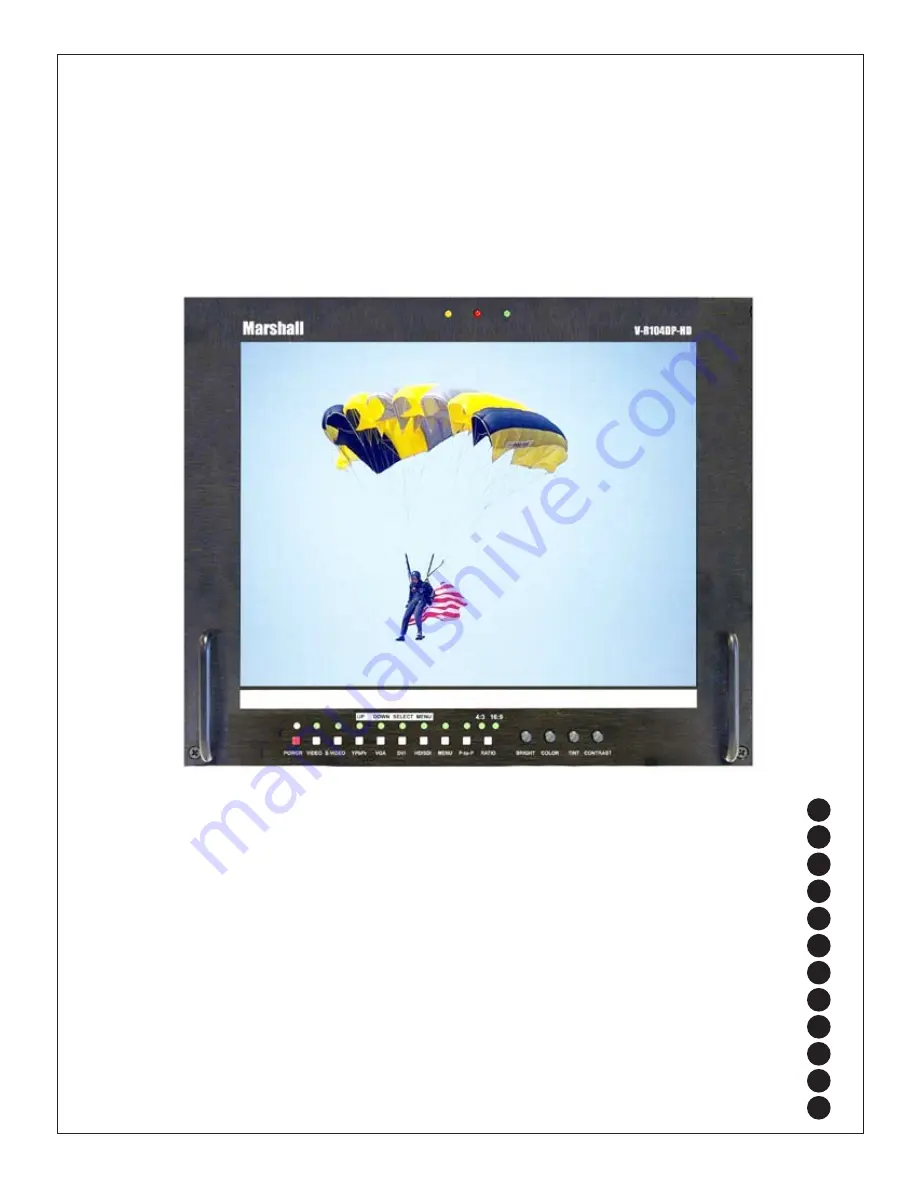
Switch Settings, Adjustments and Indicators

Menu Functions

Warranty

1
2
3
4
5
6
7
8

Marshall Electronics 

1910 East Maple Ave.  

El Segundo, CA 90245   

Tel.: 800-800-6608 • 310-333-0606

 Fax: 310-333-0688 

www.LCDRacks.com


Email: [email protected] 

12

Warranty

9

10

10

V-R104DP-HD 

Users Guide

Marshall Electronics warranties to the first consumer, that this V-R104DP-HD 10.4-inch LCD rack mounted monitor set will, under normal 

use, be free from defects in workmanship and materials, when received in its original container, for a period of one year from the pur-

chase date.  

This warranty is extended to the purchasing end user only and proof of purchase is necessary to honor the warranty.  If there is no proof 

of purchase provided with a warranty claim, Marshall Electronics reserves the right not to honor the warranty set forth above. Therefore, 

labor and parts may be charged to you.

This warranty does not apply to product exterior and cosmetics. Misuse, abnormal service or handling, improper alterations or modifica-

tions in design or construction, voids this warranty. No sales personnel of the seller, nor any other person is authorized to make any war-

ranties other than those described above, or to extend the duration of any warranties on behalf of Marshall Electronics, beyond the time 

period described above.

An extra note about LCD displays: It is considered normal for a minimal amount of pixels, not to exceed three, to fail on the periphery of 

the display active viewing area. Marshall Electronics has the option to reserve service for display pixel failure if deemed unobtrusive to 

effective use of the monitor by our technicians.

Due to constant effort to improve products and product features, specifications may change without notice.

11
12

08/21/2007

OSD

Use SELECT to enable the On Screen Display 
for input and function status

Blue Only


SELECT

 to adjust SMPTE or split field color bars.

1. Allow monitor to warm up for 5-10 minutes minimum. 

2. Display SMPTE color bars on monitor. Turn on off Color with control.

3. Find the PLUGE (superblack, black, and gray bars) at the lower right 

of the pattern. 

Adjust BRIGHTNESS until there is no difference visible between the super-

black and black bars, but is still visible.

4. Adjust CONTRAST control to achieve a balanced gray scale across 

top bars. 

5. Turn up CHROMA (color level) control until the two outermost bars

(white and blue appear to match in brightness. 

6. NTSC Only -Adjust COLOR PHASE (tint or hue) control until the third 

bar from the left (cyan) and the third bar from the right (magenta) appear to 

match in brightness. 

SDI:  525i/60hz 4x3

Summary of Contents for V-R104DP-HD

Page 1: ...l Setup Connectors Faceplate Cleaning Optional Accessories Switch Settings Adjustments and Indicators Menu Functions Warranty 1 2 3 4 5 6 7 8 Marshall Electronics 1910 East Maple Ave El Segundo CA 90245 Tel 800 800 6608 310 333 0606 Fax 310 333 0688 www LCDRacks com Email sales lcdracks com 9 10 V R104DP HD Users Guide 11 12 ...

Page 2: ... 4 3 16 9 switchable Display Viewing Area 10 4 Inch diagonal 211 2mm w x 158 4mm h Viewing Angles 130 H x 120 V Resolution RGB Dots 800H RGBx600V 1 44 million pixels Color Depth 262 000 Colors 6 Bit Dot Pitch 213mm square pixel Contrast Ratio 350 1 Pixel Response 10ms rise 25ms fall Brightness in cd m 500 cd m Backlight Field Replaceable CCFL 50 000 hour half life LCD Screen Treatments Anti Reflec...

Page 3: ...SMPTE 170M Tally lamps active when connected to ground S Video In 4 Pin Din Female Pin1 GND Pin2 GND Pin3 Yin Pin4 Cin S Video Out 4 Pin Din Female Pin1 GND Pin2 GND Pin3 Yout Pin4 Cout Active Outputs require power to be applied All input signals appear as output signal Analog output signals are buffered and amplified VGA XGA Connector PIN SIGNAL PIN SIGNAL 1 RED 9 NC 2 GREEN 10 NC 3 BLUE 11 NC 4 ...

Page 4: ...0i Y Y x x 1280 x 720 60P Y Y Y Y 1280 x 720 50P Y Y Y Y 1280 x 720 30P Y Y x x 1280 x720 29 97P Y Y x x 1280 x720 25P Y Y x x 1280 x 720 24P Y Y x x 1280 x 720 23 98P Y Y x x 1920 x 1080 60i Y Y Y Y 1920x1080 59 94i Y Y Y Y 1920 x 1080 50i Y Y Y Y 1920 x 1080 30P Y Y Y Y 1920x1080 29 97P Y Y Y Y 1920 x 1080 25P Y Y Y Y 1920 x 1080 24P Y Y Y Y 1920 x 1080 24Psf Y Y Y Y Table 1 Computer Signals Dis...

Page 5: ...0p 60Hz Y Y 1280x720p 59 94Hz Y Y 1280x720p 50Hz Y Y 1280x720p 30Hz Y Y 1280x720p 29 97Hz Y Y 1280x720p 25Hz Y Y 1920x1080p 30Hz Y Y 1920x1080p 29 97Hz Y Y 1920x1080p 25Hz x x 1920x1080p 24Hz x x 1920x1080p 23 98Hz Y Y 1920x1080sf 24Hz Y Y 1920x1080sf 23 98Hz Y Y 1920x1080i 60Hz Y Y 1920x1080i 59 94Hz Y Y 1920x1080i 50Hz Y Y 1920x1035i 60Hz Y Y 1920x1035i 59 94Hz Y Y ...

Page 6: ... by using recommended cleaning and polishing practice Faceplate Polishing Protect and maintain surface gloss by occasional polishing with a good plastic cleaner and polish Apply a thin even coat with a soft clean cloth and polish lightly with cotton flannel Then wipe with a damp cloth to help eliminate electrostatic charges that can attract dust particles Marking on the Faceplate Use SHARPEE or eq...

Page 7: ...th 3 LED power Indicator 55 W Lithium Battery with Power Link IDX E7 V Mount Battery Pack with PowerLink includes accurate Power Status Display and supports Digi View 82 W Lithium Battery IDX E10S V Mount battery pack with 3 LED power Indicator 82 W Lithium Battery with Power Link IDX E10 V Mount Battery Pack with PowerLink includes accurate Power Status Display and supports Digi View Digital to A...

Page 8: ...spect ratio switch 4 3 or 16 9 selector and indicators 4 3 Aspect 16 9 Aspect 10 Switch Settings Adjustments and Indicators Tally Lamps V R104DP HD Users Guide Image Adjustment Controls Note Tint only functions when NTSC Video or S Video are selected ...

Page 9: ...s pixel to pixel will appear as cropped 800x600 4 3 aspect with 60 lines from the top and 60 lines from the bottom cropped Horizontally 240 pixels will be cropped from each edge 3 Menu Enable and navigation Access menu functions by selecting the MENU button Use UP DOWN to navigate and SELECT to enable or disable the function Note Source selection is disabled when in menu mode Color Temperature D 6...

Page 10: ...about LCD displays It is considered normal for a minimal amount of pixels not to exceed three to fail on the periphery of the display active viewing area Marshall Electronics has the option to reserve service for display pixel failure if deemed unobtrusive to effective use of the monitor by our technicians Due to constant effort to improve products and product features specifications may change wi...

Reviews: