Majestic ODGSR36ANAU, Installation And Operating Instructions Manual
The Majestic ODGSR36ANAU is a stunning gas fireplace that adds elegance to any living space. To ensure a hassle-free installation and operation, we provide an easy-to-follow Installation And Operating Instructions Manual. You can conveniently download this manual for free from our website, making your experience with this extraordinary product even better.
Share
Download


Reviews:
No comments
Related manuals for ODGSR36ANAU
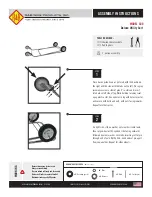
500
Brand: R&B Wire Products Pages: 2
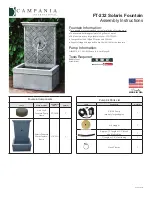
Solaris
Brand: Campania International Pages: 3

Yukon
Brand: Palram Pages: 100

GIGIO
Brand: chazelles Pages: 50

GBI-34
Brand: GreatCo Pages: 11

MARABO
Brand: tepro Pages: 26

26100040
Brand: Restoration Hardware Pages: 4

11061-2
Brand: HAMPTON BAY Pages: 7

WIN256
Brand: Alpine Pages: 2

PIT1005A
Brand: Safavieh Furniture Pages: 3

PFL240 LED
Brand: WE-EF Pages: 3

EGO 0105314
Brand: Kettler Pages: 20

RO8311AC
Brand: Quoizel Pages: 2

Venetian Pavilion
Brand: Forest garden Pages: 6

0-05531020-5
Brand: Jaclyn Smith Pages: 7

UNB12
Brand: ABBA Pages: 5

MLDVTCD-35NE
Brand: Lennox Hearth Products Pages: 30

MANOR
Brand: Keter Pages: 28


