background image

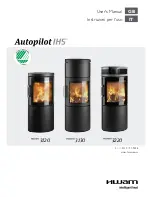
Magnum T40AC, T40DC, T40I, ESSEX, 


Wood Pellet Stove / Fireplace Insert 


NOTE: THESE INSTRUCTIONS MUST BE SAVED for future reference 


PLEASE READ THIS ENTIRE MANUAL BEFORE INSTALLATION AND USE OF THIS PELLET 

BURNING STOVE.  FAILURE TO FOLLOW THESE INSTRUCTIONS MAY RESULT IN PROPERTY 

DAMAGE, BODILY INJURY OR EVEN DEATH. 


IMPORTANT: 

Always contact your local dealer/installer with questions before contacting the factory.  

When you call have your serial number, purchase date, who installed the unit and a list of questions. 


AMERICAN ENERGY SYSTEMS, INC. GRANTS NO WARRANTY, IMPLIED OR 

STATED, FOR THE INSTALLATION OR MAINTENANCE OF THE STOVE AND 

ASSUMES NO RESPONSIBILITY FOR ANY CONSEQUENTIAL DAMAGE(S). 

AMERICAN ENERGY SYSTEMS, INC.  -150 Michigan Street SE  -  HUTCHINSON, MINNESOTA 55350 


Web 

Site: 

www.hearthdirect.com


9


When installing your 

Magnum Wood Pellet

 stove or Insert, particular attention needs to be made in 

regards to fire protection.  If the unit is not properly installed, a house fire may result.  For your safety, 
follow the installation and operation instructions provided, and if a question arises contact local building or 
fire officials about restrictions and installation requirements in your area. 

9


Read the operations and fuel section of this manual before plugging in your unit. 

9


Always unplug the unit before attempting any service work. 

9


Do not connect the unit to a chimney flue already serving another appliance. 

9


When installing the chimney pipe to the unit, it is important to remember that the unit operates on a 
negative pressure and the chimney on a positive pressure.  All chimney connections, elbows and fittings 
must be airtight.  

(proper venting practices must be followed. Consult with a venting professional)


9


Ashes must be disposed of in a metal container with a tight fitting lid. 

9


All minimum clearances to combustibles must be followed. 

9


The 

Magnum Wood Pellet Stove / Insert

 is tested for operation with wood pellets with an ash content of 

no more than 2%.  

It is recommended that wood pellets with an ash content of 1% or less be used for 

efficient operation of this unit. Higher ash content fuels will require additional maintenance and 
service.  For use with wood pellets, cherry pits, olive pits or other pelletized fuel. 

9


It is important to use fuel that is clean, dry and consistent.  

Make sure that your supplier is giving you 

the same fuel each time that you purchase.  It is recommended that you purchase your entire heating season 
supply of fuel at one time so that the fuel will be the same.


9


A voltage surge protector or ground fault outlet is required for this unit.  The warranty will be 
voided if surge protection is not installed before operating this unit.   

9


A grounded outlet must be provided with proper polarity.  A constant 115 volt, 60 cycles must be 
provided for proper operation or the warranty of this appliance will be forfeited.  

9


Special attention needs to be taken to clean out the top heat exchangers of this unit on a regular 
basis.  The fly ash settles on the heat exchangers and must be cleaned off to keep the unit operating 
properly.  Check for plugging every two-four weeks or when needed. 

9


If unit is not operated for extended periods of time (like summer) unplug the unit and disconnect the 
battery to assure long life of electrical components. 

9


This appliance has been tested to UL1482/ ASTM E 1509  standards

OWNER’S MANUAL 

Installation – Operation – Maintenance Instructions


Summary of Contents for T40AC

Page 1: ...ws and fittings must be airtight proper venting practices must be followed Consult with a venting professional 9 Ashes must be disposed of in a metal container with a tight fitting lid 9 All minimum c...

Page 2: ...and Replacement 36 Circuit Board Functions 37 38 Setting the Draft 39 Wiring Diagram AC DC 40 41 Draft Slide Gate Adjustment 42 Igniter Replacement 43 Trouble Shoot Guide 44 45 46 47 Warranty 48 Servi...

Page 3: ...ergy Systems Inc manufacturer of the Magnum Wood Pellet Appliances reserves the right to alter its products their specifications and or price without notice Safety tested and EPA exemption tested by W...

Page 4: ...t could be that there is a serious lacking of good quality air in the home caused by negative pressure If you have done any remodeling or if this is a newer home it is a very real possibility that thi...

Page 5: ...approved for this appliance it will void the warranty and no service warranty will be allowed The Magnum models will burn high ash content fuels but will require additional maintenance cleaning 9 A wo...

Page 6: ...to using and selecting proper fuels for your stove WOOD PELLETS 9 Be consistent in your wood pellet fuel supplier Wood Pellets will vary in content and burn characteristics from supplier to supplier...

Page 7: ...Make sure that the shroud is with the unit when you get it The following diagram will show how to install the legs on the Leg Unit The legs are wrapped up and packaged in the hopper Unpackage the leg...

Page 8: ...ombustible material or equivalent extending beneath heater and to the front side rear as indicated CHIMNEY AND CONNECTOR 3 LISTED PELLET VENT ONLY NOTE REGARDLESS OF STOVE CLEARANCE VENT PIPE MUST ALW...

Page 9: ...gases are not hot enough to ignite grass plants or shrubs located in the vicinity of the termination The grade surface must not be a lawn Distance from bottom of termination and public walkway is 7ft...

Page 10: ...nt pipe length should not exceed 30 feet Component Equivalent Length Equivalent Pipe Length Horizontal Straight Pipe Actual Length in ft x 1 0 Horizontal Pipe 1 x 2 1 3 ft Vertical Straight Pipe Actua...

Page 11: ...equate fresh air to the home so that the Magnum appliance does not become the fresh air source 4 Only non combustible pipe 3 inches in diameter is approved to use for outside air connections straight...

Page 12: ...ocal building codes fire codes and the safety listing tag on the inside hopper lid An outside air source must be connected to the stove and can be brought in through the sidewall or vented crawl space...

Page 13: ...FOLLOWING REQUIREMENTS ARE MANDATORY FOR INSTALLATION IN A MOBILE HOME 1 Stove must be permanently bolted to the floor 2 Stove must have permanent outside air source 3 Stove must be permanently elect...

Page 14: ...er the pipe manufacturer s instructions Connect the pipe and lock the joints as directed by the pipe manufacturer and secure the vent pipe to the flue collar on the back of the stove Add a small bead...

Page 15: ...Note The pipe lengths shown are for reference only Your actual pipe length requirements may differ SINGLE WALL PIPE SHALL NOT BE USED FOR ANY INSTALLATION HORIZONTAL INSTALLATION SHALL BE A MAXIMUM O...

Page 16: ...es and presence of all necessary parts including a chimney cap prior to making the connection 3 This stove may be connected to an existing ceiling mounted factory built chimney with a diameter of 4 6...

Page 17: ...s ash buildup premature failure of exhaust system staining of the house siding and serious creosote buildup This installation should not be used in a cold climate area Storm Collar Note This type of i...

Page 18: ...wo terminals on the back of the control panel When the room temperature drops below the thermostat setting the thermostat switch will close allowing the stove to operate at the medium or higher settin...

Page 19: ...o the two terminals on the back of the control panel When the room temperature drops below the thermostat setting the thermostat switch will close allowing the stove to operate at the medium or higher...

Page 20: ...20 MAGNUM T40I INSERT INSTALLATION...

Page 21: ...21 T40I INSERT INSTALLATION cont Siding Use only rigid Pellet Vent pipe Framing Chimney cap Storm Collar Seal Plate 3 75mm Minimum Clearance Around vent 6 150mm min 16 375mm minimum 6 150mm minimum...

Page 22: ...22 T40I INSERT INSTALLATION cont...

Page 23: ...ir to the top of the chimney It is best to route the fresh air intake either out the back of the fireplace cavity or down and out to an outside air source Running the fresh air up and out the top of t...

Page 24: ...24...

Page 25: ...25...

Page 26: ...26 Thermostat wire connection Low voltage thermostat Molex Plug 24 volt thermostat hookup...

Page 27: ...lack negative lead to the negative battery terminal 10 Reconnect the 110 volt AC power The stove is now ready for 12 volt back up and will switch automatically to 12 volt operation when AC power is lo...

Page 28: ...will stop feeding and You will need to start the cycle over again Pushing and holding the Auger switch allows you to prime the auger and add fuel to the firepot automatically This can be done app 1 mi...

Page 29: ...ou to prime the auger and add fuel to the firepot automatically Press and hold the button until you have the right fuel load Do not continue to hold the auger button under normal operation as it could...

Page 30: ...od in or out An air damper closed too much will produce a lazy and slow flame Adjusted properly the flames should be bright and lively Altitude and fuel types greatly affect the amount of air required...

Page 31: ...ed WARNING MANY HOME VACUUM CLEANERS ALLOW ASH TO ESCAPE INTO THE ROOM AIR HOWEVER VACUUMING IS RECOMMENDED OCCASIONALLY TO AID IN SEASONAL CLEANING AND KEEP THE UNIT FREE OF EXCESS ASH DISCARD THE VA...

Page 32: ...odically they should be inspected and vacuumed clean The combustion blower is accessed by removing the stove s right side panel and then removing the inspection caps or the exhaust manifold cover See...

Page 33: ...l accumulate dust cat hair etc on the blades during the heating season This must be vacuumed clean as often as necessary If you have pets they will need to be cleaned Auto reset 110 deg Normally open...

Page 34: ...remove these products periodically to eliminate the possibility they will be ignited in the chimney and produce damage to the chimney or even possibly destroy the home Clean the chimney as often as n...

Page 35: ...ill shut itself down safely The stove may not be restarted until it has cooled and the reset button is depressed See Thermodisk location section If the auger does not turn after cleaning the back of t...

Page 36: ...glass will break when tightening the screws if the glass is on the gasket Hold the glass toward the top of the door glass channel when tightening CLEANING THE GLASS When the fire is first started it w...

Page 37: ...hest setting Optimum efficiency is achieved by using lower settings 2 or 3 It is also recommended that the unit not be run for extended periods of time on the number 1 setting The draft blower and ven...

Page 38: ...e ability to use 3 separate programming features This programming must be done by a qualified factory trained technician Contact your local dealer to set up an appointment to have this done The unit a...

Page 39: ...flame again If the status of the flame has not changed move the damper another 1 8 until you get a clean dancing flame If moving the damper does not change the fire you might have negative pressure in...

Page 40: ...40 AC MODEL WIRING DIAGRAM WARNING DISCONNECT POWER BEFORE SERVICING THIS UNIT DHC 3000 AC board...

Page 41: ...41 DC MODEL DDC 3000 WIRING DIAGRAM WARNING DISCONNECT POWER BEFORE SERVICING THIS UNIT...

Page 42: ...position the plate will be against the mounting plate as shown If the unit needs a draft correction adjustment the bolts are loosened and the slide gate is rotated a few degrees at a time until the p...

Page 43: ...gniter is flush with the outside of the igniter housing tube Do not tighten the set screw very tight onto the igniter shaft Barely tightening it is enough If you over tighten the set screw it may ruin...

Page 44: ...ess plates 9 Change to a better grade of fuel if necessary 9 Check that damper control knob is adjusted properly Pull out to increase fire burn 9 Push ash cleanout slides in 9 Check gasket seal around...

Page 45: ...t board pressure switch or relay 9 Check contents of the hopper Add fuel if necessary 9 Check all operation fuses re set manual high limit thermodisk 9 Clean out auger system 9 Have your Magnum resell...

Page 46: ...house 9 Clean the glass when the unit is not running 9 Seal any leaks in the exhaust system with RTV high temperature silicone sealer 9 Use approved ash Vacumm 9 Correct negative pressure situation 9...

Page 47: ...o much ash Dirty fuel Wet fuel Lack of clean combustion air Dirty or plugged stove or venting Poor exhaust vent configuration Negative pressure present in the home Combustion motor going out Use combu...

Page 48: ...Gold Door Finish only re finish gold door 208 RP2070 T40 Gold Door complete door assembly 372 RP2072 T40 Black Door complete door assembly 163 RP2075 Essex Gold Door Finish only re finish gold door 20...

Page 49: ...and liability under this warranty is limited to the repair or replacement of the covered defective part The purchaser shall assume all costs related to shipping the replacement parts or return of the...

Page 50: ...50 SERVICE RECORD DATE SERVICE OR CLEANING PERFORMED This record must be sent in when any warranty claims are made...

Reviews: