LUCCI 190150, Manual
Looking for a manual for LUCCI 190150? Look no further! Download the comprehensive user manual for free from manualshive.com, offering step-by-step instructions and troubleshooting tips. Discover everything about your LUCCI 190150 and make the most out of this incredible product.
Share
Download


Reviews:
No comments
Related manuals for 190150

H9
Brand: Rasland Pages: 2
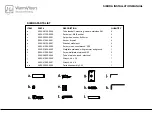
Sierra
Brand: WarmlyYours Pages: 4

Opulence D306257
Brand: Danze Pages: 4

ROSA II
Brand: RAVAK Pages: 12

Croma 280 Air 1jet 26221 Series
Brand: Hans Grohe Pages: 6

ETERNAL A5A978B 0 Series
Brand: Roca Pages: 16

KV-4020
Brand: baliv Pages: 40

AVANTGARDE DJ2L/AVIV
Brand: SANPLAST Pages: 32

TECB3450
Brand: Conmetall Meister Pages: 2

101693
Brand: MAAX Pages: 24

STRATOS STRX671E
Brand: Franke Pages: 8

4-part corner entry with swing doors
Brand: Concept2 Pages: 15

K-2011
Brand: Kohler Pages: 16

Laundry
Brand: Newtech Pages: 14

DREAM CUBE
Brand: Bossini Pages: 20

KN4
Brand: SANPLAST Pages: 20

FS-5802
Brand: Fontana Showers Pages: 5

Victorian 850/850 Series
Brand: JADO Pages: 2


