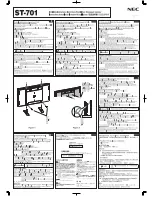
TH100200W Wall Plate
3Pl. #14 x 2-1/2" Lag Screws
(For metal stud walls, use WMATB3 toggle bolt kit
for concrete walls, use WMAAB3 anchorbolt kit,
sold separately)
Wall Plate Installation
5/16"-18 x 1-7/8"
Hex Flanged Head Screw
5/16"-18 Nylock Nut
5/16" Flat Washer
5/16" Belleville Washer
(Curved Side Facing Down)
Wall Arm Installation
3Pl. 5/16" Belleville Washer
(Curved Side Facing Up)
1 ...
1 ...
1 ...
1 ...
1 ...
1 ...
1 ...
1 ...
2 ...
1 ...
4 ...
3 ...
4 ...
6 ...
4 ...
4 ...
4 ...
Component List
TH100200W Wall Plate with Knuckle
TH100200W 6" Projection Wall Arm
TH100200W 3-1/2" Projection Wall Arm
TH100200W 100/200mm Adapter
TH100200W 75/100mm VESA Plate
5/16"-18 x 1-7/8" Hex Flanged Head Screw
5/16"-18 x 2" Hex Button Head Screw
1/4"-20 x 2" Hex Button Head Screw
5/16"-18 Nylock Nuts
1/4"-20 Nylock Nut
5/16" Flat Washers
1/4" Belleville Washers
5/16" Belleville Washers
6mm x 12mm Phillips Pan Head Screws
1/4" Flat Washers
8mm x 20mm Phillips Pan Head Screws
8mm Flat Washers
Wall Plate Installation
Measure from the floor and ceiling to the centerline for
where the screen needs to be mounted on the wall.
Make sure that appropriate clearance under the screen is
maintained by subtracting the distance from the bottom
of the screen to the center of the VESA mounting pattern.
Align the center of the TH100200W Wall Plate with the
centerline measurement for the screen. Use the
TH100200W Wall Plate as a template to mark the
locations to drill pilot holes. Make sure that the
TH100200W Wall Plate is level while marking the
pilot hole locations.
For wood studs, drill 1/8" holes 2-1/2" deep. (For metal
studs & concrete anchor bolts, consult the appropriate
fastener installation guide for the hole diameter needed)
Attach the TH100200W Wall Plate with the provided
#14 x 2-1/2" Lag Screws.
Adjust the TH100200W Wall Plate level and tighten
all 3 screws.
Wall Arm Installation
Attach the TH100200W Wall Arm to the TH100200W
Wall Plate with the 5/16"-18 x 1-7/8" Flanged Head
Screw, Washers & Nylock Nut as shown in the
illustration.
Tighten the pivot screw for the desired pivoting tension.
Note: The curved 5/16" Belleville Washers should be
installed with the curve facing towards the welded
knuckle (Top washer facing down and bottom washers
facing up) to facilitate smooth pivoting action.
Protected under one or more of these U.S. Patent numbers: 3,291,432 3,559,942 3,724,798 DES.270,689 4,613,109 4,878,645 4,852,842 DES.309,5624,973,023 5,169,114 5,255,884 5,310,152 5,522,576 5,621,614 Re.35,677 DES.398,834 5,826,384 5,941,492 5,964,068 6,060,661 6,102,398 6,158,704 6,454,116B1 6,761,276B2 6,806,425B1
TH100200W INSTALLATION INSTRUCTIONS Page 1 of 3
©2013 Lucasey Manufacturing Corporation, Oakland, California www.lucasey.com
TH100200W Wall Mount Installation
TH100200W_Ins (5/13)