background image

LS TRACTOR

OPERATOR'S MANUAL

MT342   MT347   MT352   MT357

Stage 

Summary of Contents for MT342

Page 1: ...LS TRACTOR OPERATOR S MANUAL MT342 MT347 MT352 MT357 Stage...

Page 2: ......

Page 3: ...cer and birth defects or other reproductive harm Always start and operate the engine in a well ventilated area If in an enclosed area vent the exhaust to the outside Do not modify or tamper with the e...

Page 4: ...ver occurs first The warranty period shall begin x On the date the equipment is first delivered to the first retail purchaser or x If the equipment is placed in service for demonstration purposes prio...

Page 5: ...formed at no charge to the owner at a warranty station The owner will not be charged for diagnostic labor that leads to the determination that a warranted part is in fact defective provided that such...

Page 6: ...the warranty service to which you believe you are entitled under the Limited Emission Control Systems Warranty you should contact LS Mtron at the address below for assistance If you need additional a...

Page 7: ...ngine as described in the Maintenance Manual 2 Damage resulting from accident acts of nature or other events beyond the control of LS Mtron 3 The replacement of expendable maintenance items such as ex...

Page 8: ...s 1 Fuel System A Fuel injection pump B Fuel Injectors 2 Air Induction System A Intake manifold B Turbocharger C Air Control Valve D Exhaust Manifold 3 Exhaust Gas Recirculation EGR System A EGR valve...

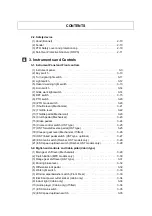
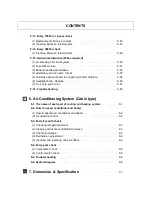
Page 9: ...ractor orientation 1 12 1 2 Safety Precautions Read this for safety before using 1 Notices before using the tractor 1 13 2 Notices when starting Engine 1 17 3 Notices while operating using the tractor...

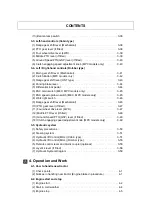
Page 10: ...19 HST linked pedal switch HST type optional 3 27 20 ESC main switch Roll bar HST models only 3 28 21 ESC speed up down switch Roll bar HST models only 3 28 3 2 Right hand controls and Cabin pillar C...

Page 11: ...els only 3 45 8 Work light switch 3 46 9 Range gear shift lever Mechanical 3 46 10 PTO gear lever if fitted 3 47 11 Four wheel drive lever 4WD 3 47 12 Middle PTO lever if fitted 3 48 13 Ground Speed P...

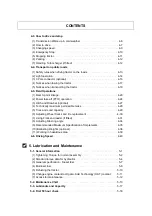
Page 12: ...topping tractor 4 11 6 Parking 4 12 7 Handling Turbocharger if fitted 4 12 4 4 Transport on public roads 1 Safety rules when driving tractor on the roads 4 13 2 Light operation 4 14 3 7 Pole connector...

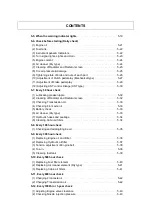
Page 13: ...or and Radiator screen 5 32 3 Checking Transmission oil 5 33 4 Checking Front axle oil 5 33 5 Battery check 5 33 6 Air cleaner Dry type 5 33 7 Hydraulic hoses and Leakage 5 34 8 Cleaning Cabin air fil...

Page 14: ...heck 1 Compressor check 6 5 2 Control switch check 6 5 6 5 Troubleshooting 6 6 6 6 System diagram 6 8 7 Dimension Specification 7 1 CONTENTS 5 13 Every 1500hr or 2 year check 1 Replacement of Engine c...

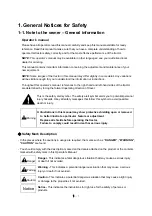
Page 15: ...o comply could result in death or serious injury Warning Operator s manual Please have all operators read this manual carefully and keep this manual available for ready reference Read this manual to m...

Page 16: ...equipment when ordering parts Locate these numbers now and record them below Refer to the General Information section of this manual for the location of the model and product identification numbers of...

Page 17: ...ctor without wearing the seat belt and Roll Over Protective Structure ROPS during operations where roll over or tip over hazards exist The ROPS will only be fully effective when the driver remains att...

Page 18: ...n are not allowed Always stay clear from implements operating area and especially do not stand between tractor and trailed vehicle either three point linkage when operating lift controls ensure no bys...

Page 19: ...ment Adjustment and configuration of the tractor and equipment for the specific conditions of the job site field and or crop Movement of components into and out of working positions Routine service an...

Page 20: ...uring the scrapping and or dismantling of the tractor Trained service personnel familiar with the tractor characteristics must perform these activities Trained service personnel must comply with the i...

Page 21: ...z Hz hertz Hz Rotational frequency Revolution per minute rpm Revolution per minute rpm Length kilometer Km mile mi meter m foot ft centimeter cm inch in millimeter mm inch in Mass kilogram kg pound lb...

Page 22: ...rate Liter per minute L min US gallon per minute US gal min Sound pressure level decibel dB decibel dB Acronym Definition MEC Mechanical transmission with synchro shuttle MPC Mechanical transmission w...

Page 23: ...d local dealer when requesting parts or service and also to identify the tractor in case of theft 1 Engine Product Identification Number PIN plate The engine PIN plate is located on the left hand engi...

Page 24: ...of the cabin For roll bar models it is located on the right hand side of the ROPS connector plate The ROPS PIN plate may vary depending on the market or ROPS type 3 5 TM number and Running hours In c...

Page 25: ...st be stored in a secure place prior to operation and it must be kept available for use by all operators CABIN For cabin models manual storage box is installed on the rear side of the driver s seat To...

Page 26: ...nd and right hand are determined by standing behind the unit looking in the direction of travel Left hand view Rear view Front view When reading this Operator s Manual refer to the right figure for th...

Page 27: ...ty equipment instead of loose or long clothes Also slippers high heel shoes are not suitable for operation Wear the low shoes or work shoes or boots Warning Do not approach the rotating shaft such as...

Page 28: ...t life or physical injury Periodic Lubrication and Maintenance Fuel Oil Filter Air cleaner Battery Belt Cable Grease Pedals such as clutch Mechanical models only and brake pedal Tire air pressure Whee...

Page 29: ...he FOPS Falling Objects Protective Structure For cabin model it provides protection against falling objects according to OECD code 10 standard The energy level of drop test is 1365 J But it does not m...

Page 30: ...ted tree grab crane is mounted at the rear of the tractor penetrating objects in the operator s enclosure primarily in case a winch is mounted at the rear of the tractor steep slope or rough terrain w...

Page 31: ...ng brake is applied Lower the implements on the ground Ensure that rear view mirrors and the other mirrors if fitted are adjusted correctly and check the operation of the headlights and other lights F...

Page 32: ...to check if there is any obstacle or person in the rear DO NOT permit other people and especially children approach within working area while operating tractor and equipment Noise and Vibration When...

Page 33: ...ouch the overhead power lines and hanging obstacles Do not operate the tractor during an electrical storm Lightening strikes Obey the traffic rules while driving on public roads Do not exceed the loca...

Page 34: ...attach over weighted implement Before connecting or checking the implement put PTO switch to OFF and place PTO gear lever in Neutral position When attaching or detaching the implement make sure to fi...

Page 35: ...Caution Do not use cables or rope to tow the machine If the cable or rope breaks or slips it may whip back with enough force to cause serious injury When using a chain attach the chain with the hook...

Page 36: ...c pipes or hoses and other parts make sure to check that hydraulic pressure is relieved completely The leaks of pressurized oil can cause a fatal physical injury Use proper protection equipment before...

Page 37: ...hten the fuel tank cap securely Failure to comply could result in death or serious injury Warning When assembling operating or servicing the tractor wear protective clothing and any Personal Protectiv...

Page 38: ...ation go to www P65warnings ca gov diesel WASH YOUR HANDS AFTER HANDLING Stop the tractor on a level ground Place the transmission gear in the neutral position and put PTO switch to the OFF position L...

Page 39: ...based on a tractor on even ground Driving hazard To prevent tractor instability ALWAYS consider and follow the tractor stability requirements in this manual Failure to comply could result in death or...

Page 40: ...or See chapter 7 a Distance Center of gravity of front load to front axle center Manual of the equipment or your measurement b Wheelbase See chapter 7 c Distance rear axle center to lower hitch point...

Page 41: ...b FWr a b RF 0 2 M RF value must be higher than 0 2 M FWr RW c d R1 b 0 2 M b a b Required rear ballast To calculate RWr Ballast required at the rear when carrying a load FW at the front CALCULATION...

Page 42: ...emission of exhaust fumes Do not increase the pressure in a pressurized circuit as this may lead to a component failure 7 Do not open the air conditioning system yourself It contains gases that shoul...

Page 43: ...e batteries are not properly recycled after use Improper disposal of batteries can contaminate the soil groundwater and waterways We strongly recommends that you return all used batteries to a authori...

Page 44: ...m Side lights Headlights High beam Work light Light switch Emergency lights Cylinder rod shorten Cylinder rod extend Cylinder rod floating Window wiper Window wiper Washer front Window wiper Washer re...

Page 45: ...can be detached If a decal is on a part that is replaced make sure the decal is attached on the new part Caution If you find Read Operator s Manual symbol 1 in the decals refer to the appropriate page...

Page 46: ...1 32 2 9 6 11 3 1 Roll Bar 5 10 7 8 4 12 13 14 16 18 17 10...

Page 47: ...ractor and equipment shields in place during operation Part No 40195650 4 Location On the left right hand side of the fan shroud Keep hands clothing away from the rotating fan and belts Contact with m...

Page 48: ...SERIOUS INJURY High pressure steam and hot water Remove filler cap with extreme care Failure to comply could result in death or serious injury Part No 40297729 8 Location On the right hand side of the...

Page 49: ...lace for your protection Pull only from approved drawbar or lower links of 3 point hitch at horizontal position or below Lock tractor brake pedals together for travel on roads or highways Always apply...

Page 50: ...duce the chance of injury or death in roll over or upset occur Do not attach ropes or chains to ROPS for pulling purpose Failure to comply could result in death or serious injury Part No 40234561 11 L...

Page 51: ...e right hand side of the hood cover TO PREVENT SERIOUS INJURY OR DEATH During the DPF regeneration process the exhaust stack and surrounding hood area becomes extremely hot Park the tractor away from...

Page 52: ...rator wishes to delay the regeneration process press downward on the DPF switch for 1 2 seconds The inhibit lamp will illuminate and the regeneration will be postponed Beware Inhibit is only intended...

Page 53: ...ust system Do not idle the engine except as necessary For more information go to www P65warnings ca gov diesel Part No 40401298 18 Location On the right hand lever guide for cabin models on the right...

Page 54: ...igns clean and legible Clean instructional signs with a soft cloth water and a gentle detergent Do not use solvent gasoline or other harsh chemicals Solvents gasoline and other harsh chemicals may dam...

Page 55: ...d legible Clean instructional signs with a soft cloth water and a gentle detergent Do not use solvent gasoline or other harsh chemicals Solvents gasoline and other harsh chemicals may damage or remove...

Page 56: ...rol position and draft control lever Part No 40279848 Cabin models only 1 Location On the right hand side of the instrument cover Throttle lever Part No 40233965 Mechanical models only 2 Location On t...

Page 57: ...switch Part No 40189937 8 Location below the driver s seat Hydraulic lift control down speed control valve Part No 40008821 9 Location on the left hand side below the driver s seat Four wheel drive 4...

Page 58: ...400008815 12 Location on the left hand lever guide PTO gear lever Part No 40416171 It may vary depending on the market optional 13 Location On the left hand side of the instrument cover Start and sto...

Page 59: ...ly the wheel chocks to the tires and disengage the parking brake Check the lubricant level of each parts and if the engine oil has exceeded 100 hours of work change the oil and run the engine for 5 mi...

Page 60: ...This may vary depending on the engine fuel system fuel type and so on Consult your authorized local dealer The battery should be charged about once a month not to be discharged entirely As the electro...

Page 61: ...straight run of the belt starts to bend around the pulley Check the vee groove in the pulley for corrosion Electric system check Is there any open circuit or any other problem in the wiring Is there...

Page 62: ...1 48...

Page 63: ...tion for Safe Operation Instrument panel Steering wheel Driver s Seat Sub step Head lights Bonnet Hood Front ballast weight optional Front axle Fender 1 The name of each part Roll Bar type Fuel tank R...

Page 64: ...2 2 Instrument panel Steering wheel Driver s Seat Sub step Head lights Cabin ROPS Bonnet Hood Front ballast weight optional Front axle Fender Cabin type Fuel tank...

Page 65: ...up down for your safety Jumping on off the tractor could cause an injury Always face the tractor use the handrails and steps and get on off slowly Maintain a three point contact to avoid falling both...

Page 66: ...he operator gets up from the seat while engine is running the engine will stop automatically for safety in case of getting up from the seat for more than 2 seconds with HST pedal NOT in neutral positi...

Page 67: ...justment lever upward to release the lock 2 Move the driver s seat forward or backward according to your body length 3 Release the seat F R adjustment lever and check if the driver s seat is locked in...

Page 68: ...r and check if the driver s seat is locked in place Seat F R adjustment lever Back rest angle adjustment lever Back rest angle adjustment lever 1 After lifting the back rest angle adjustment lever upw...

Page 69: ...button on the buckle Check the seat belt regularly If damaged or frayed replace it with a new one Warning If not wearing the seat belt it may cause a serious injury in case of an accident During opera...

Page 70: ...arning DO NOT ventilate the cabin in pesticides or other hazardous spraying area Ventilation lever External circulation Internal circulation 5 Tilting steering wheel Push the tilt lever downward to re...

Page 71: ...ar window turn the rear window grip clockwise with pulling the grip Push the grip outside slightly This rear window can be used for emergency exit or ventilation Do not grasp the transmission gear lev...

Page 72: ...protection device to prevent an unintended access to the PTO shaft and to prevent an accident causing by the rotating drive shaft Do not remove the PTO safety cover If the PTO safety cover or protect...

Page 73: ...death when being overturned Be sure to stand up the Roll Over Protective Structure ROPS and check the bolts pins and nuts correctly kept in place Always wear the seat belt when operating the vehicle w...

Page 74: ...and fold the upper frame backward Be careful of the possibility that your body might be hurt by sudden folding due to its own weight 3 Set the holes of the frame and in line and insert the pins into...

Page 75: ...e operating the tractor Warning Roll over hazard Failure to comply could result in death or serious injury Do not modify or remove the Roll Over Protective Structure ROPS arbitrarily for safety Unless...

Page 76: ...2 14...

Page 77: ...witch Brake pedals Throttle pedal Instrument panel Important to owner read carefully Throttle lever PTO switch PTO mode switch if fitted Creeper gear lever if fitted Tilt lever See page 2 8 Mechanical...

Page 78: ...k light switch DPF switch Key switch HST forward pedal HST reverse pedal Instrument panel Throttle lever Tilt lever See page 2 8 Cruise control switch Important to owner read carefully HST linked peda...

Page 79: ...icator Not used 17 Cold start aid indicator 18 Fuel level gauge 12 LCD display 19 Engine oil pressure indicator 20 Battery charging warning indicator 21 Low fuel level warning indicator 22 Cruse contr...

Page 80: ...hazard warning lights are operated at the same time when the turn signal is activated the hazard warning light for the opposite side of turning direction will stop flashing and illuminate continuously...

Page 81: ...SC main switch to ON position and the ESC mode is ready 11 HST linked pedal indicator HST type optional This is only used for HST models optional When the key switch is ON position the throttle lever...

Page 82: ...engine or vehicle control occurs the engine diagnosis error codes and hour meter will be displayed by turns with the vehicle control error warning light 23 as shown Fig2 At this time after escaping f...

Page 83: ...but normal operation If this indicator is blinking it means that the soot is over accumulated in the DPF Comply with the instructions of the chapter 3 1 8 DPF switch in this manual For further informa...

Page 84: ...es out when sufficient oil pressure is present at the oil sender This indicator will be turned on when turning the key switch to ON position and it will be turned off after starting engine If the indi...

Page 85: ...ping from the emergency area contact your authorized local dealer for check 22 Cruse control drive indicator HST only This indicator will be turned on when pressing the cruise control switch to activa...

Page 86: ...immediately If not it may cause damage to the starter motor Because a safety switch for start up has to be engaged put PTO switch to OFF position depress the clutch pedal fully and place the F R shut...

Page 87: ...rn signal lights are blink If the hazard warning lights are operated at the same time when the turn signal is activated the hazard warning light for the opposite side of turning direction will stop fl...

Page 88: ...ts low beam are ON Instrument light side lights tail lights and headlights high beam are ON Combination light switch is used to turn on off the following lights Instrument panel lights Side lights Tai...

Page 89: ...regulation If the hazard warning lights are operated at the same time when the turn signal is activated the hazard warning light for the opposite side of turning direction will stop flashing and illum...

Page 90: ...will be stopped Horn switch 7 Grille work light switch This is used to turn on off the grille work lights of the front grille ON Press the upper side symbol part of the switch OFF Press the lower side...

Page 91: ...9 in this manual And this switch is used to process the regeneration manually For the detail operating methods see page 3 18 in this manual Definitions of system components and operation The following...

Page 92: ...portant to read this operator s manual and understand the safe operation of your tractor If you have any questions in the operation of this emission system please contact your authorized local dealer...

Page 93: ...arning indicator 3 When the soot s rate is over 150 Engine power reduction Contact your authorized local dealer for check 2 DPF inhibited regeneration indicator Continuous ON When the Inhibited regene...

Page 94: ...n mode NOTE Regeneration will be lasted for approximately 15 to 25 minutes If engine is turned off during the regeneration soot will not be completely burned and may increase fuel consumption KEY OFF...

Page 95: ...tractor arrives at a safe regeneration location press again the lower side B of the DPF switch to exit the Inhibited regeneration mode If not excessive soot in the DPF may overload the emission syste...

Page 96: ...witch if fitted to the MANUAL or AUTO position Refer to the following chapter 4 Turn the PTO switch to the ON position to operate the PTO shaft When the PTO shaft begins to rotate the PTO operation in...

Page 97: ...en gear shifting may cause transmission damage It is recommended to stop the tractor before operating the shuttle lever Caution Forward Reverse Shuttle lever MPC Mechanical transmission with power clu...

Page 98: ...nsor while the engine is running the engine speed will be fixed to 1500 rev min so called LIMP HOME mode Contact your authorized local dealer Throttle lever The shuttle lever allows any forward range...

Page 99: ...ur authorized local dealer Throttle pedal 14 Clutch pedal Mechanical This is used to engage or disengage the main transmission clutch for starting engine or shifting transmission gears Depress the clu...

Page 100: ...ly DO NOT press the one side brake pedal while differential lock is engaged It may cause damage or a failure of the axles The brake lights will illuminate when the brake pedal is depressed and the key...

Page 101: ...s the one side brake pedal during the cruise drive You must connect the left and right brake pedal with the brake pedal latch before driving in order to avoid a possible accident Do not operate the cr...

Page 102: ...ine power and press down the brake pedals Caution 18 Creeper gear lever Mechanical if fitted It is used to work with very low driving speed creeper speed When doing general work or traveling on the ro...

Page 103: ...ce the HST pedal in the neutral position release the brake pedals and parking brake press down the upper side symbol part of the switch At this time the HST linked pedal indicator on the instrument pa...

Page 104: ...gine Speed Cruise Control ESC function If pressing the ESC main switch from position 0 to position 1 Off Ready ESC indicator on the instrument panel will be blinked Engine speed stored on ECU will be...

Page 105: ...ue to the synchromesh gears Notice Operate the main gear shift lever by correct H pattern If operated diagonally it may cause a failure Main gear shift lever Work light switch Cabin only Differential...

Page 106: ...smoothly Use this clutch button only for normal shifting the main gear shift lever on a level ground It is strongly recommended to use the foot clutch pedal instead of the clutch button when you need...

Page 107: ...in only Range gear shift lever Electrical power outlet socket Cabin only Indoor light Cabin only ESC speed up down switch Beacon switch Cabin only ESC main switch Cabin only Notice Operate the range g...

Page 108: ...second each other This pedal is installed on the step floor but the location is on the right hand side for mechanical model on the left hand side for HST model Do not turn the tractor with pressing th...

Page 109: ...to the driver of the oncoming following car Caution This switch is used to operate the front rear window wiper Press the upper side symbol part of the switch for operating only the front rear wiper If...

Page 110: ...the tractor Caution This is used to withdraw electric power for charging of a cigarette lighter jack or cellular phone In case of using a cigarette lighter jack optional push the cigarette lighter ja...

Page 111: ...ol ESC will begin if pressing over 2 second current engine speed will be stored on ECU and the stored engine speed will blink 3 times on the LCD panel To exit the ESC control Press the lower side Off...

Page 112: ...s switch is used to turn on off the beacon lamp installed to the beacon connectors The beacon connectors are installed on the left and right hand rear side under the cabin roof ON press the upper side...

Page 113: ...er Range gear shift lever PTO gear lever if fitted Important to owner read carefully Down speed control knob Page 3 53 Mechanical type HST type Four wheel drive lever PTO gear lever if fitted Down spe...

Page 114: ...rear implement place the PTO gear lever to the neutral position Before operating the PTO gear lever depress the clutch pedal and put PTO switch to the OFF position and stop the PTO shaft completely T...

Page 115: ...iddle PTO gear Before operating the middle PTO lever put PTO switch to OFF position and stop the PTO shaft completely Pull the middle PTO lever up to engage the middle PTO gear For further information...

Page 116: ...e tractor completely put the PTO switch in OFF position and stop the PTO shaft completely GSP Independent PTO 6 Clutch engaging speed adjustment knob MPC models only This knob is used to adjust the en...

Page 117: ...itch See chapter 3 5 4 See chapter 3 5 6 1 Main gear shift lever Mechanical Four speed gears and neutral position is available The main gear shift lever can be operated while driving after depressing...

Page 118: ...t lever while driving After pressing the clutch button shift the main gear shift lever smoothly Only use this clutch button when shifting the main gear shift lever for your safety Caution Be careful n...

Page 119: ...al position is available Before operating the range gear shift lever release the HST pedal press down the brake pedals and stop the tractor completely Notice Operate the range gear shift lever by corr...

Page 120: ...ght one side brake pedal slightly for a second each other This pedal is installed on the step floor but the location is on the right hand side for mechanical model on the left hand side for HST model...

Page 121: ...if pressing over 2 second current engine speed will be stored on ECU and the stored engine speed will be displayed on LCD panel To exit the ESC control Press the lower side Off position of the ESC mai...

Page 122: ...ever Mechanical Notice Operate the range gear shift lever by correct H pattern If operated diagonally it may cause a failure 8 Work light switch The rear work light has a switch on its back To turn on...

Page 123: ...high speed while the 4WD is engaged sharp steering may cause a serious accident Only operate four wheel drive lever by hand If stepping on it it may cause a failure Caution 10 PTO gear lever if fitted...

Page 124: ...push the lever forward fully the ground speed PTO GSP is disengaged and independent PTO is available Before operating the GSP lever press a clutch pedal brake pedals and stop the tractor completely p...

Page 125: ...em MPC You can adjust the engaging speed appropriately depending on your working conditions If turning the knob with a screw driver or other suitable tools clockwise for slower engaging speed counter...

Page 126: ...me hazardous Lifted mechanisms can fall to the ground steering system may fail etc Stay clear of a pressurized hose assembly that has blown apart Hose fittings can be thrown off at high speed and a lo...

Page 127: ...is necessary to reduce the size of the load 2 Do not operate the tractor unnecessarily in a state of fully steered front wheels for a long time As unnecessary hydraulic force is applied to the steeri...

Page 128: ...ansmitted to the lift control valve Generally this mode is used for the implement which receives the draft load In this case operate the lever as follows 1 Remove the draft sensor stopper of the upper...

Page 129: ...o avoid bounding of the implement 4 Hydraulic lift Control Mechanical Hydraulic Lift MHL Roll bar type The hydraulic lift system is operated by the position control lever and or draft control lever Ro...

Page 130: ...implement which receives the draft load In this case operate the lever as followings 1 Remove the draft sensor stopper of the upper link bracket 2 Move the position control lever forward fully Down an...

Page 131: ...l be fixed and even if lowering down the position control lever the implement does not let down Tiller Slow in down speed Plough Fast in down speed When working in hard ground slow down the down speed...

Page 132: ...ractor If you push the remote control lever s forward the hydraulic pressure works to the left hand coupler s of the related lever and the right hand coupler s is connected to the drain line Each leve...

Page 133: ...e implement attached to your tractor If you pull the remote control lever s backward the hydraulic pressure works to the left hand coupler s of the related lever and the right hand coupler s is connec...

Page 134: ...In this case the light loaded cylinder may be moved first If you want to float the bucket along the ground lower the front end loader and push forward the joystick lever to the float position After f...

Page 135: ...4 Steering cylinder 5 Independent PTO valve 6 Oil cooler 7 Cooler valve 8 Hydraulic lift pump 9 Front loader valve optional 10 Remote control valve 11 Hydraulic lift control valve 12 Down speed contro...

Page 136: ...ndependent PTO valve 6 Oil cooler 7 Cooler valve 8 Hydraulic lift pump 9 Power clutch valve 10 Front loader valve optional 11 Remote control valve 12 Hydraulic lift control valve 13 Down speed control...

Page 137: ...teering unit 4 Steering cylinder 5 HST filter 6 Oil cooler 7 HST unit 8 Hydraulic lift pump 9 Independent PTO valve 10 Front loader valve optional 11 Remote control valve 12 Hydraulic lift control val...

Page 138: ...ring unit 4 Steering cylinder 5 HST filter 6 Oil cooler 7 HST unit 8 Hydraulic lift pump 9 Independent PTO valve 10 Front loader valve optional 11 Remote control valve 12 Hydraulic lift control valve...

Page 139: ...possible contact your authorized local dealer for First 50 hour check 2 Notices in handling new tractor Engine brake in procedure To get the best performance comply with the followings DO NOT start or...

Page 140: ...er to the low speed position 6 Depress clutch pedal fully and turn key switch to START position As soon as the engine starts release the key switch to ON position 5 Wait until the cold start aid indic...

Page 141: ...after starting engine If not stop the engine immediately and check the problem 3 Pull the throttle lever to the low speed position 6 Turn key switch to START position As soon as the engine starts rel...

Page 142: ...osion never use starting fluid to start the engine Start the engine only from the driver s seat with placing all the transmission gear levers in neutral position DO NOT start the engine by shorting ac...

Page 143: ...fter stopping engine Throttle lever Key switch To stop the engine after finishing heavy work run the engine for about 2 minutes at low idle position If you stop the engine suddenly the engine life cou...

Page 144: ...mmended to assure proper vehicle functionality transmission lubrication and operation NOTE Do not operate the tractor under full load condition until the hydraulic oil is sufficiently warmed up Unexpe...

Page 145: ...from the ground after starting engine 3 Depress clutch pedal fully and place all the transmission gear levers main range shuttle lever on a suitable position 4 After pressing brake pedals down releas...

Page 146: ...verse pedal Throttle lever HST forward pedal Cruse control switch Parking brake lever Range gear shift lever Roll bar Parking brake lever If pressing the brake pedals or turning off the cruise control...

Page 147: ...road conditions Mechanical type HST type Just pressing the HST forward reverse pedal respectively makes it possible to travel forward or in reverse Moving forward reverse neutral and changing speed c...

Page 148: ...the HST forward reverse pedal and press the brake pedals immediately HST type 2 Pull throttle lever backward to decrease the engine speed and turn off the key switch Cabin Parking brake lever The par...

Page 149: ...anical type 1 Release the HST forward reverse pedal slowly Pull the throttle lever to Low speed position Place the range gear shift lever in NEUTRAL and PTO switch to OFF position 3 Apply parking brak...

Page 150: ...brake is applied In this case apply all the gears in lowest speed and apply wheel chocks or blocks to the all tires Mechanical downhill reverse 1st gear uphill forward 1st gear HST type Apply the low...

Page 151: ...FF LOCK Connect the left right brake pedals with the brake pedal latch before driving Avoid a sudden start sudden brake and sharp turning DO NOT allow people on the tractor or implement DO NOT place b...

Page 152: ...ights Front turn signal lights and Hazard warning lights Rear turn signal lights and Hazard warning lights Tail lights and Brake lights Rear work lights Front work lights Grille work lights Use the ha...

Page 153: ...ts Front turn signal lights and Hazard warning lights Rear turn signal lights and Hazard warning lights Tail lights and Brake lights Rear work lights Grille work lights Use the hazard warning lights a...

Page 154: ...at the rear of the tractor The connections of the 7 pole connector viewed from the rear of the tractor are as follows ASAE Version Pin No Function 1 Ground Earth 2 Working light 3 Left turn signal lig...

Page 155: ...of the towed vehicle before towing See chapter 4 5 3 Hitch and Drawbar in this manual Make sure to install the towing pins and locking pins after connecting the chain Tow the tractor slowly in a longi...

Page 156: ...ain to the front towing hook on the front ballast weights make sure to check the snap pin is installed in place firmly on the front towing hook pin Otherwise the front towing hook pin may be out of pl...

Page 157: ...local regulation to avoid collision with a vehicle When fixing the tractor do not hook or connect chains to the 4WD shaft steering cylinder tie rod or front axle These can be damaged by the chain or...

Page 158: ...ame procedure in reverse 1 Rear 3 point linkage 4 5 Field Operations Warning Before attaching detaching an implement place the PTO switch in the OFF position and the PTO gear lever if fitted in the ne...

Page 159: ...CAT2 484 734mm 19 1 28 9 in Insert snap pin 6 firmly to prevent the upper link pin 5 from being escaped Notice Adjustment of lift rod Left Right For lift rod LH remove the lift rod pin 3 and detach th...

Page 160: ...le hole with adjusting the stabilizer s length Insert the link pin 1 into the hole and let it tightened firmly by locking spring Reference of implement installation part A B C MAX D MIN E MAX F MIN G...

Page 161: ...per link 5 2 Detach the rear side of the stabilizer 2 from the lower link 3 while holding the lower link tightly not to fall down 3 Remove lift rod LH lift rod RH and stabilizer 2 step by step 4 Remov...

Page 162: ...m 750 2375 rpm 1000 2381 rpm Rotation direction Clockwise When looking at PTO shaft end Shaft dimension Unit inch 3 0 in 1 5 in 0 34 in 1 1 in 1 3 8 in Teeth 6T Spline Teeth 6T Where fitted Warning Do...

Page 163: ...94 in 0 84 in 0 98 in MID PTO 1 speed gear 15T PTO Engine speed 2000 2562 rpm Rotation direction Counter clockwise When looking at PTO shaft end Shaft dimension Unit inch Spline Teeth 15T Where fitte...

Page 164: ...tion of the 3 point linkage check the articulation angle of the PTO drive shaft and rotating noise is suitable check the interference with PTO safety cover and other structure check the effective enga...

Page 165: ...towable mass N A Inertia braked towable mass 2800kg 6173 lb Hydraulic Pneumatic braked towable mass N A Technically permissible maximum towable mass es The maximum permissible towable mass is dependi...

Page 166: ...maximum permissible mass 3008kg 6631 lb It depends on the load capacity of the tires See next chapter Front axle 1320kg 2910 lb Rear axle 2105kg 4641 lb Maximum permissible mass is measured with only...

Page 167: ...1320 2910 lb 3008 6631 lb 2 340 80R24 135 D 3 2 320 KPa 45 psi 2180 4806 lb 2105 4641 lb 1 280 70R16 112 B 2 4 240 KPa 35 psi 1200 2646 lb 1320 2910 lb 3008 6631 lb 2 360 70R24 122 B 1 6 160 KPa 23 p...

Page 168: ...r wheel tracks may vary For the details contact your authorized local dealer Front wheel track 9 5 16 with rim disk W8x16 Not available Standard track 1269mm 50 0in Rear wheel track 13 6 24 with rim d...

Page 169: ...The rolling or tipping of the tractor can be happened easily When loading unloading the bucket on a slope move the tractor straight against the slope DO NOT try to approach a stiff slope Attach the r...

Page 170: ...e hydraulic lines Operate 2 3 times fully all the hydraulic actuators on a newly attached front implement to exhaust air from the system After lowering the front implement check if the transmission oi...

Page 171: ...4 33 Attaching points for Front end loader When attaching a front end loader for all models refer to the drawings as below Unit mm...

Page 172: ...the possible interferences by combinations of the steering and oscillation of the front axle 5 Tighten the locking nuts of the both sides 8 Adjusting Steering Angle The steering angle must be checked...

Page 173: ...1 Disk harrow pull type Max harrowing width 1650 mm 65 0 in 1700 mm 67 0 in 1750 mm 69 0 in 1800mm 71 in 12 Chisel Plow Maximum width 1500 mm 59 0 in 1800mm 71 in 13 Front grader Max working width 180...

Page 174: ...ide Ballast the tractor less implement so that approximately one third of the tractor weight is on the front wheels For optimum traction tractors equipped with 4WD should be ballasted so that 40 45 of...

Page 175: ...he right figure Bumper weight kg 21kg Front ballast weights Bumper Bolts Locking nut When assembling the ballast weights comply with the reverse procedure of the disassembly For additional ballast wei...

Page 176: ...Warning Rear ballasting weights optional Rear wheel weights Optional NOTE Rear wheel weights are not available Rear ballast weights on the 3 point linkage To mount the ballast weights on the rear of t...

Page 177: ...Discarded filters must not be thrown away Take disposed filters to authorized collection points Cleaning the cabin inside Protective clothing worn when handling the sprayer with pesticides or when ca...

Page 178: ...94 3 48 4 13 4 85 6 50 9 01 10 7 12 6 16 8 Reverse 1 02 1 20 1 42 1 90 2 30 2 73 3 20 4 29 5 08 6 03 7 08 9 49 13 2 15 6 18 3 24 6 mph 0 63 0 75 0 88 1 18 1 43 1 69 1 99 2 67 3 16 3 75 4 40 5 90 8 17...

Page 179: ...2 3 Forward 0 4 85 0 3 01 0 10 95 0 6 80 0 25 16 0 15 63 Reverse 0 4 85 0 3 01 0 10 95 0 6 80 0 25 16 0 15 63 Front tires 9 5 16 6PR Rear tires 13 6 24 8PR Note Engine rated speed 2600 rev min Dynamic...

Page 180: ...4 42...

Page 181: ...additional oil quantities Regular lubrication is the best insurance against delays and repairs Proper lubrication will extend tractor life Refer to the following charts for lubricants and service int...

Page 182: ...26 M12 X 1 75 19 8 8 68 50 82 60 90 67 10 9 98 72 117 86 133 98 12 9 114 84 137 101 155 114 M14 X 1 5 24 8 8 119 87 142 105 157 116 10 9 170 125 204 150 231 170 12 9 198 146 238 176 270 199 M16 X 1 5...

Page 183: ...5 3 Identification markings Metric hex bolt head 1 Manufacturer s identification 2 Property class GS 8 8 1 2...

Page 184: ...Position the fitting by turning out counterclockwise up to a maximum of one turn 5 Holding the pad of the fitting with a wrench tighten the locknut and washer against the face of the boss Standard to...

Page 185: ...igure Remarks N m f m G 1 8 15 1 5 G 1 4 25 2 6 G 3 8 49 5 G 1 2 59 6 G 3 4 118 12 Thread Torque Figure Remarks N m f m G 1 8 20 25 2 2 5 1 Materials of threaded hole G 1 4 39 49 4 5 Cast or steel G 3...

Page 186: ...hreaded hole G 3 8 2 47 54 4 8 5 5 Cast or steel 4 39 44 4 0 4 5 2 Assemble with packing G 1 2 4 47 54 4 8 5 5 washers G 3 4 4 59 69 6 0 7 0 3 Holes Number of holes on M 12 2 20 27 2 0 2 8 the same se...

Page 187: ...eriod of time See your fuel supplier for winter fuel requirements in your area Diesel fuel conditioner is available from your authorized local dealer Instructions for the use of the fuel conditioner i...

Page 188: ...oned above Biodiesel Fuel must be purchased from a trusted supplier that understands the product and maintains good fuel quality Biodiesel Fuel must be pre blended by the supplier Mixing Biodiesel Fue...

Page 189: ...cessary to drain the fuel filter water tap more frequently Potential oxidation and stability could be a problem with the fuel stored in the tractor NOTICE Tractor must not be stored for more than thre...

Page 190: ...to diesel fuel These mixtures are explosive in fuel tank Never remove the fuel cap or refuel with the engine running or hot Maintain control of the fuel filler nozzle when filling the fuel tank Never...

Page 191: ...lant types procedure below to attain the full benefit of the coolant Changing coolant types To change coolant from OAT coolant to conventional coolant or vice versa 1 Empty the engine cooling system b...

Page 192: ...s case by case Do not hesitate to contact your authorized dealer for asking Do not use the front axle assembly or steering linkage and cylinder for jacking point These components have some rotating pi...

Page 193: ...bnormal symptoms make sure to carry out the inspection and maintenance work regardless of recommended service intervals in this maintenance chart Appropriate service intervals vary depending on the us...

Page 194: ...y 5 33 9 Fan belt tension 5 18 5 38 First 10 Valve clearance 5 43 11 EGR Cooler Injector Tips 5 47 12 Fuel injector DOC DPF Turbocharger ECU etc 5 48 13 Hydraulic oil filter 5 18 5 37 14 Transmission...

Page 195: ...symptoms make sure to carry out the inspection and maintenance work regardless of recommended service intervals in this maintenance chart Appropriate service intervals vary depending on the usage and...

Page 196: ...3 9 Fan belt tension 5 18 5 38 First 10 Valve clearance 5 43 11 EGR Cooler Injector Tips 5 47 12 Fuel injector DOC DPF Turbocharger ECU etc 5 48 13 Hyd oil filter HST filter 5 18 5 37 14 Transmission...

Page 197: ...ed products Engine coolant 8 7 L 2 3 U S gals ASTM D6210 Soft water 50 Anti freeze 50 Fuel 40 L for Roll bar 10 6 U S gals 47 L for Cabin 12 4 U S gals ASTM D975 08a Grade 2 EN590 2009 Diesel fuel BS2...

Page 198: ...heck torque of exhaust manifold bolts Check and adjust V belts and tension Tighten all cooling system hose connections Check torque of safety cab or frame mounting bolts Check torque of front end weig...

Page 199: ...e oil must be disposed according to the environment laws Caution Fuel leaked or spilled onto hot surfaces or electrical components can cause a fire To help prevent possible injury turn the key switch...

Page 200: ...the indicator If the engine oil level is normal it means that there is a problem on the lubrication system contact your authorized local dealer for check 3 Battery charging indicator This indicator w...

Page 201: ...pped If your engine is operated in dusty dirty condition the service interval must be shorter than normal condition Must replace the engine oil and engine oil filter after the first 50 hours of use En...

Page 202: ...n this manual If contaminants such as dust or water are mixed with the fuel it can cause serious damage to the engine The fuel storage facility must be equipped as shown in the right figure If possibl...

Page 203: ...12V 55W 60W Turn signal lights front 12V 21W Side lights front 12V 5W Cabin Turn signal lights rear 12V 21W Brake lights Tail lights rear 12V 21W 5W Work lights 12V 27W Grille 37 5W Cabin 27W Roll bar...

Page 204: ...72psi from inside to outside as shown in the right figure to remove the dust and dirt And clean inside the filter element with a clean damp cloth Do not assemble a wet filter element Do not dry the we...

Page 205: ...ated Clean the radiator only after stopping engine If cleaning with water take care not to spray water to the electric and electronic parts If possible DO NOT USE WATER Caution Inspect the radiator an...

Page 206: ...nuts Front Wheel Torque M16x1 5P 1800 2000 kgf cm 177 196N m 130 145 lb ft Roll over hazard Never operate the machine with a loose wheel rim or disc Always tighten nuts and or bolts to the specified t...

Page 207: ...main clutch disk wears out until all of the clutch pedal play 20 30mm disappears or if the engine power is not cut off completely when shifting with the push button switch or clutch button installed o...

Page 208: ...his rule must be adapted when you adjust the clutch arm next times 3 4 5 Clutch arm assembly 2 H If the clutch arm assembly is not adjusted on time it may cause a rapid earlier clutch disk abrasion an...

Page 209: ...ight brake is same as below Checking the brake distance 1 Connect the left and right brake pedal with the brake pedal latch if fitted 2 Check the skid marks of the tires or stability of the tractor wh...

Page 210: ...tion and apply wheel chocks to the front wheels It is necessary for the tractor not to move forward when the engine starts 4 After loosening bolt 1 slightly adjust the height of the forward pedal and...

Page 211: ...he engine starts 4 If it is necessary to adjust the released position of the HST forward reverse pedals loosen the locking nuts 1 3 adjust the height of the forward reverse pedal with turning the adju...

Page 212: ...his manual See page 5 25 1 Wipe dirt from fittings before greasing 2 Use a grease gun containing clean high grade of grease For grease specification see chapter 5 3 Lubricants and Capacity or the last...

Page 213: ...ents to the ground Clean around oil filling inlet and pull the gauge straight out If oil level is between Min and Max marks of oil gauge it means Proper amount For oil specification see chapter 5 3 Lu...

Page 214: ...e nozzle at least 12 in 300mm from the element to prevent damage to the filter media Clean all filter chambers with a damp lint free cloth Re install the filter elements Re install the filter cover an...

Page 215: ...must only be checked while the engine is stopped Check if the oil level is between MAX and MIN marks of the engine oil gauge If the engine oil level is under the minimum mark add new engine oil up to...

Page 216: ...ngine while running the engine for several minutes at idle rpm Stop the engine After about 5 10 minutes later check again if the oil level is between MIN and MAX marks Install the oil gauge Replace En...

Page 217: ...ydraulic Oil Filter Hydraulic oil filter Main Stop the tractor on a level surface and apply parking brake and lower implements Stop the engine and cool down the tractor sufficiently This filter is att...

Page 218: ...r side by the same displacement After adjusting the toe in tighten the lock nuts If possible contact your authorized local dealer If the fan belt tension exceeds the normal value adjust the tension as...

Page 219: ...ng attaching the fuel tank please be careful and cooperate with other people and use suitable equipment to move the heavy part Failure to comply could result in death or serious injury Warning Do not...

Page 220: ...to the fuel injection system Caution Stop the engine and set a clean container under the fuel filter and disconnect the electric wire from the fuel filter Remove the fuel filter sensor and drain fuel...

Page 221: ...tall the filter covers and tighten the knobs 2 Replacing Air cleaner element Dry type Remove the cover and pull the primary element straight out ensuring the safety filter element remains in place Cle...

Page 222: ...for several minutes to warm oil and lower implements and stop the engine Clean around the oil filling inlet and drain plugs Set a clean container under drain plugs and remove them under the transmiss...

Page 223: ...cover over disconnected fuel system component If a fuel injector is suspected of operating outside of normal parameters it should be removed by a qualified technician The suspect fuel injector should...

Page 224: ...ning Pressurized System When opening the radiator cap be careful of the escaping hot water or steam Hot coolant can cause serious burns To open the radiator cap stop the engine and wait until the cool...

Page 225: ...rain cock or remove the drain plug on the engine and radiator Allow the water to drain Drain plug Care must be taken to ensure that fluids are contained during performance of inspection and maintenanc...

Page 226: ...perating temperature Use the coolant with anti freeze solution in cold weather Anti freeze solution is filled up from the factory After first winter change the coolant to remove the debris or corrosio...

Page 227: ...ing items are major engine emission related parts These items are checked and cleaned periodically But it is performed by special engine service experts Contact your authorized local dealer for check...

Page 228: ...ed parts These items are checked and cleaned periodically But it is performed by special engine service experts Contact your authorized local dealer for check Fuel injector DOC DPF Turbocharger ECU EG...

Page 229: ...urn the key switch off when changing fuel filters or water separator elements Clean up fuel spills immediately Warning Do not adjust or modify the fuel injection system arbitrary It can cause a seriou...

Page 230: ...uired Cover the bleeding fuel with a rag so that it does not flow into other components Do not throw the exhausted waste fuel to any place This may pollute the soil and water seriously and also is pro...

Page 231: ...cabin pillar The capacity and function of each fuse is described on the fuse box cover Cabin fuse box Cabin type 2 Fuse Main fuse Cabin fuse box cover Chassis fuse box If the same function fuse is dam...

Page 232: ...e total electric system of the tractor if damaged check if there is a trouble in the electric system Contact your authorized local dealer for check The main fuse is an important part to protect the el...

Page 233: ...n The poisonous gases from battery is explosive Comply with the following instructions Keep cigarettes sparks and flames away from the battery Use a flashlight to check the battery electrolyte level o...

Page 234: ...op engine and apply parking brake and remove the ignition key before replacing the battery Put on eye protection and globes to protect your body from poisonous sulfuric acid before handling the batter...

Page 235: ...e during the charging 7 Unplug charge cord and remove charger cables 8 Attach battery to the tractor Put on eye protection and globes to protect your body from poisonous sulfuric acid before handling...

Page 236: ...nd the other end to engine block desired to start 4 Start engine If the engine does not start check the electrolyte level of each battery Removing Jumper cables Remove jumper cables as referring to th...

Page 237: ...Do not disconnect the alternator output lead or battery cables while the alternator is operating Do not remove the alternator from the tractor without first disconnecting the negative battery cable Wh...

Page 238: ...turn signal light counter clockwise to remove the socket from the housing 4 Push in on the tail brake light bulb or turn signal light bulb and rotate counter clockwise in the socket to remove the old...

Page 239: ...pull out the bulb and replace it with a new one 5 Install lenses and retaining screw NOTE For about bulb specification refer to the chapter 5 6 4 in this manual Front turn signal light bulb replaceme...

Page 240: ...fingers Oil from the fingers can shorten the life of bulb Use protective cloth or glove when installing bulb Bulb and surroundings are very hot while working Be careful not to touch the bulb with bar...

Page 241: ...0 Left Right hand interior trims Remote control lever guide N3 0 LS Cool Gray Instrument covers joystick cover control panel cover 10B 4 1 LS Metallic Silver Wheels Black Transmission case Front axle...

Page 242: ...eak bad ground Improper viscosity of engine oil Air in fuel system Fuel filter clogged Error in engine body Fuel cock closed Charge or replace Tighten the ground Replace the oil with proper viscosity...

Page 243: ...r Repair Repair Repair Check fuel system Clean or replace Engine oil pressure indicator is ON during operation Lack of engine oil Low viscosity of engine oil Warning light switch error Fault of oil pu...

Page 244: ...ulic pump failure Control valve failure Cylinder or cylinder related parts broken Aid oil Tighten the filter or replace seal of connecting parts Clean the filter or replace Repair or replace Repair or...

Page 245: ...lure Relief valve Valve spool clogged Setting pressure too low Check mounted condition of steering unit and column Replace Apply regular torque Adjust RPM or Repair Repair or replace Repair or replace...

Page 246: ...ion on HST pedal Neutral position of HST pedal is changed HST pedal linkage damaged HST arm bolt loosened Adjust neutral position Replace damaged part Fasten the bolt with adhesive HST power is too lo...

Page 247: ...and repair Headlight does not ON Light bulb cut off Fuse blown Replace Check the cause and replace Horn does not sound Switch failure Abnormal wiring Horn failure Replace Repair Replace Turn signal Li...

Page 248: ...5 68...

Page 249: ...Condenser w receiver drier Cooler hose Quick coupler Compressor Heater hose Maintenance of the air conditioning system and components Compressor Receiver drier Condenser Heater evaporator unit and co...

Page 250: ...te the air conditioner If you push the air conditioner switch and turn the blower control switch to 1 4 position the operation lamp shall be ON and the air conditioner begins to work Direction control...

Page 251: ...have to be handled by an authorized service expert Refrigerant and capacity R 134a 550 g 1 21 lb 2 Cleaning Condenser and Radiator screen Stop engine and allow the engine to cool Open bonnet Unscrew...

Page 252: ...filters Knobs Filter cover 4 Belt tension adjustment Check if the belt tension is suitable and If necessary adjust the belt tension with the tension adjust bolt Tension approx 10 12 mm 0 4 0 5 in when...

Page 253: ...ur authorized local dealer for check 2 Control switch check Check the electric switches of the control panel is normally operated Blower control switch Heater control switch Direction control switch A...

Page 254: ...ning is insufficient despite of the normal operation of compressor and blower Low and high pressure is low Leakage of refrigerant Contact the dealer Low and high pressure is high Refrigerant overcharg...

Page 255: ...t Coil of magnet clutch was shorted or cut off Contact the dealer Compressor failure Contact the dealer Wiring cut off or poor connection such as ground Check and repair 5 The warm airflow does not bl...

Page 256: ...diagram Heater evaporator Fan motor Evaporator core Heater core Hot water Control panel Engine Compressor Fan Radiator Condenser w receiver drier Quick coupler Expansion valve Heater lose Cooler hose...

Page 257: ...7 1 Unit mm 7 Dimension and Specification Cabin type Front tires 9 5 16 6PR Rear tires 13 6 24 8PR...

Page 258: ...7 2 Unit mm Roll bar type Front tires 9 5 16 6PR Rear tires 13 6 24 8PR...

Page 259: ...2 N m 1600 167 N m 1600 174 N m 1600 188 N m 1600 Rated power 31 3 kW 2600 35 1 kW 2600 38 8 kW 2600 42 5 kW 2600 FUEL INJECTION SYSTEM Type Delphi CRDI Common Rail Direct Injection Fuel filter Replac...

Page 260: ...apacity Lower link end 1250 kgf 2756 lbf 24 behind lift point 1120 kgf 2469 lbf REMOTE CONTROL Type Double acting Spring return type Detent type optional No of Q coupler 4EA optional 6EA F Loader coup...

Page 261: ...ght rear 12V 21W 5W Work lights 12V 27W Grille 37 5W Cabin 27W Roll bar Indoor light 12V 10W Cabin only Instrument indicator lights LED Cold start aid Glow plug STD AGRI TIRE Front 9 5 16 6PR Rear 13...

Page 262: ...acturer GS Caltex Front axle oil Kingpin case 5 5L Gear cases 2x1 5L 8 5L 2 2 U S gals API GL4 SAE 80W EPK 80W90 Manufacturer S OIL TOTAL Co Ltd Grease Front axle holder Steering cylinder pin 3 point...

Page 263: ......

Page 264: ...P NO 52132436 05 DATE 20220000...

Reviews: