

Page 1 of 2
USRIC USB Temperature Data Logger Quick Start Guide
This quick start guide covers preparation, use and
maintenance for the following models:
USRIC-4, USRIC-8 and USRIC-16
The LogTag
®
USRIC family consists of 3 fully configurable, single-use USB
temperature data loggers.
All models can be downloaded to LogTag Analyzer or uploaded to LogTag
Online, a cloud storage and sharing platform, and the data viewed from
anywhere in the world where you have access to a PC. The USRIC-8 and
USRIC-16 models can also create PDF temperature reports without the
need to install proprietary software or hardware at the destination.
1. EQUIPMENT SETUP
Before you can use your LogTag
®
data logger, it needs to be configured
with several parameters. For this, you need a PC running Windows and the
free companion software
LogTag
®
Analyzer
from our website.
Browse to the software page at
https://logtagrecorders.com/software/
and navigate to the Downloads page. Once downloaded, install LogTag
®
Analyzer, then start the program. (For detailed software download and install
instructions, please refer to the LogTag
®
Analyzer User Guide).
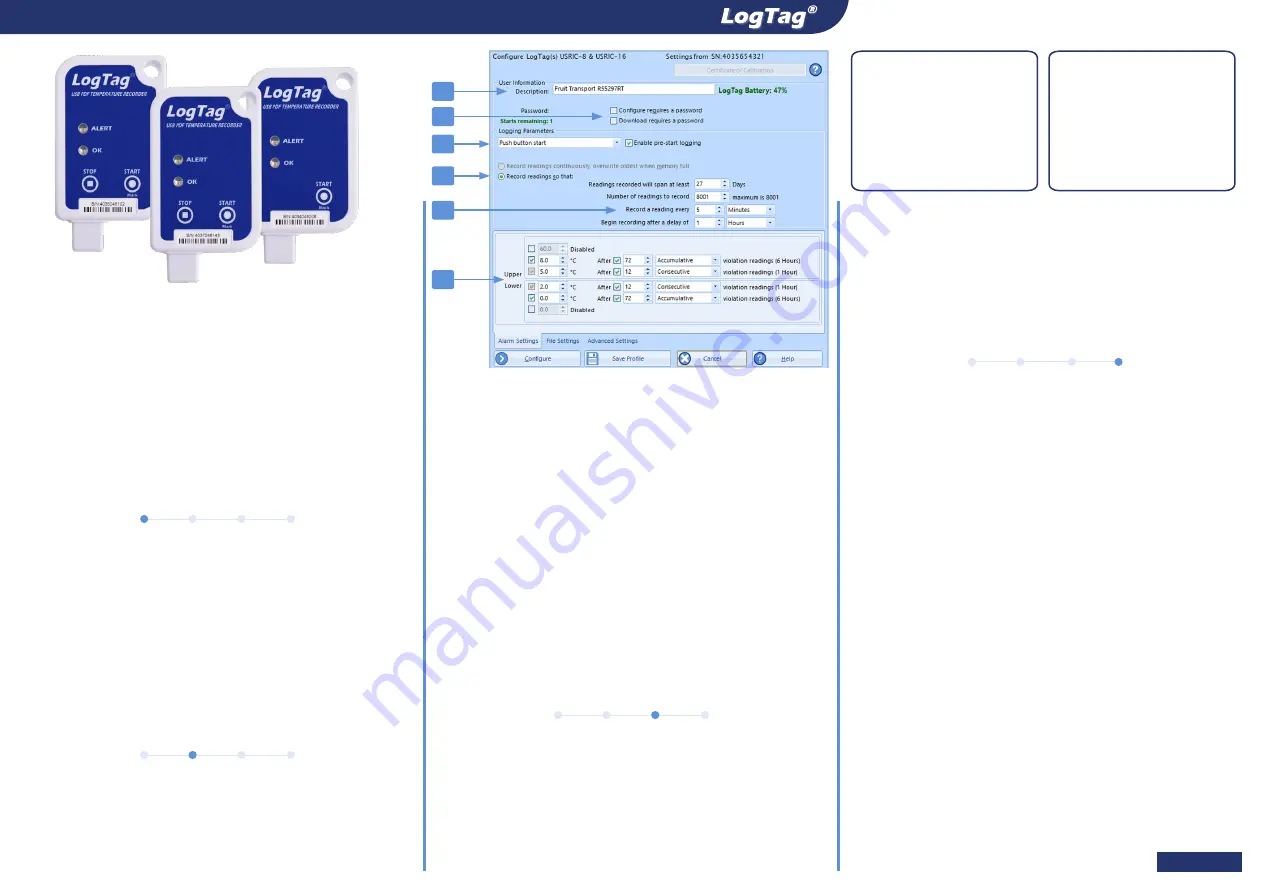
2. LOGGER CONFIGURATION
Remove the protective cap and plug the LogTag
®
logger into a USB port
on your PC. Start the software and click
LogTag - Configure
, or press
F3
.
Following dialogue will be shown:
1. Add a description for the logger or the goods it accompanies
2. Select Date/Time start, or Push button start (with pre-start logging).
3. Specify how long you wish to record for (with optional start delay).
4. Choose the time duration between each reading.
5. Specify the
upper
and
lower
temperature alarms.
6. Optionally, specify a password for next configure or download.
Complete any other entries as required for your trip. You can also set the
parameters for your PDF file, and specify if the logger can be manually
stopped.
When you have entered all parameters, click
Configure
.
You can remove the logger from the USP port when you see the success
message.
Every LogTag
®
model is unique in specification. For more information on
setting the advanced configuration options of your model please refer to
the description in the LogTag
®
Analyzer User Guide or in the Product User
Guide for your specific model.
You are now ready to start and deploy the logger.
3. START / INSPECT
Depending on your selection during configuration, the logger may start
recording by itself at a specific time, or require a manual start.
We recommend enabling pre-start logging, so data is not lost if the user
forgets to press the button. This way, temperatures will be recorded even
before the trip is started.
A start delay can be useful, if you need the logger to acclimatize before the
recording of data begins.
While recording, the green LED blinks every 4 seconds if none of the
configured alarm conditions have been met. As soon as one of the alarms is
triggered, the red alert LED blinks every 4 seconds.
After the LogTag
®
USRIC started logging, pressing the Mark button will
insert an inspection mark in the data recordings, which is displayed when
viewing the data in the software or on-line.
4. DOWNLOAD / RESULTS
At the end of the trip, several options exist for viewing the recorded data.
Viewing the on-board PDF
USRIC-8 and USRIC-16 models generate a PDF file as soon as they are
plugged into a PC. Refer to the products’ user guides for information about
what the PDF contains and how to access it.
The files created by the
USRIC loggers are not automatically copied to a permanent storage
volume on your computer. If you wish to retain the files you need to
manually copy them to a location such as your Documents folder.
Viewing the data with LogTag
®
Analyzer
The same software used for configuring the logger can also be used to
view recorded data. With the software running, click
LogTag - Download
or press
F4
. You can now inspect the data as a chart, data list or report. At
the same time, a file with the data is saved to the
Documents
-
My LogTag
Data
folder on your PC, which you can share with other users.
Viewing the data with LogTag Xpress
Instead of using LogTag Analyzer, you can use LogTag Xpress to view the
data. More information is available from
https://logtagrecorders.com/ltx/
View the Data with LogTag Online
Continue to read on the next page to see how you can upload the logger’s
data to LogTag Online so you can view and share your
data.
Date/Time start
If you configured the logger
for a Date/Time start, simply
wait until this time has
passed. The logger will start
recording automatically.
Push-Button Start
To start the logger, press
and hold the Start/Mark
button until the red and
green LEDs start flashing,
then release.
1
2
3
4
5
6


