Summary of Contents for L19DVDB10
Page 1: ...19 HD Ready Digital LCD TV With DVD Player Instruction Manual L19DVDB10 ...
Page 57: ......
Page 58: ......
Page 59: ......
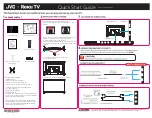
The Logik L19DVDB10 offers a versatile and compact solution for your entertainment needs. With its integrated DVD player and HD-ready display, this product is perfect for small spaces. Discover the full potential of your device by downloading the free Instruction Manual from manualshive.com, ensuring smooth operation and optimal performance.
Page 1: ...19 HD Ready Digital LCD TV With DVD Player Instruction Manual L19DVDB10 ...
Page 57: ......
Page 58: ......
Page 59: ......