LIW MayorSIT, Manual
Introducing the LIW MayorSIT manual – your go-to guide for unlocking the full potential of this remarkable product. Download the comprehensive user manual for free from manualshive.com, packed with detailed instructions and insightful tips to enhance your experience. Master the features effortlessly with this essential manual at your fingertips.
Share
Download


Reviews:
No comments
Related manuals for MayorSIT

AL600 Pioneer
Brand: Harmar Mobility Pages: 11

CELEBRITY X
Brand: Pride Mobility Pages: 43

Quantum 610
Brand: Pride Pages: 24

Caribou
Brand: R82 Pages: 148

Merida
Brand: clinicalfly Pages: 4

HSL410
Brand: Harvest Healthcare Pages: 4

NRS 4
Brand: NRS Healthcare Pages: 4

L35555
Brand: NRS Healthcare Pages: 2

H87115
Brand: NRS Healthcare Pages: 2

G21808
Brand: NRS Healthcare Pages: 2

KY692L
Brand: Rainbow Pages: 4

0809175
Brand: Mobiak Pages: 2

0806054
Brand: Mobiak Pages: 3

0805311
Brand: Mobiak Pages: 9

07B
Brand: Queenstone Pages: 35

Walker 12er
Brand: Walker Pages: 16
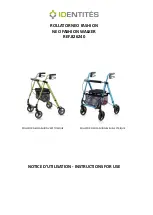
826240
Brand: identités Pages: 11

826024.B
Brand: identités Pages: 11


