LIVARNO LUX 307505, Operation And Safety Notes
The LIVARNO LUX 307505 user manual provides comprehensive Operation and Safety Notes, ensuring proper usage and enhanced safety. Download the manual for free from manualshive.com to effortlessly access step-by-step instructions, allowing you to make the most out of your LIVARNO LUX 307505 product.
Share
Download


Reviews:
No comments
Related manuals for 307505
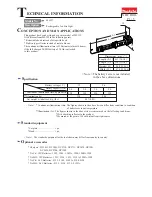
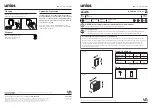
ML123
Brand: Makita Pages: 5

TBL4170A
Brand: Safavieh Pages: 2
Zenith
Brand: unios Pages: 2

SUA-8448KW
Brand: Kaiser Pages: 8

PUREFORM GEN. 2 P26 WS
Brand: Gardco Pages: 6

ROBATA ROB-36
Brand: Paloform Pages: 15

GLT1332SP
Brand: Uniflame Pages: 16

Mallorca AO127
Brand: Ballard Designs Pages: 4

09988
Brand: Badger Basket Pages: 6

0808356
Brand: Allen + Roth Pages: 10

DOUBLE SHOT BASKETBALL STAND
Brand: Triumph Sports USA Pages: 8

TRINITY TAB40200
Brand: hanit Pages: 3

GAR8406SS
Brand: Quoizel Pages: 2

JS-FT039K
Brand: iKayaa Pages: 2

WEB234
Brand: Seville Classics Pages: 2

70401
Brand: Epstein-Design Pages: 24

L600-A
Brand: Europlay Pages: 8

Marquee Fire Pit Table
Brand: Outdoor GreatRoom Company Pages: 8


