

Quick Installation Guide
Applicable models: LDV-002EASK / LDV-004EASK
Rev. 1.0 Copyright© All rights reserved. May 2005
LDV-002EASK/LDV-004EASK
2/4-port DVI PS/2 KVM Switch
w/ Audio&Mic
and Enhanced Digital Video Support
Quick Installation Guide
Thank you for purchasing the
LDV-002EASK/LDV-
004EASK DVI KVM Switch
! With our highly reliable and
quality product, user can enjoy countless benefits from
using it.
LDV-002EASK
LDV-004EASK
Introduction
The
LDV-002EASK/LDV-004EASK DVI KVM Switch
is a
2-/4-port PS/2 type DVI KVM Switch with Audio and
Microphone Switching. It provides DVI interfaces (with
DVI-
D Single Link
connectors) to offer genuine digital video
quality for your Flat Panel Displays. Audio and Microphone
switching function offers you uninterrupted multimedia
experience while performing KVM Switching. It enables the
computer administrator to access, control, boot and reboot
multiple DVI-enabled computers using only one keyboard,
video, mouse and a set of speakers and microphone. They
are designed specifically for sharing DVI monitor / Flat
Panel Display between multiple PCs with DVI interfaces.
The DVI interface technology implements genuinely digital
signal transmission over the cable to reduce undesired
distortion from conventional analog/digital conversion.
Using the DVI KVM Switch with Enhanced Digital Video
Support, you can control multiple computers while enjoying
digitally clean and clear images.
Before you install
The default setting of the
LDV-002EASK/LDV-004EASK
DVI PS/2 KVM Switch
is appropriate for most systems. In
fact, you do not need to configure the KVM Switch before
installation. It’s a Plug-and-Play device: First, connect the
keyboard, monitor and mouse to the DVI KVM switch and
then connect your computers to the KVM Switch, and finally
boot them up in correct sequence and you can start to
operate immediately!
For a quick start on installation and operation, please follow
the instructions below.
The
correct setup sequence
is ……
(1) Connect at least one computer and one set of the
keyboard, monitor and mouse to the KVM Switch
first
.
(2) Make sure all the computers are in powered-off state..
and then connect all your computers to the KVM
Switch.
(3) Then connect the external power adapter (DC9V 1A)
to your DVI KVM Switch.
(4) Power up your connected computers
…
DO NOT TRY
to connect the external power adapter before
you connect either the keyboard, mouse, monitor or PC. Otherwise,
the DVI KVM Switch might not be properly initialized.
Out-of-the-box Installation
Take the DVI KVM Switch out of the box and begin
installation….
Before connecting any cable to your KVM Switch, please make
sure all of your computers and their peripherals have been
powered off. Otherwise, the Switch system might not be set up
properly.
Step 1.
Make sure all the computers to be connected to the
DVI KVM Switch and their peripherals are in
powered-off state. If not, power them off before
you proceed with the following steps.
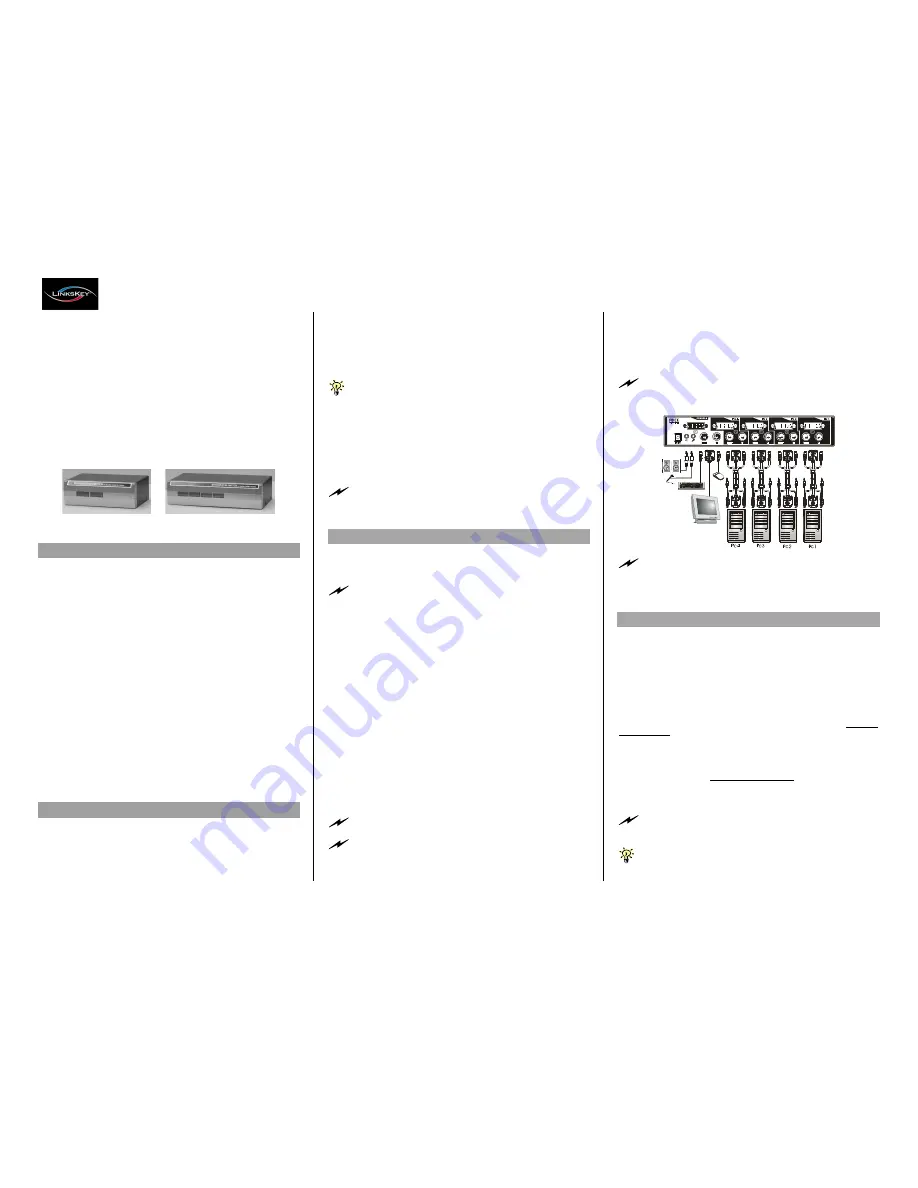
Step 2.
Connect the shared keyboard, DVI monitor/Flat
Panel Display, mouse, a speaker/headphone set
and microphone to the console connectors on the
rear of your DVI KVM switch.
Step 3.
Connect each of your computers to a PC port on
the rear of the switch. Depending on the cable you
use, the maximum cable distance is limited to at
least 5 meters (15.5 feet, with 1600 x 1200
resolution).
Step 4.
Connect the external power adapter (DC9V 1A) to
the KVM Switch.
With a resolution lower than 1600 x 1200, the cable distance
can well exceed 5 meters without visible video quality degradation.
Note that since the DVI KVM Switch is powered through the
PS/2 interface, it is powered on immediately when connected to
the PS/2 keyboard/mouse port of your PC (nonetheless even the
PC being in powered off state).
Step 5
. (
Now your KVM Switch should have been powered-
up….
) Power up the connected computers. After
your computers are powered up the keyboard and
mouse will be recognized and now you can begin
operating the KVM switch.
DO NOT TRY
to perform any channel switching before the
Operating System on your PC has completely booted. Otherwise,
the DVI interface will not be properly initialized.
DO NOT TRY
to connect the KVM Switch to the computers
while the computers are still in powered-on states. Otherwise, the
computer will have difficulty recognizing your shared keyboard and
mouse.
Easy Operation
There are two methods to control your KVM Switch for PC
as well as audio/mic channel selection: using the
front-
panel push buttons or
a
hotkey sequence.
Front-panel buttons
The front-panel button lets you have direct control over
KVM switch operation and channel switching. Simply press
the button to rotate through to a specific channel.
See
Quick
Reference Sheet
Keyboard hotkeys
A keyboard hotkey sequence consists of at least three
specific keystrokes:
See
Quick Reference Sheet
Hotkey sequence = ScrLk + ScrLk + Command key(s)
The two consecutive ScrLk keystrokes should be pressed
within 2 seconds. Otherwise, the hotkey sequence will not be
validated.
For detailed Hotkey sequences and their corresponding
functional commands, please refer to the Quick reference sheet.


