background image

Quick Reference

Learning about the printer

Using the printer control panel

1 @ ! .

2

A B C

3

D E F

4

G H I

5

J K L

6

M N O

7

P Q R S

8

T U V

9

W X Y Z

*

0

#

C

1

2

3

8

7

6

4

5

Use the

To

1

Display

View the printer status and messages.

Set up and operate the printer.

2

Home button

Go to the home screen.

3

Sleep button

Enable Sleep mode or Hibernate mode.

Do the following to wake the printer from Sleep
mode:

Touch the screen or press any hard button.

Open a door or cover.

Send a print job from the computer.

Perform a power

on reset (POR) with the

main power switch.

Attach a device to the USB port on the
printer.

4

Keypad

Enter numbers, letters, or symbols.

5

Start button

Start a job, depending on which mode is
selected.

6

Clear all /
Reset button

Reset the default settings of a function, such as
copying, faxing, or scanning.

Use the

To

7

Stop or Cancel
button

Stop all printer activity.

8

Indicator light

Check the status of the printer.

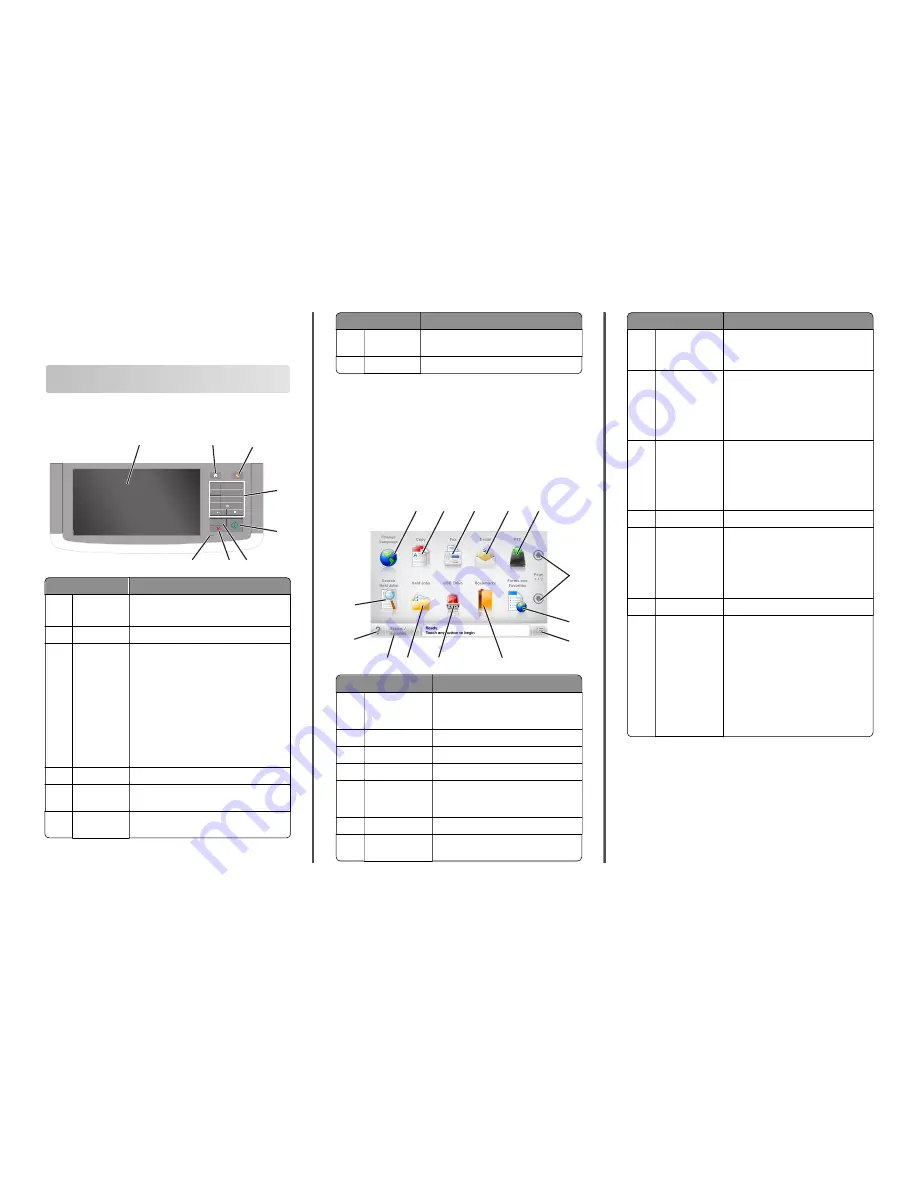
Understanding the home screen

When the printer is turned on, the display shows a basic screen,
referred to as the home screen. Touch the home screen buttons and
icons to initiate an action such as copying, faxing, or scanning; to open
the menu screen; or to respond to messages.

Note: 

Your home screen may vary depending on your home screen

customization settings, administrative setup, and active embedded
solutions.

6

1

12 11

10

7

8

2

3

4

5

9

13

14

Touch

To

1

Change Language

Launch the Change Language pop

up

window that lets you change the primary
language of the printer.

2

Copy

Access the Copy menus and make copies.

3

Fax

Access the Fax menus and send fax.

4

E-mail

Access the E-mail menus and send e

mails.

5

FTP

Access the File Transfer Protocol (FTP)
menus and scan documents directly to an
FTP server.

6

Arrows

Scroll up or down.

7

Forms and
Favorites

Quickly find and print frequently used
online forms.

Touch

To

8

Menu icon

Access the printer menus.

Note: 

The menus are available only when

the printer is in Ready state.

9

Bookmarks

Create, organize, and save a set of
bookmarks (URL) into a tree view of folders
and file links.

Note: 

The tree view supports only

bookmarks created from this function,
and not from any other application.

10

USB Drive

View, select, print, scan, or e

mail photos

and documents from a flash drive.

Note: 

This icon appears only when you

return to the home screen while a
memory card or flash drive is connected
to the printer.

11

Held Jobs

Display all current held jobs.

12

Status/Supplies

Show a warning or error message
whenever the printer requires
intervention to continue processing.

Access the messages screen for more
information on the message, and how
to clear it.

13

Tips

Open a context-sensitive Help dialog.

14

Search held jobs

Search for one or more of the following
items:

User name for held or confidential print
jobs

Job names for held jobs, excluding
confidential print jobs

Profile names

Bookmark container or print job names

USB container or print job names for
supported file types


1

Summary of Contents for M81 series

Page 1: ...o 1 Change Language Launch the Change Language pop up window that lets you change the primary language of the printer 2 Copy Access the Copy menus and make copies 3 Fax Access the Fax menus and send fax 4 E mail Access the E mail menus and send e mails 5 FTP Access the File Transfer Protocol FTP menus and scan documents directly to an FTP server 6 Arrows Scroll up or down 7 Forms and Favorites Qui...

Page 2: ...ings administrative setup and active embedded solutions 7 6 3 4 1 5 2 Touch To 1 Arrows View a list of options 2 Copy It Print a copy 3 Advanced Options Select a copy option 4 Home Go to the home screen 5 Increase Select a higher value 6 Decrease Select a lower value 7 Tips Open a context sensitive Help dialog Other touch screen buttons Touch To Accept Save a setting Cancel Cancel an action or a s...

Page 3: ...plications on page 3 or see the documentation that came with the application Understanding the different applications Use To Card Copy Scan and print both sides of a card on a single page For more information see Setting up Card Copy on page 4 Fax Scan a document and then send it to a fax number For more information see Faxing on page 19 Forms and Favorites Quickly find and print frequently used o...

Page 4: ...e scanned card is printed Select Best for Content if you want the printer to adjust the contrast automatically Default scale setting Set the size of the scanned card when printed The default setting is 100 full size Resolution setting Adjust the quality of the scanned card Notes When scanning a card make sure the scan resolution is not more than 200 dpi for color and 400 dpi for black and white Wh...

Page 5: ...n click Remote Operator Panel Launch VNC Applet Exporting and importing a configuration You can export configuration settings into a text file and then import the file to apply the settings to other printers 1 Open a Web browser and then type the printer IP address in the address field Note View the printer IP address on the printer home screen The IP address appears as four sets of numbers separa...

Page 6: ...Keep all other trays closed until needed 1 Pull out the tray Notes When loading folio legal or oficio size paper lift the tray slightly and pull it out completely Avoid removing trays while a job prints or while Busy appears on the display Doing so may cause a jam 2 Squeeze and slide the width guide to the correct position for the size of the paper being loaded until it clicks into place 2 1 1 Not...

Page 7: ...icators on the bottom of the tray to help position the guides 4 Flex the sheets back and forth to loosen them and then fan them Do not fold or crease the paper Straighten the edges on a level surface 5 Load the paper stack with the printable side facedown Note Make sure the paper or envelope is loaded properly There are different ways for loading letterhead depending on whether an optional staple ...

Page 8: ...thenmakesuretheholesonthelongedgeofthepaper are on the right side of the tray One sided printing Two sided printing A B C A B C Note If the holes on the long edge of the paper are on the left side of the tray then a jam may occur Do not slide the paper into the tray Load paper as shown in the illustration If you are loading envelopes then make sure that the flap side is facing up and the envelopes...

Page 9: ...and type in the Paper menu to match the paper loaded in the tray Note Set the correct paper size and type to avoid paper jams and print quality problems Loading the 2100 sheet tray CAUTION POTENTIAL INJURY To reduce the risk of equipment instability load each tray separately Keep all other trays closed until needed 1 Pull out the tray 2 Adjust the width and length guides Loading A5 size paper a Pu...

Page 10: ...s into place Loading A4 letter legal oficio and folio size paper a Pull up and slide the width guide to the correct position for the size of the paper being loaded LGLOFCFOLIO LTR A4 A5 1 LGL OFC FOLIO LTR A 4 A 5 2 LGL OFC FOL IO LTR A4 A5 b If the A5 length guide is still attached to the length guide then remove it from its place If the A5 length guide is not attached then proceed to step d c Pu...

Page 11: ...ere are different ways of loading letterhead depending on whether an optional staple finisher is installed or not Withoutanoptionalstaplefinisher With an optional staple finisher ABC One sided printing A B C One sided printing ABC Two sided printing A B C Two sided printing If you are loading prepunched paper for use with the staple finisher thenmakesuretheholesonthelongedgeofthepaper are on the r...

Page 12: ...k down while inserting the tray 6 From the printer control panel set the paper size and type in the Paper menu to match the paper loaded Note Set the correct paper size and type to avoid paper jams and print quality problems Loading the multipurpose feeder 1 Pull down the multipurpose feeder door Note Do not load or close the multipurpose feeder while a job is printing 12 ...

Page 13: ...r size indicators on the bottom of tray to help position the guides 4 Prepare the paper or specialty media for loading Flex the sheets back and forth to loosen them and then fan them Do not fold or crease the paper Straighten the edges on a level surface Hold transparencies by the edges and then fan them Straighten the edges on a level surface Note Avoid touching the printable side of the transpar...

Page 14: ...r With an optional staple finisher One sided printing One sided printing Without an optional staple finisher With an optional staple finisher ABC Two sided printing A B C Two sided printing If you are loading prepunched paper for use with the staple finisher thenmakesuretheholesonthelongedgeofthepaper are on the right side of the tray One sided printing Two sided printing A B C Note If the holes o...

Page 15: ...Damage Paper loaded in the tray should match the paper type name assigned in the printer The temperature of the fuser varies according to the specified paper type Printing issues may occur if settings are not properly configured Creating a custom name for a paper type Using the Embedded Web Server 1 Open a Web browser and then type the printer IP address in the address field Notes View the printer...

Page 16: ...opriate tray or feeder 3 Click Print Adjusting toner darkness 1 Open a Web browser and then type the printer IP address in the address field Notes View the printer IP address on the printer home screen The IP address appears as four sets of numbers separated by periods such as 123 123 123 123 If you are using a proxy server then temporarily disable it to load the Web page correctly 2 Click Setting...

Page 17: ...en touch Delete Selected Jobs Canceling a print job from the computer For Windows users 1 Open the printers folder In Windows 8 From the Search charm type run and then navigate to Apps list Run type control printers OK In Windows 7 or earlier a Click or click Start and then click Run b In the Start Search or Run dialog type control printers c Press Enter or click OK 2 Double click the printer icon...

Page 18: ...ter home screen The IP address appears as four sets of numbers separated by periods such as 123 123 123 123 If you are using a proxy server then temporarily disable it to load the Web page correctly 2 Click Settings E mail FTP Settings E mail Settings 3 Enter the appropriate information and then click Submit Configuring e mail settings 1 Open a Web browser and then type the printer IP address in t...

Page 19: ... If necessary enter a prefix in the Dialing prefix field 5 Select the appropriate paper size and page orientation 6 If you want to include a cover page withthe fax then select Include cover page with fax and then enter the appropriate information 7 Click OK Notes The Fax option is available for use only with the PostScript driver or the Universal Fax Driver For information on installing these driv...

Page 20: ... number Note To create a group of fax numbers touch Next number and then enter the next fax number 2 Touch 3 Type a unique name for the shortcut and then touch Done 4 Verify that the shortcut name and number are correct and then touch OK Note If the name or number is incorrect then touch Cancel and then reenter the information Scanning You can use the printer to send a scanned file You can also us...

Page 21: ...scans and sends the document to the directory you specified From the home screen navigate to Held Jobs Profiles locate your shortcut on the list 8 View the file from the computer Note The output file is saved in the location or launched in the program you specified Setting up Scan to Computer Notes This feature is supported only in Windows Vista or later Make sure that your computer and printer ar...

Page 22: ...ad paper as shown in the illustration Make sure the guides in the tray or the multipurpose feeder are properly positioned and are not pressing tightly against the paper or envelopes Push the tray firmly into the printer after loading paper Ifyouareloadingprepunchedpaperforusewiththestaplefinisher then make sure the holes on the long edge of the paper are on the right side ofthe tray For more infor...

Page 23: ... and locations When a jam occurs a message indicating the jam location and information to clear the jam appears on the printer display Open the doors covers and trays indicated on the display to remove the jam Notes When Jam Assist is set to On the printer flushes blank pages or pages with partial prints to the standard bin after a jammed page has been cleared Check your printed output for blank p...

Page 24: ... jam clear manual feeder 250 Remove all paper from the multipurpose feeder and then remove the jammed paper 9 Inside the printer x page jam lift front cover to remove cartridge 200 201 Open the front cover and the multipurpose feeder then remove thetoner cartridge and the imaging unit and then remove the jammed paper 10 Standard bin x page jam remove standard bin jam 203 Remove all paper from the ...

Page 25: ...rint quality of future print jobs 6 Pull the jammed paper gently to the right and then remove it from the printer Note Make sure all paper fragments are removed 1 2 Warning Potential Damage The jammed paper may be covered with toner which can stain garments and skin 7 Install the imaging unit Note Use the arrows on the side of the printer as a guide 8 Insert the toner cartridge into the printer an...

Page 26: ...low the surface to cool before touching 1 Pull down the rear door 2 Firmly grasp the jammed paper on each side and then gently pull it out Note Make sure all paper fragments are removed 3 Close the rear door 4 From the printer control panel touch Done to clear the message and continue printing x page jam open upper and lower rear door 231 234 CAUTION HOT SURFACE The inside of the printer might be ...

Page 27: ...Make sure all paper fragments are removed 3 Close the rear door 4 Open the rear door of the duplex area and then push the back of the standard tray 1 2 5 Press down the rear duplex flap then firmly grasp the jammed paper and then gently pull the paper out Note Make sure all paper fragments are removed 27 ...

Page 28: ...er fragments are removed 2 From the printer control panel touch Done to clear the message and continue printing x page jam remove tray 1 to clear duplex 235 239 1 Pull out the tray completely Note Lift the tray slightly and then pull it out 1 2 3 2 Push down the front duplex flap then firmly grasp the jammed paper and then gently pull the paper to the right and out of the printer Note Make sure al...

Page 29: ...agments are removed 3 Insert the tray 4 From the printer control panel touch Done to clear the message and continue printing x page jam clear manual feeder 250 1 From the multipurpose feeder firmly grasp the jammed paper on each side and then gently pull it out Note Make sure all paper fragments are removed 2 Flex the sheets back and forth to loosen them and then fan them Do not fold or crease the...

Page 30: ...ntly pull it out Note Make sure all paper fragments are removed 1 2 2 Close the rear mailbox door 3 Ifthejamisinthemailboxbin thenfirmly graspthejammed paper and then gently pull it out Note Make sure all paper fragments are removed 4 From the printer control panel touch Done to clear the message and continue printing x page jam open automatic feeder top cover 28y xx 1 Remove all original document...

Page 31: ...into the ADF and then adjust the paper guide 9 From the printer control panel touch Done to clear the message and continue printing x page jam remove paper open finisher rear door Leave paper in bin 451 1 Open the rear staple finisher door and then gently pull the paper out of the finisher Note Make sure all paper fragments are removed 1 2 2 Close the staple finisher door 3 From the printer contro...

Page 32: ...of the printer 4 Use the metal tab to lift the staple guard and then remove any loose staples 5 Press down the staple guard until it clicks into place 6 Slide the staples toward the metal bracket Note If the staples are at the rear of the cartridge then shake the cartridge downward to bring the staples near the metal bracket 32 ...

Page 33: ...surface This could damage the cartridge 7 Push the cartridge holder firmly back into the stapler unit until the cartridge holder clicks into place 8 Close the stapler door 9 From the printer control panel touch Done to clear the message and continue printing 33 ...

Reviews: