Leica Rugby 620, User Manual
The Leica Rugby 620 is a reliable and precise laser level tool for all your construction needs. Ensure proper usage and maximize its features with the free User Manual available for download from manualshive.com. Easily access the manual to get the most out of your Leica Rugby 620.
Share
Download


Reviews:
No comments
Related manuals for Rugby 620
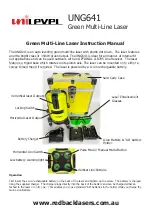
UNG641
Brand: Unilevel Pages: 2

X2-Laser
Brand: LaserLiner Pages: 11

2100
Brand: KRAUSMANN Pages: 20

AL 10
Brand: Flex Pages: 48

DL-04
Brand: Cocraft Pages: 4

ROTEC LS.RH.HP
Brand: MOBA Pages: 16

CCL460G
Brand: LEVELFIX Pages: 2

1876-2400
Brand: Johnson Pages: 2

40-6616
Brand: Johnson Pages: 12

40-6028
Brand: Johnson Pages: 12

40-6692
Brand: Johnson Pages: 18

1880-2400
Brand: Johnson Pages: 12

40-6646
Brand: Johnson Pages: 16

40-0612
Brand: Johnson Pages: 14

40-6641
Brand: Johnson Pages: 18

40-6184
Brand: Johnson Pages: 16

40-6601
Brand: Johnson Pages: 20

40-6584
Brand: Johnson Pages: 28


