


CCBB Series Floor Box
I N S T A L L A T I O N I N S T R U C T I O N S
Installation Instruction No.: 1 009 489R2 – Updated May 2012
Legrand/Wiremold electrical systems conform to and should be
properly grounded in compliance with requirements of the current
National Electrical Code or codes administered by local authorities.
All electrical products may present a possible shock or fire
hazard if improperly installed or used. Legrand/Wiremold electrical
products may bear the mark as UL Listed and/or Classified and
should be installed in conformance with current local and/or the
National Electrical Code.
Products Covered: CCBBS, CCBBS-OG, CCBBSCTCAL, CCBBSBTCAL
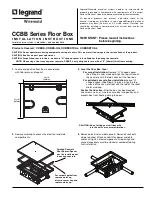
1.
Locate and position floor box in accordance
with floor plans or blueprint.
4.
Remove electrical and data panels. Remove knockouts
where required. Attach conduits for power and data
cables using UL Listed components. All openings and
unused knockouts must be closed or sealed off during
final installation.
2. Level the floor Box, then:
For carpet installation:
Remove “U” shaped spacer
(See Step 3) under mudcap. Align the top surface of
the concrete with the top surface of the floor box.
For polished concrete floor installation:
Leave “U”
shaped spacer (See Step 3) in place. Align the top
surface of the concrete floor with the top of the sheet
metal mud cap.
Anchor the floor box:
After the box has been leveled,
use screws, nails, or wire to secure box into position and
prevent box from floating during the pour.
IMPORTANT: Please read all instructions
before beginning.
CAUTION: Do not operate resurfacing equipment over top of covers. This may result in damage to the surface finish of the product.
CAUTION: Box has no post pour adjustment.
CAUTION: For polished concrete floors, make sure “U” shaped spacer is installed prior to pouring the concrete.
NOTE: When using a floor covering over concrete, CCBBS is only designed for use with a 1/4" [6.4mm] thick floor covering.
CAUTION: Do not dislodge or shift box with
job site traffic or concrete vibrations.
19 1/8"
[486mm]
15 1/4"
[387mm]
3.
Remove mudcap to access the electrical and data
compartments.
For carpet applications
remove mud cap,
discard spacer ring and
replace mud cap.
Polished Concrete
Floor Spacer: Spacer
must be installed prior
to pouring concrete.


