
V1.0
PV-RC200HDW
1080p Key Fob Wi-Fi DVR
User Manual
1. From the desktop right-click to open Notepad, create a text
file named
settime.txt
2. On the first line of the file, enter date and time informaiton as
year.month.day hours.minutes.seconds
For example, suppose the time is October 16, 2015 15:00.
Then enter
2015.10.16 15:00:00
Note : There should be a space left between day and hours,
and the time format should be the 24-hour format.
3. Save the file to the root directory of the memory card.
4. Insert the memory card into the slot, and power on the device.
The date and time setting is now completed.
Note : When the date and time setting is completed. The
settime.txt
file will not be visible when you connect the device
to the computer again.
5. Date and time setting (for Windows system)
6. Operation
6-1 Power on: Press once.
6-2 Recording: With device powered on, press again to start
or stop recording.
6-3 Vibration: Switch to the left to turn off, or right to turn on.
6-4 Wi-Fi: With device powered on, press to turn on/off Wi-Fi.
6-5 Power off: With no ongoing recording, press .
6-6 Reset: When the device functions abnormally, press .
6-7 Restore default Wi-Fi password: long press for 3 seconds.
6-8 Restore default setting : press for 10 seconds.
The device vibrates once, when you turn on/off the power,
start recording, and turn on Wi-fi. The device vibrates twice, when
you turn off Wi-fi.
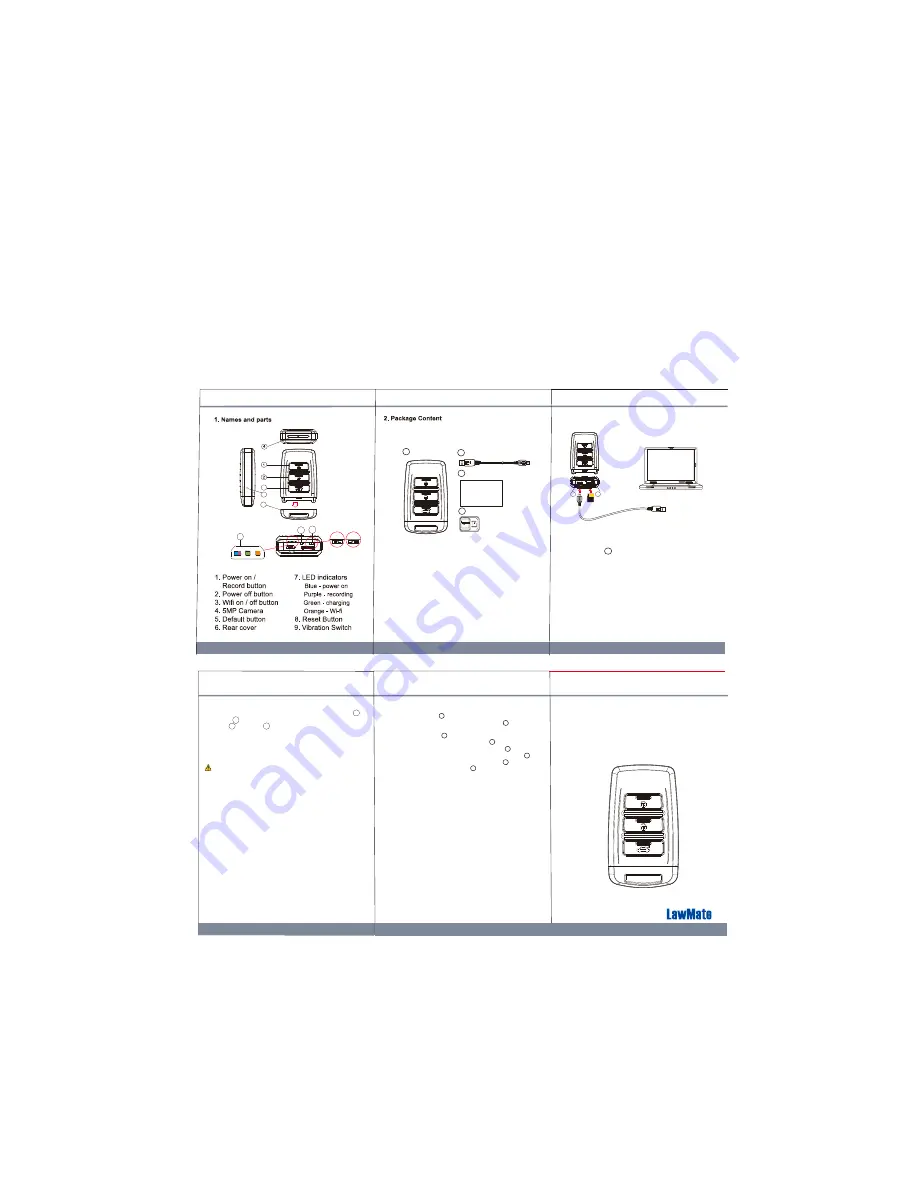
●
Solid blue LED - power on
●
Solid purple LED - recording on
●
Blinking orange LED - searching for Wi-fi connection
●
Solid orange LED - device is connected to Wi-fi
LawMate, innovation never stops
®
3
5
6
2
User manual
4
1
3
4GB
Lock
Adapter
1. Key fob camera
2. USB cable
3. User manual
4. Memory card
Connect to PC by USB cable
10
11
10. Mini USB port
11. Memory card slot
3. Charge the battery
3
9
8
5
5
Knowing that all video files are stored in the memory card.
You can ...
1. Use a memory card reader to transfer datas from the card to
the computer.
2. Or, connect the device to the computer with memory card
inserted. Turn on the device and it will work as a flash drive.
7. Download videos and photos from DVR
Remove the rear cover , plug the micro USB end of
cable into and plug the other end into the
computer or other USB power source.
● Solid green LED - the device is charging.
● Green LED goes off - the deviced is full charged.
4. Format memory card
4.1 With gold contact facing up, insert the memory card into
4.2 Press to power on the device,
4.3 Hold first, press for one second, and release both
at the same time.
● Solid blue LED - the device is powered on.
● Purple LED blinks for five times - the memory card is being
formatted.
● All lights off with one vibration - the formatting is completed.
Caution: To make the memory card recognizable, please be
sure to format the memory card before using it for the first time.
Pleas note that formatting on computer is not recommended,
for it might result in the failure for the computer to recognize
the card.
11
1
2
3
10
1
2
1
9
8
7
ON
OFF


