Lakeland DRY:SOON 24576, Instruction Booklet
The Lakeland DRY:SOON 24576 Instruction Booklet is available for free download on our website. This comprehensive manual provides step-by-step guidance on how to use and maintain your Lakeland DRY:SOON 24576 efficiently. Access the manual today at manualshive.com and maximize the potential of your product.
Share
Download


Reviews:
No comments
Related manuals for DRY:SOON 24576
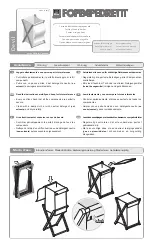
Devil 03
Brand: Foppapedretti Pages: 2

Spiral Master
Brand: U.S. Kitchen Pages: 2

Oasis Clearwater Z54 DELUXE
Brand: Humes Pages: 9

NT Designo
Brand: Roto Pages: 104

42044SR2
Brand: Milnor Pages: 161

Per Se P77618-00-CP
Brand: Kallista Pages: 2

Fired Earth
Brand: AGA Pages: 12

CHIEF LF49UxP
Brand: LEGRAND Pages: 20

C1407
Brand: Grizzly Pages: 2


