background image

16” Planer with
ShearTec II Manual

LAGUNA TOOLS

2072 Alton Parkway

Irvine, California 92606

Ph: 800.234.1976

www.lagunatools.com

© 2017, Laguna Tools, Inc. LAGUNA® and the LAGUNA Logo® are the registered trademarks of Laguna Tools, Inc. All rights reserved.

Model Numbers: MPLAN1510-0120                 

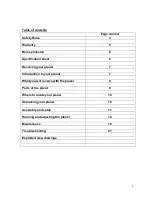
Содержание MPLAN1510-0120

Страница 1: ...UNA TOOLS 2072 Alton Parkway Irvine California 92606 Ph 800 234 1976 www lagunatools com 2017 Laguna Tools Inc LAGUNA and the LAGUNA Logo are the registered trademarks of Laguna Tools Inc All rights r...

Страница 2: ......

Страница 3: ...et 6 Receiving your planer 7 Introduction to your planer 7 What you will receive with the planer 8 Parts of the planer 9 Where to locate your planer 10 Unpacking your planer 10 Assembly and setup 11 R...

Страница 4: ...istributor Read carefully before operating the machine 1 Keep the working area clean and be sure adequate lighting is available 2 Do not wear loose clothing gloves bracelets necklaces or ornaments Wea...

Страница 5: ...empted by others Laguna Tools Inc is not responsible for additional tools or modifications sold or performed other than from by Laguna Tools Inc on any Laguna Tools Inc machine Warranty maybe voided u...

Страница 6: ...ote It is probable that your machine will be delivered by a third party Before you unpack your new machine you will need to first inspect the packing invoice and shipping documents supplied by the dri...

Страница 7: ...e it is better to use a machine with the insert cutters than the parallel blades as it greatly reduces the risks of having to scrap valuable wood or spending excessive time sanding tear out marks Addi...

Страница 8: ...k with lumber after you have inspected it completely Staples nails loose knots and any other metal in the plank will damage your cutter head and could cause injury or fire If you have any question abo...

Страница 9: ...pport the work piece when returning back for additional cuts 4 Start stop switch 5 Power cable No power cable is supplied with the machine A power cable will have to be connected to the termination bo...

Страница 10: ...tic wrap from the top The accessories that were ordered could be attached to the side of the machine and extreme caution must be taken so that the parts do not fall and cause injury or damage Remove t...

Страница 11: ...to the base of the machine The wheels are locked by tightening the clamp screws on the outside of the body Fitting the dust chute Note The dust chute has to be removed to access the cutter head Attac...

Страница 12: ...ug as the type of plug and the length of the cable will be dependent on the installation Connecting the dust collection Connect a 4 inch flexible hose between the dust collection hood and your dust co...

Страница 13: ...key may be a tight fit 3 Fit the washer and nut as shown Fitting the extension tables Extension table Straight edge Fixing and jacking screws There are two extension tables one on either side of the m...

Страница 14: ...must be removed with WD40 or similar as it attracts saw dust and dirt The surfaces should then be coated with a Teflon lubricant or similar Teflon tends to dry and will not attract sawdust and dirt To...

Страница 15: ...have been removed from the machine 2 All the guards are in place 3 You are wearing the appropriate safety equipment 4 You have read and understood the instruction manual Note If any of the below func...

Страница 16: ...le clamp handle The height scale comes factory set and should not need adjustment If movement has taken place during shipping adjust as follows 1 Plane a plank of wood to a convenient thickness 2 Chec...

Страница 17: ...s loosen the motor adjustor lower nut Tighten the upper nut to increase the belt pressure Note To access the drive belts and motor remove the side cover and belt cover Note Disconnect the power to the...

Страница 18: ...surfaces again This is very frustrating and a waste of time take your time and ensure that you are very thorough with cleaning 3 Lower the tooth into the cutter head and clamp with the allen key Note...

Страница 19: ...e cutter head 2 Check cutter blades for chips and dullness 3 Generally inspect the machine for damage and loose or worn parts 4 Check the dust extraction for blockages and any large bits that could ca...

Страница 20: ...elt failure There should be a 3 16 deflection when the belt is pressed with moderate finger pressure 8 Refit the side cover and belt guard Note Your machine is fitted with a multi drive belt system Al...

Страница 21: ...it Note It is recommended that you use a Teflon based lubricant as it tends to dry and therefore will attract less sawdust and dirt Lubricate the drive chains and cogs Drive roller and anti kickback t...

Страница 22: ...w both sides of the machine for both rollers four adjusting screws in total If parallel adjustment is required both screws must be moved the same amount for each roller To adjust for parallel it is su...

Страница 23: ...power or motor speed slows with load over heats or stalls 1 Motor run capacitor faulty 1 Replace the capacitor 2 Machine overloaded 2 Take smaller cuts 3 Motor overheating 3 Clean motor taking care to...

Страница 24: ...rn cutter head bearings 1 Replace cutter head bearings Shiny finish 1 Blades are blunt 1 Replace the blades 2 Too fine a cut 2 Increase the depth of cut Chip marks random pattern 1 Chips not removed f...

Страница 25: ...25 Exploded view drawings...

Страница 26: ...26...

Страница 27: ...27...

Страница 28: ...28...

Страница 29: ...2 4 14 006002 032 FLAT WASHER 6 6 13 1 0t 8 15 000103 103 SOC HD CAP SCREW M6 1 0P 12 9 16 170494 000 DUST HOOD 1 17 006001 056 FLAT WASHER 8 5 23 2 0t 8 18 000103 106 SOC HD CAP SCREW M6 1 0P 16 9 19...

Страница 30: ...3C 2000mm 1 42 7 471004 012 SWITCH CORD SJT12AWG 1C 150mm 1 42 8 021203 000 RELIEF BUSHING SW P6H 3 42 9 006502 100 TOOTH WASHER 5 3 10 2 42 10 021385 000 RELIEF BUSHING PGA13 5 11B 2 43 000205 101 SE...

Страница 31: ...78 019 CHIP BREAKER 1 71 070013 000 CHAIN SPROCKET 1 72 010003 000 RETAINING RING STW 12 2 73 010209 000 RETAINING RING ETW 15 2 74 250160 615 SPACER 56 75 172281 905 ANTI KICK BACK 55 76 360387 000 S...

Страница 32: ...105 360357 901 SHAFT 1 106 280052 000 SPRING 1 107 017002 000 STEEL BALL 6 1 108 043505 000 OIL SEAL SC25 47 6 1 109 030306 000 BALL BEARING 6204Z A 1 110 006001 032 FLAT WASHER 6 6 13 1 0t 7 111 070...

Страница 33: ...351 902 MOTOR PULLEY 1 138 5 006001 043 FLAT WASHER 8 2 30 4 0t 1 138 6 021203 000 RELIEF BUSHING SW P6H 2 138 7 021369 000 RELIEF BUSHING PGA13 5 11B 1 139 008009 100 HEX NUT M12 1 75P 8 140 000003 2...

Страница 34: ...010104 000 RETAINING RING RTW 38 1 171 130046 000 BUSHING 1 Key Part No Descriptions Q ty 172 012002 004 KEY 4 4 10 2 173 360397 000 ELEVATING SCREW 1 174 040003 000 HEX WRENCH 3mm 1 175 040004 000 H...

Страница 35: ...M8 1 25P 30 1 208 8 006001 001 FLAT WASHER 4 3 10 1 0t 1 208 9 000302 101 ROUND HD SCREW M4 0 7P 6 1 208 10 000301 101 ROUND HD SCREW M3 0 5P 6 2 216 004001 101 KNOB 5 16 18NC 3 4 2 217 000002 201 HEX...

Страница 36: ...36...

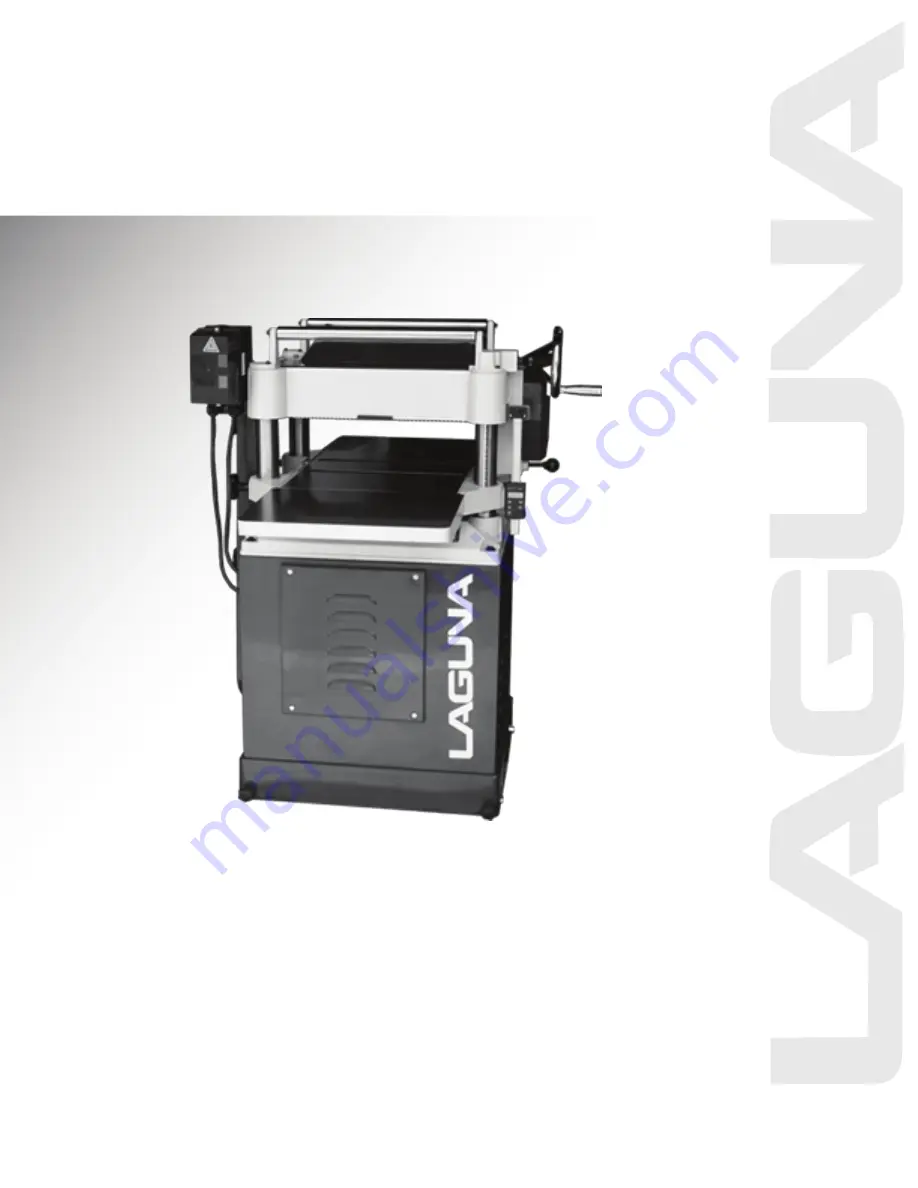
Страница 37: ...1 Laguna Tools MPLAN1510 0130 Platinum Series 16 Planer...

Страница 38: ...able saws and combination machines Through my hands on experience I work hard to make our machines better I strive to give you machines that inspire you to create works of art Machines that are a joy...

Страница 39: ...et 6 Receiving your planer 7 Introduction to your planer 7 What you will receive with the planer 8 Parts of the planer 9 Where to locate your planer 10 Unpacking your planer 10 Assembly and setup 11 R...

Страница 40: ...istributor Read carefully before operating the machine 1 Keep the working area clean and be sure adequate lighting is available 2 Do not wear loose clothing gloves bracelets necklaces or ornaments Wea...

Страница 41: ...med other than from by Laguna Tools Inc on any Laguna Tools Inc woodworking machine Warranty may be voided upon the addition of such noted tools and or modifications determined on a case by case basis...

Страница 42: ...ote It is probable that your machine will be delivered by a third party Before you unpack your new machine you will need to first inspect the packing invoice and shipping documents supplied by the dri...

Страница 43: ...e it is better to use a machine with the insert cutters than the parallel blades as it greatly reduces the risks of having to scrap valuable wood or spending excessive time sanding tear out marks Addi...

Страница 44: ...k with lumber after you have inspected it completely Staples nails loose knots and any other metal in the plank will damage your cutter head and could cause injury or fire If you have any question abo...

Страница 45: ...pport the work piece when returning back for additional cuts 4 Start stop switch 5 Power cable No power cable is supplied with the machine A power cable will have to be connected to the termination bo...

Страница 46: ...tic wrap from the top The accessories that were ordered could be attached to the side of the machine and extreme caution must be taken so that the parts do not fall and cause injury or damage Remove t...

Страница 47: ...to the base of the machine The wheels are locked by tightening the clamp screws on the outside of the body Fitting the dust chute Note The dust chute has to be removed to access the cutter head Attac...

Страница 48: ...ug as the type of plug and the length of the cable will be dependent on the installation Connecting the dust collection Connect a 4 inch flexible hose between the dust collection hood and your dust co...

Страница 49: ...key may be a tight fit 3 Fit the washer and nut as shown Fitting the extension tables Extension table Straight edge Fixing and jacking screws There are two extension tables one on either side of the m...

Страница 50: ...must be removed with WD40 or similar as it attracts saw dust and dirt The surfaces should then be coated with a Teflon lubricant or similar Teflon tends to dry and will not attract sawdust and dirt To...

Страница 51: ...have been removed from the machine 2 All the guards are in place 3 You are wearing the appropriate safety equipment 4 You have read and understood the instruction manual Note If any of the below func...

Страница 52: ...le clamp handle The height scale comes factory set and should not need adjustment If movement has taken place during shipping adjust as follows 1 Plane a plank of wood to a convenient thickness 2 Chec...

Страница 53: ...s loosen the motor adjustor lower nut Tighten the upper nut to increase the belt pressure Note To access the drive belts and motor remove the side cover and belt cover Note Disconnect the power to the...

Страница 54: ...surfaces again This is very frustrating and a waste of time take your time and ensure that you are very thorough with cleaning 3 Lower the tooth into the cutter head and clamp with the allen key Note...

Страница 55: ...e cutter head 2 Check cutter blades for chips and dullness 3 Generally inspect the machine for damage and loose or worn parts 4 Check the dust extraction for blockages and any large bits that could ca...

Страница 56: ...elt failure There should be a 3 16 deflection when the belt is pressed with moderate finger pressure 8 Refit the side cover and belt guard Note Your machine is fitted with a multi drive belt system Al...

Страница 57: ...it Note It is recommended that you use a Teflon based lubricant as it tends to dry and therefore will attract less sawdust and dirt Lubricate the drive chains and cogs Drive roller and anti kickback t...

Страница 58: ...w both sides of the machine for both rollers four adjusting screws in total If parallel adjustment is required both screws must be moved the same amount for each roller To adjust for parallel it is su...

Страница 59: ...power or motor speed slows with load over heats or stalls 1 Motor run capacitor faulty 1 Replace the capacitor 2 Machine overloaded 2 Take smaller cuts 3 Motor overheating 3 Clean motor taking care to...

Страница 60: ...rn cutter head bearings 1 Replace cutter head bearings Shiny finish 1 Blades are blunt 1 Replace the blades 2 Too fine a cut 2 Increase the depth of cut Chip marks random pattern 1 Chips not removed f...

Страница 61: ...25 Exploded view drawings...

Страница 62: ...26...

Страница 63: ...27...

Страница 64: ...28...

Страница 65: ...2 4 14 006002 032 FLAT WASHER 6 6 13 1 0t 8 15 000103 103 SOC HD CAP SCREW M6 1 0P 12 9 16 170494 000 DUST HOOD 1 17 006001 056 FLAT WASHER 8 5 23 2 0t 8 18 000103 106 SOC HD CAP SCREW M6 1 0P 16 9 19...

Страница 66: ...3C 2000mm 1 42 7 471004 012 SWITCH CORD SJT12AWG 1C 150mm 1 42 8 021203 000 RELIEF BUSHING SW P6H 3 42 9 006502 100 TOOTH WASHER 5 3 10 2 42 10 021385 000 RELIEF BUSHING PGA13 5 11B 2 43 000205 101 SE...

Страница 67: ...78 019 CHIP BREAKER 1 71 070013 000 CHAIN SPROCKET 1 72 010003 000 RETAINING RING STW 12 2 73 010209 000 RETAINING RING ETW 15 2 74 250160 615 SPACER 56 75 172281 905 ANTI KICK BACK 55 76 360387 000 S...

Страница 68: ...105 360357 901 SHAFT 1 106 280052 000 SPRING 1 107 017002 000 STEEL BALL 6 1 108 043505 000 OIL SEAL SC25 47 6 1 109 030306 000 BALL BEARING 6204Z A 1 110 006001 032 FLAT WASHER 6 6 13 1 0t 7 111 070...

Страница 69: ...351 902 MOTOR PULLEY 1 138 5 006001 043 FLAT WASHER 8 2 30 4 0t 1 138 6 021203 000 RELIEF BUSHING SW P6H 2 138 7 021369 000 RELIEF BUSHING PGA13 5 11B 1 139 008009 100 HEX NUT M12 1 75P 8 140 000003 2...

Страница 70: ...010104 000 RETAINING RING RTW 38 1 171 130046 000 BUSHING 1 Key Part No Descriptions Q ty 172 012002 004 KEY 4 4 10 2 173 360397 000 ELEVATING SCREW 1 174 040003 000 HEX WRENCH 3mm 1 175 040004 000 H...

Страница 71: ...M8 1 25P 30 1 208 8 006001 001 FLAT WASHER 4 3 10 1 0t 1 208 9 000302 101 ROUND HD SCREW M4 0 7P 6 1 208 10 000301 101 ROUND HD SCREW M3 0 5P 6 2 216 004001 101 KNOB 5 16 18NC 3 4 2 217 000002 201 HEX...

Страница 72: ...ations subject to change Machines may be shown with optional accessories 2017 Laguna Tools Inc LAGUNA and the LAGUNA Logo are the registered trademarks of Laguna Tools Inc All rights reserved 2072 Alt...

Отзывы: