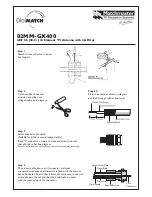
1. First loosen the screw on the clamp located on the underside of
the aerial boom shown in Fig. 1
2. Push the two semi-circular sections of the aerial into the clamp
and terminal housing (see Fig. 2). Ensure that the drilled holes are
positioned inside the terminal housing.
3. Make sure the lower part of the semi-circular sections are
pushed in tight then tighten the screw on the clamp.
4. Before preparing and stripping the cable ready for connection,
feed the coaxial cable through the hole in the terminal cover.
4. Strip 35mm of the outer sheath of the cable and peel back the
braid and foil. Twist the braid together into a single strand and
trim away the foil. Strip 20 mm of the insulating sheath to bare
the central conductor.
5. Feed the central conductor into the slot on one terminal and fix
in position with one of the self tapping screws provided, making
sure that the screw locates in the tappped hole in the semi-
circular section. Similarly feed the twisted braid into the other
terminal and secure (see Fig. 3).
5. Replace terminal cover carefully and securely making sure that
the cable is not trapped or kinked.
6. Choose a position for mounting the aerial and drill four holes in
the wall on which the wall mounting bracket is to be mounted
using the bracket as a template. Then fix the bracket and mast to
the wall using the screws and wall plugs supplied.
7. Secure the cable to the wall with the cable clips and run to a wall
outlet or prepare the cable and fit the coax plug supplied.
•
Omni FM aerial semi assembled
•
Wall/loft mounting bracket and angled mast
•
10m digital quality coaxial cable
•
15 cable clips
•
4x coach bolts and wall plugs
•
Aerial clamp
•
Coaxial plug
Contents
Installation
This kit contains an omni directional aerial for receiving FM radio signals plus all the fixtures, fittings and cable required to install it.
For best results the aerial should be mounted externally away from power and signal cables either on an outside wall or on the eaves. If this is not
practical, loft mounting is an alternative although this may reduce the quality of the FM radio signal received. The circular deaign allows reception
through 360˚ and is therfore ideal for receiving signals from more than one transmitter.
Omni FM Aerial Kit
29911LAB
User GUide
self tapping screws
Fig. 1
Fig. 3
Customer Careline:
08457 573 479
Local rate UK number, Monday to Friday 9am-5pm
Website:
http://www.labgear.co.uk
Safety Warnings
You can reduce the risk of accidents by forward planning.
Before starting installation make sure that the surface/
structure to which the bracket is to be attached is in a good state of repair
and check for hidden electrical wiring or plumbing.
Beware of overhead power lines when working on
installations outside.
If working in a loft or roof space tread carefully and ensure adequate lighting
is available.
Always follow manufacturer’s operating and safety
instructions before using tools and/or equipment.
Always read and follow the manufacturer’s instruction label affixed to a ladder
before use.
Always route cables or wiring carefully to avoid injury.
Make sure cable is correctly routed before it is fixed into
position, take care not to over tighten cable clips.
After installation make regular maintenance checks for wear and tear.
If in doubt consult a qualified electrician or professional aerial installer.
Fig. 4
mast
aerial clamp
wall bracket
Coax plug wiring instructions
1 Unscrew coaxial plug housing and slide cap
over cable.
2 Strip 23mm of cable outer sheath.
Gather copper braid, wrap around outer
sheath, slide claw over braid and crimp.
3 Strip 18mm of inner insulation to leave 5mm
exposed
4 Undo screw on plug/clamp, slide clamp over
inner wire & tighten screw. Reassemble plug
1
2
3
4
5
5 Trim inner wire flush with plug.
clamp screw
Fig. 2
aerial boom
terminal
housing
terminal cap
central conductor
terminal
braid terminal