Korg A4 Guitar, Owner'S Manual
The Korg A4 Guitar is a versatile effects processor, essential for any guitarist seeking to enhance their sound. Unlock its full potential by referring to the comprehensive Owner's Manual, available for free download from our website. Maximize your creative possibilities and take control of your music with this powerful tool.
Share
Download


Reviews:
No comments
Related manuals for A4 Guitar

EP Series
Brand: D.A.S. Pages: 15

Pro Series
Brand: 5Core Pages: 2

DMP2
Brand: M-Audio Pages: 8

CAM150
Brand: EAW Pages: 2
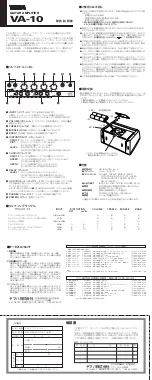
VA-10
Brand: Yamaha Pages: 4

VIBRO-KING P/N 053493
Brand: Fender Pages: 8

PB 150 HEAD
Brand: Laney Pages: 4

Taboo ARTIST
Brand: Rocktron Pages: 79

ELICIT MK5
Brand: Rega Pages: 12

PowerStation PS1
Brand: Fryette Pages: 12

SU-V6
Brand: Technics Pages: 10

EV3Kmini
Brand: Ssl Pages: 7

Fidek Power Amplifier 2 x 1500W
Brand: Conrad Pages: 40

CL 35 mk III
Brand: Luxman Pages: 11

CIT12
Brand: Harman Kardon Pages: 6

11A52
Brand: Tektronix Pages: 128

Smart phono V2
Brand: Clearaudio Pages: 3

Hombre
Brand: Suhr Pages: 11


