Kicker SWRA211, Quick Start Manual
Introducing the Kicker SWRA211! Get up and running in no time with our Quick Start Manual. For detailed instructions, simply download the comprehensive user manual – available for free at manualshive.com. Find everything you need to know about this exceptional product in one convenient place. Happy downloading!
Share
Download


Reviews:
No comments
Related manuals for SWRA211

SWE-10S4
Brand: Alpine Pages: 4

TE Series
Brand: Kicker Pages: 2

SSIEXT14
Brand: Kicker Pages: 6

LVX Psw15
Brand: dBTechnologies Pages: 2

40-1034
Brand: Radio Shack Pages: 2

HTS3
Brand: Genelec Pages: 4

SAM 7300 Series
Brand: Genelec Pages: 8

1012XII
Brand: Velodyne Pages: 6

GO10SW
Brand: Paradigm Pages: 28
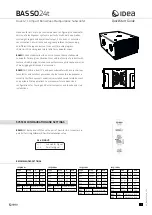
BASSO24t
Brand: Idea Pages: 4

S1510
Brand: Power Sound Audio Pages: 14

STEALTHBOX SB-VW-NB/10W3
Brand: Stealthbox Pages: 3
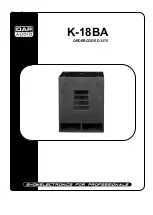
K-18BA
Brand: DAPAudio Pages: 14

I 400
Brand: Hama Pages: 13

BASSPRO
Brand: JBL Pages: 10

HiMaxX100Sa
Brand: Fbt Pages: 12

SBEV40SUB
Brand: Haier Pages: 29

WDX12 3KD2
Brand: DB Drive Pages: 4


