

Assembly Instructions
TT-Base Folding Table
Trek
™
, Datalink
®
Multipurpose, Barron
®
& Portico
™
July 2013
Assemble units as described herein only. To do otherwise
may result in instability. All screws, nuts and bolts must be
tightened securely and must be checked periodically after
assembly. Failure to assemble properly, or to secure parts
may result in assembly failure and personal injury.
The instructions below
illustrate the assembly of both the
lightweight folding base (Figure 1)
and the short fold base (Figure 2).
The item that is required to make
the base a short-fold base is the
short-fold adapter plate (Figure 2).
It is only on one base of each pair.
The adaptor plate allows the folded
leg to be clamped shut while
overlapping the opposite leg.
1. Place the table top upside down
onto a soft protective surface.
2. Locate the four pre-drilled holes
at each end of the table. Align the
holes of each TT-base with the pre-
drilled holes in the table. The folded
legs of the bases must be
positioned toward the center of the
table. If installation requires a
short-fold TT-base
the
short-fold leg must be positioned
over the standard leg.
3. Secure the bases to the table
with four #14 x 1" wood screws
provided.
4. Screw two leveling glides into
the threads at the bottom of each
leg.
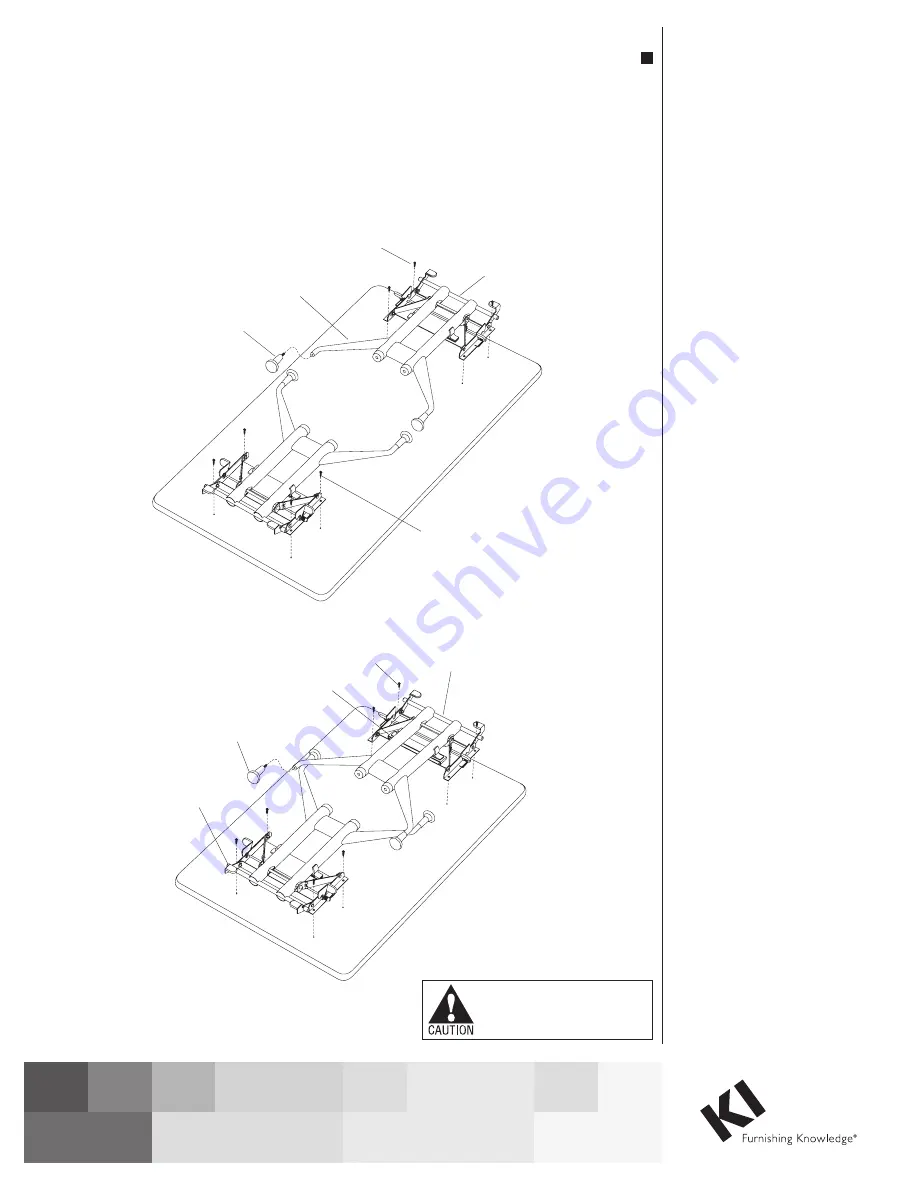
Note:
(Figure 2),
#14 x 1"
screw
short-fold
TT-base
short-fold
adapter plate
standard
TT-base
leveling
glide
table top
Figure 1
Figure 2
leveling
glide
vertical leg
wireway
leg
#14 x 1"
wood screw
TT-base
Tools Required
• Phillips Screwdriver
Hardware Included
• (8) #14 x 1” Wood Screws
• (4) Glides
Note:
The instructions below
illustrate the assembly of both the
folding TT-base (Figure 1) and the
short-fold TT-base (Figure 2).
The item that is required to make
the base a short-fold base is the
short-fold adapter plate (Figure 2).
It is only on one base of each pair.
The adapter plate allows the folded
leg to be clamped shut while
overlapping the opposite leg.
1. Place the table top upside down
onto a soft protective surface
(Figure 1).
2. Locate the four pre-drilled holes
at each end of the table. Align
the holes of each base with the
pre-drilled holes in the table.
The folded legs of the bases must
be positioned toward the center of
the table (Figure 1). If installation
requires a short-fold base
(Figure 2), the short-fold leg must
be positioned over the standard leg.
3. Secure the bases to the table
with four #14 x 1” wood screws
provided, not to exceed 60 in/lbs of
torque (Figures 1 & 2).
4. Screw two leveling glides into the
threads at the bottom of each leg
(Figures 1 & 2).


