OBE-1-BA-e-1510
KERN & Sohn GmbH
Ziegelei 1
D-72336 Balingen
E-mail: [email protected]
Tel: +49-[0]7433- 9933-0
Fax: +49-[0]7433-9933-149
Internet: www.kern-sohn.com
User instructions
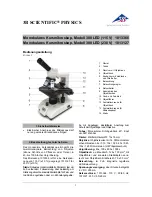
Compound laboratory
microscope
KERN OBE 111, OBE 112, OBE 113
Version 1.0
01/2015