AUTO-FEED PORTABLE Wi-Fi SCANNER
User Manual
1 List of accessory
USB cable, Scanner, Software CD, User Manual, 6 x AA batteries, Pouch.
2 Warnings for safety use
Please do the operation according to below safety rules in case of any hurt:
● Be away from fi re or hot device ● Please do not use an incorrect power supply
● Be away from water ● Please do not mix the using of batteries
● Be away from dust or dirty ● Please do not break the USB cable
● Do not disassemble the scanner ● Please do not painting
● Do not knock the product ● Disposals of abnormal case
● Please use the required Micro SD card ● Safety Storage
● Be away from such environment with strong electromagnetic ● Please do not insert or take out the Micro SD card when the scanner
interference is working, or it may cause some defects on Micro SD card
3 Product Information
This is a kind of Auto-Feed Portable Wi-Fi Scanner, it work as an automatic feeding scanner when use with docking station. Via
DIRECTSCAN Pro apps, it can scan & Wi-Fi transfer the image to mobile devices directly (iOS & Android).
With batteries & Micro SD card, it can work without PC. When work with PC, it is no need for Micro SD card & batteries. DIRECTSCAN
software included and it provides these functions of Picture Direct, OCR Direct, BCR Direct, Scan and OCR.
In this way, it can input these pictures into your needed software and do the OCR conveniently.
It can be previewing after you completed scanning. It is also very convenient to carry and you can use it to scan almost anything. It can be
connected to iPad & Android tablets to load scanned pictures directly.
4 Product Specifi cations:
Product Size(LxWxH)
285 mm x 50 mm x 43 mm
Weight
350g
Color type
CIS (Contact image sensor)
Resolution
300DPI (default) , 600DPI , 1200DPI
Scanning speed
A4 length: 1200DPI with color: ≤ 8s 1200DPI with mono: ≤ 5s
600DPI with color: ≤ 5s 600DPI with mono: ≤ 5s
300DPI with color: ≤ 5s 300DPI with mono: ≤ 5s
Scan width
216mm
Scan length
300DPI: ≤ 1200mm 600DPI: ≤ 1200mm 1200DPI: ≤1200mm
External memory card
Micro SD card (TF Card) up to 32GB
Output fi le format
JPEG / PDF
Display Panel
1.45” Color LCD (480*320)
Focus range
Contact, ±0.3mm
USB Port
USB 2.0 high Speed
Power source
6 x AA batteries or USB
USB mass storage
Windows XP / Win7 / Vista or above Mac 10.4 or above
Wi-Fi
802.11b/g/n
CD software System
requirement
Operation System: Windows XP / Win7 / Vista or above
CPU: Pentium III or above
RAM: At least 256MB
CD ROM: 4x speed CD ROM or above
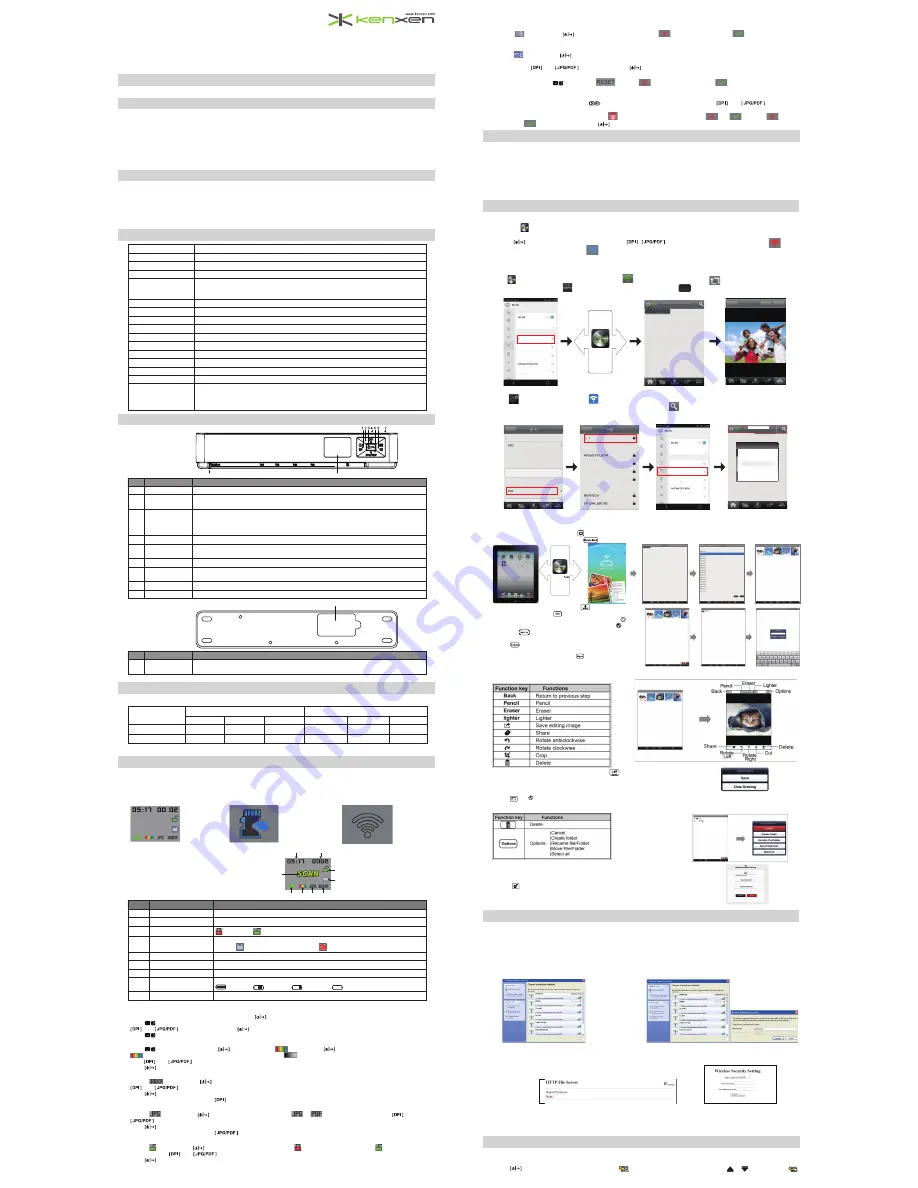
5 Introduction on appearance
5.1 Front View
No.
Name
Function / Description
1
Enter
Preview the scanning image
2
Up / Resolution
In menu mode, Upward function
In main interface, Resolution selection
3
Power/Scan
Power on / Power Off / Menu
Power off mode, press this button for 2 second to turn on
Power on mode, press this button for 2 second to turn off
Power on mode, you can also press this button shortly to start or end scanning
4
SD Card Slot
The place to insert Micro SD card
5
Down / File format
In menu mode, Downward function
In main interface, File format selection
6
Menu
Enter into menu, this button is to confi rm the function on the menu
7
USB Port
When plug in USB cable and connect with PC, it can scan and input directly.
It also can use USB cable to provide 5V power supply and it is no need to load batteries.
8
Adjustable Plate
To fi x scanning document width
9
TFT Screen
Show all the working status
5.2 Bottom View
No.
Name
Function / Description
1
Battery Cover
You can load 6xAA batteries after opening. Scanner cannot recharge these batteries itself and you
need to take out for recharging if applicable.
6. Introduction on Micro SD card capacity
Below is the store capacity for 2GB card based on A4 standard paper side:
2GB Micro
SD Card
JPG
300Dpi
600Dpi
1200Dpi
300Dpi
600Dpi
1200Dpi
Color
1600
600
120
1600
600
120
Mono
2000
800
120
2000
800
120
Remark:
the quantity may vary due to different fi le color, size or content and the above information just for reference.
7. Introduction on TFT Display
When you switch on the scanner powered When you switch on the scanner powered by USB cable,
by batteries, you can use Micro SD mode to scan / Wi-Fi mode you can choose PC / Micro SD mode to scan / Wi-Fi mode
● Main Menu, scan and save ● Micro SD mode, scan & save ● Wi-Fi mode, working with
into Micro SD into TF card DIRECTSCAN Pro apps
7.1 Introduction on TFT Display
Right is the image for the TFT display:
NO.
Name
Description
1
Time
Show setting time( hour: minutes: seconds)
2
Scanning QTY
Show the scanning QTY saved in the Micro SD card
3
Encryption Select
Encrypting
Not Encrypting
4
Micro SD Card Status
To indicate Micro SD card status: 1. No signal means no Micro SD card insert.
2. Signal
means Micro SD insert. 3. Signal
means Micro SD card is full.
5
Resolution
Resolution level
6
Format Select
Scanned fi le format
7
Color format
scanning image is mono or color
8
Battery Status
To indicate the battery status:
Full power.
Half power.
Little power.
Almost use up.
9
Status Display
Showing scanning or connecting the PC
7.2 How to set Menu
Load scanner with Micro SD card & batteries and press “
” for 2s to start.
Press “
” button to enter and you can set color, resolution, fi le format, encrypted / not encrypted, format, time and reset here. Press
“
” or “
” to choose menu, press “
” to enter the submenu option and press again to confi rm after selecting.
Press “
”
button to exit menu or pause about 5 seconds to return to main interface.
7.2.1 Color setting
Press “
” button to start and press “
” to enter. Choose “
” menu, press “
” and enter color option:
“
” show color mode, the scanned image will be colorized one; “
” show mono mode, the scanned image will be black & white,
press “
” or “
” to choose.
Press “
” button to exit the submenu.
7.2.2 Resolution setting
Choose “
” menu, press “
” button and enter the resolution option: 300dpi, 600dpi and 1200dpi can be chosen, press
“
” or “
” to select.
Press “
” button to exit the submenu.
During standby status, you can press “
” to select resolution directly
7.2.3 File format setting
Choose “
” menu, press “
” button and enter fi le format option:
or
format can be chosen, Press “
” or
“
” to select.
Press “
” button to exit the submenu.
During standby status, you can press “
” to select fi le format directly
7.2.4 File encryption setting
Choose “
” menu, press “
” button to enter fi le encryption option: “
” show scanned fi le encrypted, “
” show scanned fi le not
encrypted, press “
” or “
” to select.
Press “
” button to exit the submenu.
Remark: 1. File locking or unlocking can only work after Micro SD card formatting;
2. The fi le can be read only if you put the Micro SD card into scanner and connect to computer.
7.2.5 Formatting setting
Note: after formatting, all the data in the Micro SD card will be lost, please make sure before formatting
Choose “
” menu, press “
” button to enter formatting option: “
” indicate not formatting, “
” indicate formatting the
Micro SD card.
7.2.6 Time setting
Choose “
” menu, press “
” button to enter time setting.
When YEAR/MONTH/DAY/HOUR/MINUTE shows on the right upper part of the TFT display, you can set the YEAR/MONTH/DAY/HOUR/
MINUTE, press “
” or “
” to adjust and press “
” button to confi rm and enter the next time setting.
7.2.7 RESET setting
Under Wi-Fi mode, press “
” button into “
” select: “
” stands for not formatting, “
” stands for formatting Micro SD
card.
7.2.8 Previewing and deleting picture
During the standby status, you can press “
” button to preview the scanned image and press “
” or “
” to view whole
images.
If you need to delete any document, you can press “
” button to enter and there will appear “
” & “
” option,: “
” indicate
not deleting, “
” indicate deleting. Press “
” button to confi rm.
8 Introduction on connecting with Tablets
8.1 Connect to iPad to read SD card
1. Switch on the scanner.
2. Connect the scanner to the iPad by USB cable & *iPad connection kit.
3.The saved pictures in the SD card will be displayed automatically.
8.2 Connect to Android Tablets to read SD card
1. Switch on the scanner.
2. Connect the scanner to Tablet via USB cable.
3. DCIM folder will show on the screen, double click to enter the folder for loading pictures.
9. Operations for DIRECTSCAN APP
9.1 Download APP
Download “
” DIRECTSCAN app from App Store (iOS) or Play Store (Android) and setup.
9.2 How to connect scanner Wi-Fi
1.Press “
” button and switch on scanner. Then press “
/
” button to select Wi-Fi mode, red Wi-Fi sign “
” on the
screen will be fl ashing and Wi-Fi sign “
” will turn into blue in 30 seconds. Now, Wi-Fi mode starts;
2.Switch on Wi-Fi setting on your mobile device and search scanner Wi-Fi account, as “(DIRECTSCAN – XXXXXXX), then type password to
connect (Default password: 12345678);
9.3 Wi-Fi Direct
Click “
” DIRECTSCAN app to start, green Wi-Fi sign “
” means Wi-Fi connected, press “
” button can view all the documents
saved in Micro SD card, press “
” button to enter Wi-Fi Direct operation, press “
” button to start scanning and the scanned image
can transfer to mobile devices directly. After scanning, you can save or do own editing.
Back
Save
Edit
Synchronize
Connection Status
DIRECTSCAN-xxxxxxxx
DIRECTSCAN Apps
ONE-123
TWO-234
DIRECTSCAN-xxxxxxxx
More...
NETWORK
Connecting...
THREE-345
9.4 Wi-Fi Repeat
press “
” button to enter Wi-Fi setting “
” interface and choose a A/P Router Wi-Fi, input password and connect. Then go to mobile
device Wi-Fi setting interface and connect the selected A/P Router Wi-Fi. Click “
” button the scanner Wi-Fi ID will show on the interface
to connect. Now, both scanner & mobile device connect to A/P router Wi-Fi and you can download the scanning image via Wi-Fi & share
saving images to others synchronically.
X
DIRECTSCAN-xxxxxxxx
Back
Back
Required
New Password
Confirm Password
Required
SELECTING WI-FI...
OK
PEPEATER INTERFACE
Connection Status
ONE-123
TWO-234
DIRECTSCAN-xxxxxxxx
More...
NETWORK
Connecting...
THREE-345
DIRECTSCAN-xxxxxxxx
ONE-123
ONE-123
TWO-234
THREE-345
HJKDJAK-001
DAEFVZC-GEST
DIRECTSCAN-xxxxxxxx
App interface App interface Mobile device interface App interface
9.5 Download & save pictures
1. Use DIRECTSCAN APP.
2. Open DIRECTSCAN APP and click
to connect.
3. Select you needed pictures and touch
to download.
4. the downloaded images will be listed
,select the image for
editing directly. Pressing
,you can make relevant editing on
the selected images, such as delete, remove etc. Click
to
select image and the selected image will be showing
. Then
Pressing
button and save image to your target location.
5. Click
to create new folder and name.
6. Select your target folder and press
button to save.
9.6 Editing picture
1. Select the pictures for editing.
2. Save editing image After editing completed, press
to save
image.
9.7 Modify remove folder
1. Click
and
to select the picture & folder and click
for modifi cation or removing.
9.8 Wireless Security Setting
1. Switch Mode Button on the scanner to setting mode(Left).
2. Press
button and it will show the interface of Wireless Security Setting
as below image.
Then you can set SSID & Password here.
10 Computer modify SSID & Password
10.1 Turn on scanner and switch the button to Wireless Lan mode
1. Turn on scanner and switch the button to Wireless Lan mode;
open “Wireless Network Connection” at your PC and then press
“Refresh network list”.
3. Open the explorer to type 10.10.1.1 and switch the button to Wireless Lan setting mode after connecting. Press the Settings menu on the
left top of page to enter and submit the setting after modify the SSID & password. The newly SSID & password will take effect when you
resume the scanner.
Remark: Password should be 8 numbers.
11 Introduction on connecting with PC
11.1 Scanning to Micro SD card
Insert Micro SD card and plug in USB cable (no need for batteries).
Press “
” button about 2 seconds, power on, then
blinking in the lower part of the TFT, press
or
quickly to shift to
it
1
3
4
8
9
7
6
5
2
8
9
1
Scan
DIRECTSCAN
2. After refreshing, Wireless Lan “magic scan-XXXXXXXX” will
turn up and the last 8 numbers are the same as the last 8
number of MAC Address on your scanner. Double click the
Wireless Lan and press the default password “
12345678
”
to connect.
DIRECTSCAN
WSF01