background image

Instructions for use -  Installation advice

GAS COOKER with 

ELECTRIC DOUBLE OVEN

CK 240

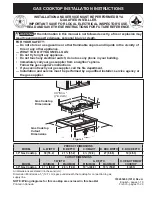
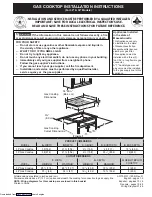
Summary of Contents for CK 240

Page 1: ...Instructions for use Installation advice GAS COOKER with ELECTRIC DOUBLE OVEN CK 240 ...

Page 2: ...2 ...

Page 3: ...ection 26 30 Electrical section 31 32 Guarantee 33 After Sales Service 34 Read the instructions carefully before installing and using the appliance CAUTION this appIiance must only be installed in a permanently ventilated room in compliance with the applicable regulations This cooker has been designed constructed and marketed in compliance with safety requirements of EEC Directive Gas 90 396 safet...

Page 4: ...dangerous The manufacturer declines all responsibility in the event of damage caused by improper incorrect or illogical use of the appliance IMPORTANT INFORMATION FOR CORRECT DISPOSAL OF THE PRODUCT IN ACCORDANCE WITH EC DIRECTIVE 2002 96 EC At the end of its working life the product must not be disposed of as urban waste It must be taken to a special local authority differentiated waste collectio...

Page 5: ...d if the appliance is used within a non domestic environment i e a semi commercial commercial or communal environment USEFUL HINTS After removing the appliance from its packing make sure of its integrity In case of doubt please contact your supplier or a qualified engineer The packing materials plastic bags polyfoam nails metal strips etc must not be left around in easy reach of children as they m...

Page 6: ...ppliances are supplied with a protective film on steel and aluminium parts This film must be removed before using the appliance WARNING When correctly installed your product meets all safety requirements laid down for this type of product catego ry However special care should be taken around the rear or the under neath of the appliance as these areas are not designed or intended to be touched and ...

Page 7: ...7 1 COOKING HOB COOKING HOB 1 Auxiliary burner A 1 00 kW 2 Semi rapid burner SR 1 75 kW 3 Triple ring burner TC 3 50 kW Fig 1 1 Fig 1 1 2 2 3 1 ...

Page 8: ...ectronic clock end cooking timer main oven only Pilot lamps 11 Main oven temperature light 12 Conventional oven temperature light 2 CONTROL PANEL Fig 2 1 8 5 4 3 2 1 7 6 11 12 Please note This appliance incorporates a safety cooling fan which you will hear operat ing whenever the oven or grill are in use This fan may continue to run for several minutes after the appliance has been switched off Thi...

Page 9: ...iquids whereas the minimum set ting allows slower warming of food or maintaining simmering conditions of liq uids Other intermediate operating can be achieved by positioning the control knob indicator between the maximum and minimum setting but not between the maximum and off positions LIGHTING THE BURNERS To ignite the burner 1 Lightly press and turn the knob anti clockwise and position the knob ...

Page 10: ...ner that is most suitable for the diameter and capacity of the pan to be used As an indication the burners and the pans must be used in the following way BURNERS POT DIAMETER Auxiliary 12 14 cm Semi rapid 16 24 cm Triple ring 26 28 cm do not use pans with concave or convex bases fig 3 3 It is important that the base diameter of the pot is at least the same diameter as the burner ring to obtain an ...

Page 11: ...d be placed directly onto the pan support When using a WOK always place the supplied stand in position over the burner to main tain the correct operation of the triple ring burner Fig 3 4a 3 4b IMPORTANT The special grille for wok pans fig 3 4b MUST BE PLACED ONLY over the pan rest for the triple ring burner ...

Page 12: ...e advised to run the oven at maximum temperature temperature knob set to 250 C for approximately one hour in the mode and for another 15 minutes in the mode in order to eliminate any traces of grease from the heating ele ments OPERATING PRINCIPLES Heating and cooking in the conventional oven are obtained a by natural convection The heat is produced by the upper and lower heating elements b by radi...

Page 13: ...ng the foods to be cooked Recommended for For foods which require the same cooking temperature both internally and externally i e roasts spare ribs meringue etc GRILLING The infra red heating element is switched on The heat is diffused by radiation Use with the oven door closed and the temperature knob to 175 C Note It is recommended that you do not grill for longer than 30 minutes at any one time...

Page 14: ...has been opened the oven quickly regains its temperature once the door is closed Attention the oven door becomes very hot during operation Keep children away 5 BOTTOM MAIN OVEN SWITCH AND TEMPERATURE SELECTOR Turn the selector knob fig 5 1 to the required function OFF as per fig 5 1 The oven light is switched on The fan operates without the heating element this function can be used for defrosting ...

Page 15: ...mins ROAST MEATS Beef medium joint 190 5 20 25 mins lb 20mins Lamb 190 5 25 30mins lb 25mins Pork 190 5 30mins lb 30mins Chicken 190 5 20 25mins lb 30mins Turkey 180 4 15 20mins lb 20mins Stews Casseroles 170 3 11 2 2hours Temperature and times given are approximate as they will vary depending on the quality and amount of food being cooked Remember to use ovenproof dishes and to adjust the oven te...

Page 16: ... button Attention If the bottom oven is switched on when the buzzer starts it will be automatically switched off For it to operate further you have to stop the buzzer by pressing the button SETTING THE FREQUENCY OF THE ALARM SOUND 3 possible sounds can be selected by pressing the button Fig 7 1 COOKING WITH AUTOMATIC SWITCH OFF Main oven only This function automatically stops the cooking after a p...

Page 17: ...The oven with smooth enamel must be cleaned after every use using a suitable product Remember that operating the oven for 30 minutes on the highest temperature will eliminate most grime and grease It is mandatory not to use abrasive sub stances The cooktop becomes very hot while in operation Keep children away STAINLESS STEEL SURFACES COATED The stainless steel front panels on this cooker facia ov...

Page 18: ...oved and washed with soapy water only They will remain always perfect if cleaned with products used for silver ware After cleaning or wash check that burn er caps and burner heads are dry before placing them in the respective hous ings It is very important to check that the burner flame distributor and the cap has been correctly positioned failure to do so can cause serious problems Note To avoid ...

Page 19: ...URNER The triple ring burner must be correctly positioned see fig 8 3 the burner rib must be enter in their logement as shown by the arrow The burner correctly positioned must not rotate fig 8 4 Then position the cap A and the ring B fig 8 4 8 5 ...

Page 20: ...es the shelf and the tray etc Figure 8 8 The shelf must be fitted so that the safety catch which stops it sliding out faces the inside of the oven To eliminate traces of grease from the heating elements switch on the ovens to the maximum temperature Dismantle in reverse order Fig 8 6 Fig 8 7 Fig 8 8 OVEN DOOR The internal glass of the oven door can be easily removed for cleaning by unscrewing the ...

Page 21: ...eping it in this position slowly close the door in order to block the hinge Grip the door as indicated in fig 8 11 and while closing it release the two hinges as shown in fig 8 12 DOOR ASSEMBLY Grip the door with your hands placed near the hinges and raise the levers H with your forefingers fig 8 12 Insert the hinges in their position until levers H are hooked Open the door completely to obtain th...

Page 22: ... fig 8 13A Attach the retaining rings to the hooks on the left and right hinges fig 8 13B Hold the door as shown in fig 8 13 Gently close the door and withdraw the lower hinge pins from their location fig 8 13C Withdraw the upper hinge pins from their location fig 8 13D Rest the door on a soft surface To replace the door repeat the above steps in reverse order ...

Page 23: ...re to observe this rule will invalidate the warranty The electrical mains outlet if located behind the cooker must not be higher than 18 cm above the floor level Some appliances are supplied with a protective film on steel and aluminium parts This film must be removed before using the cooker USABLE lit 35 USABLE lit 57 600 930 600 Advice for the installer ...

Page 24: ...an the gas hob cooktop a gap of at least 50 mm must be left between the side of the cooker and the furniture The cooker may be located in a kitchen a kitchen diner or bed sitting room but not in a room containing a bath or shower Curtains must not be fitted immediatly behind appliance or within 500 mm of the sides The cooker is equipped with 4 levelling feet which must be fitted to the base of the...

Page 25: ...ises the per manent opening shall be an air vent If there are other fuel burning appliances in the same room BS 5540 Part 2 1989 should be consulted to determine the requisite air vent requirements If the cooker is installed in a cellar or basement it is advisable to provide an air vent of effective area 100 cm2 irrespective of the room volume If the room or internal space containing these applian...

Page 26: ...lation of the cooker to Natural Gas or LP Gas must be carried out by a qualified gas engineer Installers shall take due account of the provisions of the relevant British Standards Code of Practice the Gas Safety Regulations and the Building Standards Scotland Consolidation Regulations issued by the Scottish Development Department INSTALLATION TO NATURAL GAS Installation to Natural Gas must conform...

Page 27: ...ected to corrosion by acidic cleansing agents The hose should also be connected in such away that it does not touch the floor NB Gas hoses designed for natural gas MUST NOT be used for supplying LPG gas LPG gas hoses can be identified by a either a red band or stripe on the rubber outer coating of the hose To avoid damage to the appliance gas rail inlet pipe the fittings should be tightened using ...

Page 28: ...s of millimetre Select the injectors to be replaced according to the Table for the choice of the injectors page 30 To replace the injectors Remove the gratings the burner and the covers Using a wrench substitute the nozzle injectors J Fig 10 4a 10 4b with those most suitable for the kind of gas for which it is to be used The burners are conceived in such a way so as not to require the regulation o...

Page 29: ...off the knob With a small flat screwdriver turn the screw inside the tap rod to the correct regulation fig 10 5 Normally for LPG tighten up the regu lation screw Fig 10 5 Flame Flame Flame faulty in correct with excess primary air primary air long yellow clear short and sharp and interior blue too blue interior trembling cone cone tending to detach CAUSE air regulating correct air regulating tube ...

Page 30: ...al factory parts The manufacturer declines any liability resulting from the non compliance of this obligation TABLE FOR THE CHOICE OF THE INJECTORS Cat II 2H3 INCREASE OF AIR NECESSARY FOR GAS COMBUSTION 2 m3 h x kW BURNERS Air necessary for combustion m3 h Auxiliary A 2 00 Semi rapid SR 3 50 Triple ring 7 00 G 30 28 30 mbar G 20 BURNERS G 31 37 mbar 20 mbar Auxiliary A 1 00 0 30 27 50 72 X Semi r...

Page 31: ... switch with minimum open ing between the contacts of 3 mm between the appliance and the mains The power supply cable must not touch the hot parts and must be posi tioned so that it does not exceed 75 C at any point Once the appliance has been installed the switch or socket must always be accessible IMPORTANT The cooker must be installed in accordance with the manufacturer s instructions Incorrect...

Page 32: ...simultaneusly 4 68 kW Connecting the mains cable Remove the two screws securing the cover plate A behind the cooker Remove the screw C from the cable clamp Insert the mains cable type H05RR F of minimum 2 5 mm2 section into the cable protector P Connect the phase and earth cables to the mains terminal connection block B EARTH N NEUTRAL L LIVE Refit the cable clamp so that it clamps the outer sleev...

Page 33: ... not misused neglected or damaged it it has not been modified it is not second hand it has not been used commercially you have not fitted a plug incorrectly and you supply your receipt to show when you brought it The appliance has been installed as per the instructions contained within this booklet This guarantee does not affect your statutory rights GUARANTEE ...

Page 34: ...t considering the characteristics of the models described here at any time and without notice to make eventual necessary modifications for their construction or for commercial needs Ser Nr If you require After Sales Service contact the MASTERCARE Domestic Appliance Helpline Telephone 08701 565550 AFTER SALES SERVICE ...

Page 35: ...35 ...

Page 36: ...code 1102199 ß6 Part Number 55158 ...

Reviews: