manualshive.com logo in svg
background image

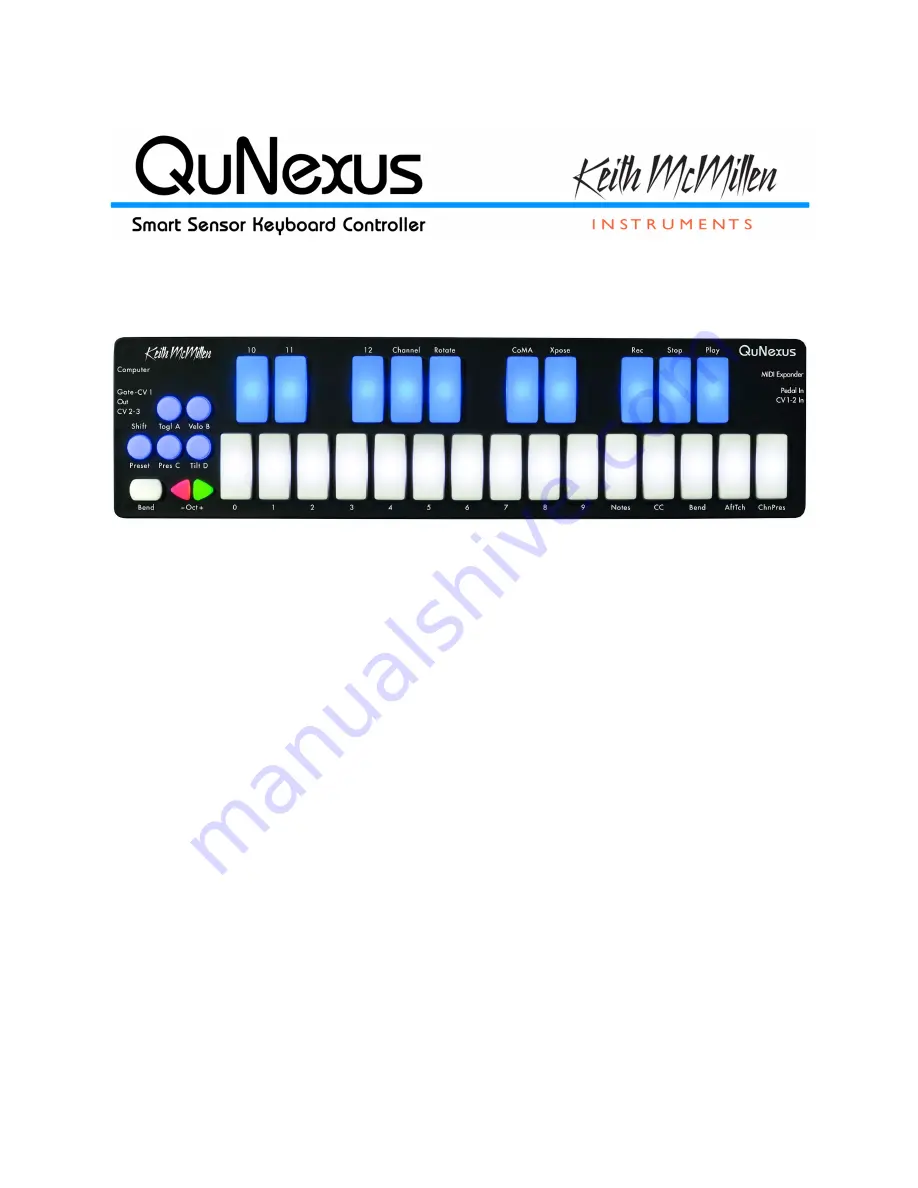
QuNexus Reference Manual

QuNexus Version 1.1.1
July, 2013

Keith McMillen, Conner Lacy, Nick Wang, Evan Adams, Jimmy Allison, Jasmin Blasco, Diane 
Douglas, Tom Ferguson, Steven Fruhwirth, Paul Gaeta, Ingmar Gorman, Christian Heilman, 
Matthew Hettich, Sarah Howe, William Leach, Daniel McAnulty, Jon Short, Carson Whitley, and 
Steve Wright

1

Содержание QuNexus

Страница 1: ...th McMillen Conner Lacy Nick Wang Evan Adams Jimmy Allison Jasmin Blasco Diane Douglas Tom Ferguson Steven Fruhwirth Paul Gaeta Ingmar Gorman Christian Heilman Matthew Hettich Sarah Howe William Leach...

Страница 2: ...the inability to use this product or its documentation even if the possibility of such damage is known Product and brand names contained in this document are used for identification purposes only Kei...

Страница 3: ...Side Buttons 2 3 1 The Oct Buttons 2 3 2 The Bend Pad 2 3 3 The Shift Preset Button 2 3 3 1 Selecting Presets 2 3 4 Togl A Velo B Pres C Tilt D 2 4 Data Sources and Sensor Output 2 4 1 Factory Presets...

Страница 4: ...Connection 4 2 CV Trouble 4 2 1 Steps to Convert MIDI to CV 4 2 2 Audible High Pitched Noise in Computer Audio when using CV 4 2 3 QuNexus LEDs Light Up Erratically When Receiving CV 4 3 Firmware Trou...

Страница 5: ...tage technology Plug into your computer iPad Apple Camera Connector required or Android tablet via USB Control hardware via 5 PIN MIDI MIDI Expander required or control your modular synthesizers with...

Страница 6: ...345 g There are no user serviceable parts inside QuNexus Attempts to open the enclosure will void the warranty 2 1 Connecting QuNexus Connect QuNexus to a computer This image shows QuNexus set up to...

Страница 7: ...pander 2 Use a USB A to Micro cable to connect the QuNexus micro port to a USB port on a computer QuNexus will receive power from the computer 3 Connect the MIDI Out on the Expander to the MIDI In on...

Страница 8: ...a Computer steps See the CV chapter for more information 2 2 Input Output Routing QuNexus can output USB Control Voltage and MIDI using a KMI MIDI Expander sold separately Each of these data types ca...

Страница 9: ...communication with other devices Port 2 is used for the KMI MIDI Expander sold separately and Port 3 is used for CV A computer or iPad can control the QuNexus LEDs by sending MIDI data into the QuNexu...

Страница 10: ...us can communicate with synthesizers or other CV devices using Control Voltages Connect QuNexus to CV devices using a cable that is compatible with your CV device s CV ports Using adapters if needed m...

Страница 11: ...pression pedal QuNexus CV In is uni polar If you send it a bi polar signal half of the signal will be clipped and can cause malfunctions in extreme cases Sending a signal above 5 Volts is also unsuppo...

Страница 12: ...Expression Pedals Not all Expression Pedals work well Some are noisier than others Yamaha Pedals are known to misbehave because they don t function as a voltage divider We recommend the Roland EV 5 2...

Страница 13: ...lpful for splitting the second CV output into CV2 and CV3 2 2 3 3 CV Data Output By default QuNexus sends different data out the 4 CV outputs Gate Note ons and offs Note ons are expressed as 5 volts C...

Страница 14: ...olar signal half of the signal will be clipped and can cause malfunctions in extreme cases Sending a signal above 5 Volts is also unsupported You can convert a bi polar 10V signal to a uni polar 5V si...

Страница 15: ...on and Sustainer Inputs It is possible to create a TRRS cable wired so that you can use two Expression or Sustainer pedals with QuNexus Though we do not provide these you can make them using the schem...

Страница 16: ...originating from the MIDI Device or USB the CV outputs by default are set up to convert data from specific MIDI messages coming from the Keyboard USB Port 3 and the MIDI Expander Below is a list of w...

Страница 17: ...s and software use different note number to note name conversions Below is a chart that will help convert note numbers to note names and vice versa The Octave buttons will increment or decrement the Q...

Страница 18: ...hapter and the Live Edit Mode Chapter for more information about adjusting the Bend Range 2 3 3 The Shift Preset Button The Shift Preset Button shown to the right is used for 2 different purposes to g...

Страница 19: ...Factory Presets all use Toggle For information about how to set Toggle Mode to use Legato see the Toggle section in the QuNexus Editor Chapter Togl A is off by Default Hold Togl A for 1 sec to turn T...

Страница 20: ...ff anything assigned to the pressure source in Keyboard Layer with this button Pres C is on by Default Hold Pres C for 1 sec to turn Pressure Off Tilt D Turn on and off anything assigned to the tilt s...

Страница 21: ...e QuNexus keys By default this requires an intentional pressure shift tilt of your finger to engage bend Expression Pedal When an expression pedal is plugged into the CV input of QuNexus the expressio...

Страница 22: ...t B Press and Tilt The Press and Tilt preset was designed for a wide variety of synths apps and plugins with pitch bend and modulation functionality This preset maps QuNexus key tilt to pitch bend and...

Страница 23: ...eset was designed for playing drum sounds samples and launching clips in Ableton Live This preset is most useful when paired with our Ableton Live MIDI Remote script but will also work well with any s...

Страница 24: ...utton to exit CoMA Mode and go back to playing QuNexus normally CoMA will work differently depending on whether Channel Rotation is turned on To check whether or not Channel Rotation is on after perfo...

Страница 25: ...ing the next key 5 You can switch sources just by tapping the button for the next source you want to map see step 1 and repeat Controller Layer 1 After entering CoMA Mode hold the Togl A button for 1...

Страница 26: ...ons to switch octaves if necessary for note mapping a All keys in Keyboard Layer have the same CC s for Pressure or Tilt so all you need to do is press the source button to output the MIDI message 5 T...

Страница 27: ...ny Live Edits will affect Keyboard Layer only not Controller Layer An illegal entry will just kick you out of Live Edit Mode but any legal entries made prior to that will be kept To enter Live Edit Mo...

Страница 28: ...above 12 in Live Edit Mode are displayed with a solid LED in the tens place and a blinking LED in the ones place i Example A If 16 the LED on key 1 will be solid and the 6 key will blink ii Example B...

Страница 29: ...ou don t have to hit a key button first The current Preset s Program Change Number will be displayed when you first enter Live Edit Mode Use the Oct buttons to increment or decrement to the desired Pr...

Страница 30: ...0MB free hard disk space WINDOWS Windows XP Windows 7 8 Intel Core 2 processor or greater 1GB of RAM with 50MB free hard disk space 3 2 Installing the Software For those who wish to customize QuNexus...

Страница 31: ...tible an update prompt will appear Click ok and wait until the blue Shift button light stops flashing The blue light and progress bar on screen indicate that the firmware update is in progress An Upda...

Страница 32: ...Threshold Off Threshold and Tilt Sensitivity for the QuNexus keys Controls for saving and recalling presets are found on the right side of the window There are tabs for editing Keyboard Layer Control...

Страница 33: ...king the Save As button You can name it and it will be added to the bottom of the Library To send any of the Presets in the Library down to the QuNexus click on the Preset in the Library and use the b...

Страница 34: ...peggiator track selection mute and solo shown in blue The other keys shown in white can be used for playing melodies These keys also use Pressure to control modulation and tilt to control pitch bend T...

Страница 35: ...her key and paste by going to Paste Controller Sensor You can also use the items within the Copy Paste Layer submenu to copy and paste entire layers to other Presets Select a Preset and use the menu o...

Страница 36: ...can adjust the Sensitivity On and Off Thresholds and the Tilt Sensitivity These are global for the entire keyboard but can be set differently for each preset Sensitivity controls how easy it is to ge...

Страница 37: ...the slider up to make the key more sensitive or down to make it less sensitive Adjustments made here are added to the sensitivity setting in the main window So adjustments can be made in both places a...

Страница 38: ...tions Gain Offset Curve Min and Max if you wish to or leave them the same if you don t wish to alter the MIDI output values 4 Select what MIDI output you wish to use in the final column USB the MIDI E...

Страница 39: ...a mixer channel 3 8 2 Sources Key Velocity for notes only The value between 0 and 127 that represents the overall pressure on the QuNexus keys at the moment a note on or finger on is detected Sensitiv...

Страница 40: ...Menu See the View Edit Tables chapter below for more information on setting the User Tables Min and Max These allow the value to be constrained between a minimum and a maximum number If the min is set...

Страница 41: ...t corner If you select Custom 1 or Custom 2 the tables become editable When the table is editable the line will turn green as shown in the image to the right You will be able to click the buttons alon...

Страница 42: ...annel on the fly using Live Edit Mode See the Live Edit Mode chapter for more information 3 8 6 Channel Rotation Channel Rotation is a feature that causes the order of keys pressed at one time to rota...

Страница 43: ...1 second to turn Toggle or Legato mode on and off All the Factory Presets initialize with Toggle off and do not use Legato mode If you are using a custom preset the Togl A button s blue state will ind...

Страница 44: ...the Selecting Presets chapter for more information Program Changes can be useful for changing presets on a synth 3 8 11 Bend Range Here you can set the Range of semitones for Pitch Bend This should a...

Страница 45: ...der Then look below the image at the Sensor Settings Tip CV Layer does not convert MIDI Messages from Controller Layer 3 9 1 Sensor Settings Here you can decide what to enable for the highlighted Key...

Страница 46: ...e on and Pitch Bend set to Tilt in Keyboard Layer and have all 4 sources on in Controller Layer then that Key will send out 2 notes Channel Pressure Pitch Bend and CC values for an additional Pressure...

Страница 47: ...Controller Layer turn the Toggle On Off check box on and set the Toggle CC Toggle CC Value and Toggle CC Return parameters Toggle CC This is where you choose which CC number will toggle Toggle CC Val...

Страница 48: ...egato box if this is checked the gate output will not iterate an off state between notes You can set the Pitch Scaling Scheme in the box to the left of the Gate Legato box You can set this to 1 Volt p...

Страница 49: ...for a device connected to the MIDI Expander follow these steps 1 Choose the row for CV 1 or CV 2 2 Select the MIDI Channel to convert the CV to 3 Select the CC to convert the CV to 4 Use the math mod...

Страница 50: ...ons submit a support request http www keithmcmillen com support outlining the problems you re experiencing The more detailed you are in describing your problem information about your computer the soft...

Страница 51: ...le section for some more info 4 2 CV Trouble If you are having trouble working with QuNexus CV outputs and inputs this chapter should help Make sure to read the main CV chapter above as well for even...

Страница 52: ...black one for CV2 5 Plug the Stereo end of the y cable into the Gate CV 1 port or the CV 2 3 port 6 Plug the 2 MONO ends into the CV destinations on your CV device a If plugged into the Gate CV 1 por...

Страница 53: ...your CV device is connected to speakers headphones Scenario 4 QuNexus plugged into the Computer With MIDI Expander Use Case This is a good way to play CV with QuNexus a different hardware MIDI device...

Страница 54: ...ware 1 Plug QuNexus into the Computer 2 Open the Audio MIDI software you wish to convert CV to MIDI with like Ableton Live 3 Check Ableton s MIDI Preferences to make sure QuNexus Port 1 and Port 3 are...

Страница 55: ...IDI Expander into the MIDI Input on your MIDI Device 4 Open the Audio MIDI software you wish to convert CV to MIDI with like Ableton Live 5 Check Ableton s MIDI Preferences to make sure QuNexus Port 1...

Страница 56: ...es any LED feedback on QuNexus 3 Make sure to have a hot loud signal coming out of the laptop so you don t have to put a lot of gain on it and then if you need to you can reduce the signal later The b...

Страница 57: ...you are having trouble with your QuNexus Firmware are experiencing odd behavior after an update or just want to know more about firmware then this is the chapter for you 4 3 1 QuNexus Doesn t Do Anyth...

Страница 58: ...othing else ever happens it just kind of hangs there It will seem like the only thing that can be done is to cancel the firmware update and try again Causes Why this problem happens is more of a myste...

Страница 59: ...ust the QuNexus plugged in then open up the QuNexus Editor and see if that helps Once the firmware has updated you can plug everything back in If you have multiple devices plugged in you might want to...

Страница 60: ...which are essentially just special MIDI messages If you send other MIDI messages while the SysEx message is being transmitted things can get confused and go awry You won t hurt your QuNexus if you do...

Страница 61: ...indow opens navigate to the firmware file generally named to the effect of QuNexus_Firmware_1 0 0 syx and hit Open 5 Repeat the previous step but navigate to the Enter Bootloader sysex file typically...

Страница 62: ...d enter_bootloader syx and click Open 6 Click the Send Sysex button the blue shift button on your QuNexus should light up solid Your QuNexus is now in bootloader mode and ready to receive firmware 7 M...

Страница 63: ...ior to using QuNexus Explosive Atmospheres Do not use QuNexus in any area with a potentially explosive atmosphere such as at a fueling area or in areas where the air contains chemicals or particles su...

Отзывы: