Summary of Contents for R1
Page 1: ...Car Camera User Guide ...
Page 16: ......
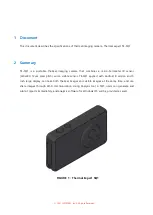
The Pioneer R1 is a cutting-edge gadget designed to revolutionize your daily tasks. With its sleek design and user-friendly interface, this device is perfect for tech enthusiasts. Enhance your experience with a comprehensive Instruction Manual, available for free download from manualshive.com. Unleash the full potential of your Pioneer R1 today!
Page 1: ...Car Camera User Guide ...
Page 16: ......