JVC Network Pack SA-DV6000, User Manual
The JVC Network Pack SA-DV6000 is a versatile multimedia system that offers various features for an immersive entertainment experience. Enhance your understanding of its functionalities and settings by downloading the comprehensive User Manual, available for free on manualshive.com. Maximize your enjoyment with this must-have manual!
Share
Download


Reviews:
No comments
Related manuals for Network Pack SA-DV6000

8820
Brand: Paradyne Pages: 86

Express Ethernetwork DI-704P
Brand: D-Link Pages: 2

QMiroPlus-201W
Brand: QNAP Pages: 20

LightSpeed Appliance QLS250
Brand: Quantum Pages: 12
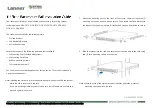
NCA-2510
Brand: Lanner Pages: 2

ADSL/ADSL2/ADSL2+ Router 660R-6xC Series
Brand: ZyXEL Communications Pages: 282

Hotwire 6341
Brand: Paradyne Pages: 23

Vigor 2760 Series
Brand: Draytek Pages: 54

IPQoS
Brand: Speedtouch Pages: 124

SW-UNM-24FE2GC-24POE
Brand: Morrell Pages: 8

iWSN-200E
Brand: ICP DAS USA Pages: 8

UniFi WiFi BaseStation XG
Brand: Ubiquiti Pages: 19

Emotron OSTO 100
Brand: CG Pages: 112

HL-002-006
Brand: 8e6 Technologies Pages: 94

A 1475
Brand: METREL Pages: 21

ONU5100-B22
Brand: ZyXEL Communications Pages: 2

GS1900 Series
Brand: ZyXEL Communications Pages: 263

900B
Brand: N-Tron Pages: 21


