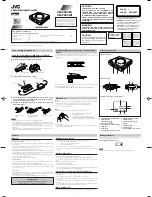
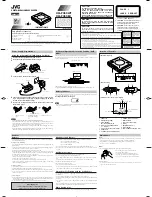
background image

For model:

HR-XVC21UJ

DVD/CD PLAYER

Hi-Fi STEREO

VIDEO CASSETTE

RECORDER

USER'S GUIDE

LPT0872-001A

For Customer Use:

Model No.
Serial No.

Enter below the Model No. and Serial No. which are located on the rear of cabinet. 
Retain this information for future reference.

 2C50801AE Cover

7/10/03, 10:37

1

Summary of Contents for HR-XVC21UJ

Page 1: ...REO VIDEO CASSETTE RECORDER USER S GUIDE LPT0872 001A For Customer Use Model No Serial No Enter below the Model No and Serial No which are located on the rear of cabinet Retain this information for future reference 2C50801AE Cover 7 10 03 10 37 1 ...

Page 2: ...e AC outlet Dangerous voltage inside Refer internal servicing to qualified service personnel To prevent electric shock or fire hazard remove the power cord from the AC outlet prior to connecting or disconnecting any signal lead or aerial Changes or modifications not approved by JVC could void user s authority to operate the equipment CAUTION A DVD VCR IS A CLASS 1 LASER PRODUCT HOWEVER THIS DVD VC...

Page 3: ...cur keep the DVD VCR s power turned on for a few hours to let the moisture dry How to use the Remote Before use insert two AAA size batteries into the Remote with the polarity and matched correctly as indicated on the battery compartment or on the lid Point the Remote toward the remote sensor on the target component The maximum operating distance of the remote control is about 5 m NOTE If the Remo...

Page 4: ... Optical or Coaxial When a component with a built in Dolby Digital decoder is connected Dolby Digital sound can produce the effect of being in a movie theater or a concert hall Surround standard different from Dolby Digital This format is already in use in many theaters By connecting this unit to a DTS decoder or an AV amplifier with a built in DTS decoder the DTS audio of DVD discs recorded in th...

Page 5: ...cassette tape 24 Setting up the VCR section Disc 35 Setting setup language 36 Playback procedure 37 Special playback 38 Zooming 39 Locating desired scene 39 Repeat playback 40 Program playback CD 41 Random playback CD 41 MP3 WMA JPEG playback 42 Setting the JPEG Interval 44 Setting the Select Files 45 Zooming JPEG CD 46 Changing angles JPEG CD 46 Marking desired scenes 47 Changing soundtrack langu...

Page 6: ... indicator VCR DVD mode selector button Cassette Loading Slot REW Rewind button REC button DVD indicator AC power cord DVD VCR common AUDIO L R VIDEO OUT jacks S VIDEO COMPONENT Video selector switch DVD COAXIAL DIGITAL AUDIO OUT jack RF IN jack DVD OPTICAL DIGITAL AUDIO OUT jack DVD S VIDEO OUT jack DVD COMPONENT OUT jacks RF OUT jack DVD AUDIO L R OUT jacks 2C50801AE 02 09 7 10 03 10 37 6 ...

Page 7: ...On Screen Symbol DVD Display 8 9 10 11 VCR DVD CD PM 10 00 01 00 2 C036 L TRK REC CH02 Playback lights Auto resume flashes Still picture DVD disc is inserted CD is inserted Display for afternoon lights out in the morning Clock display colon flashes Counter display by hour minute at VCR DVD by minute second at CD Track number display for CD TV channel display for VCR CATV channel display External i...

Page 8: ...n 38 43 INDEX Search for the INDEX mark of a tape 27 TV VCR CH Select channel of the connected TV or VCR 8 28 30 34 Cursor buttons SET Setting buttons 31 32 Manual tracking buttons in playback mode 26 Cursor buttons To move Up in the VCR menu you press the To move Down in the VCR menu you press the ENTER Enter information in the menu SELECT Select option in the menu SET UP MENU Display menu of set...

Page 9: ...batteries may cause damage to the device To avoid a potential short circuit insert the end first 3 Do not mix different types of batteries together e g Alkaline and Carbon zinc or old batteries with fresh ones 4 If the device is not to be used for a long period of time remove the batteries to prevent damage or injury from possible battery leakage 5 Do not try to recharge batteries not intended to ...

Page 10: ...e your remote control s batteries PANASONIC has two codes If the TV does not function with one code try entering the other 3 First press TV POWER on the remote to see if the TV s power goes on as it should If it does try other operations The TV POWER TV CH TV VOL ENTER INPUT and Number keys on the remote can all be used to operate the TV For some brands of TV you must press ENTER after having pres...

Page 11: ...to VCR DVD Preparation Press one of the following buttons to enter the desired code then press ENTER 1 sets the remote control code to A 2 sets the remote control code to b 3 sets the remote control code to C 4 sets the remote control code to d 3 To turn off the unit press POWER on the front panel 4 Press PLAY on the front panel for 5 seconds The current setting code of the unit appears on the dis...

Page 12: ...V First disconnect the antenna from the TV and connect it to the DVD VCR Then connect the DVD VCR to the TV Below are 3 common methods of connecting an antenna system to a DVD VCR Find the type of antenna system you are using and follow the connection diagram If both VHF and UHF antennas have 300 ohm twin lead flat wires use a combiner having two 300 ohm inputs and one 75 ohm output NOTE Basic con...

Page 13: ...ohm UHFand 75 ohm VHF antenna inputs TV with 300 ohm UHF and 300 ohm VHF antenna inputs DVD VCR TO TV CONNECTION After you have connected the antenna to the DVD VCR you must connect the DVD VCR to the TV Below are 3 common methods of connecting your DVD VCR to a TV Find the type of TV you are using and follow the connection diagram This DVD VCR has a single 75 ohm output for connection to a TV If ...

Page 14: ...able timer Recording of one channel while watching another ALLOWS Recording of channels through the converter box scrambled and unscrambled Using the programmable timer to record only the channel selected at the converter box PREVENTS Recording one channel while watching another Using the DVD VCR tuner to select channels 1 2 DVD VCR Incoming Cable TV Converter Descrambler Incoming Cable TV Incomin...

Page 15: ...converter box PREVENTS Watching scrambled channels while recording another channel Using the DVD VCR tuner to select channels DVD VCR Splitter Converter Descrambler TV DVD VCR Converter Descrambler A B Switch TV Incoming Cable Splitter ALLOWS Recording of nonscrambled channels Recording of one channel while watching another Watching premium channels through the converter while recording nonscrambl...

Page 16: ...nent Video Output for DVD CD playback You can enjoy high picture quality by connecting the unit s COMPONENT VIDEO OUT jacks to the COMPONENT VIDEO IN jacks of your TV with the COMPONENT video cables not supplied NOTES When you connect to a TV with S video jack or component jacks set the S VIDEO COMPONENT Video selector switch to the desired position And also you must select the corresponding video...

Page 17: ...with an optical digital input connector which does not contain a Dolby Digital or DTS decoder Otherwise any attempt to play DVDs may cause such a high level of noise that it may be harmful to your ears and damage your speakers DTS audio will be output only from the COAXIAL or OPTICAL output To hear DTS audio DTS Decoder is necessary When playing DTS encoded CDs only noise will be heard from the sp...

Page 18: ...ur area The channel number will appear on the screen for about 4 seconds For a push button TV tuner If CH 3 or 4 corresponding to the video channel cannot be tuned on your TV proceed as follows set the VCR 3 4 channel selector and the TV to CH 3 or 4 play back a prerecorded tape and tune the TV to receive a sharp color picture from the video cassette recorder Refer to your TV owner s manual for de...

Page 19: ...en press ENTER Then press ENTER to select the TV or CATV mode The arrow indicates the selected mode 1 2 Press or to select the TV CATV option 4 Press SET UP MENU until the menu screen is cleared TV VHF UHF channels CATV CABLE TV channels 2 Setting channels automatically The VCR can receive a maximum of 181 channels by presetting the channels into memory Then press ENTER The auto tuning will start ...

Page 20: ...E BACKGROUND 1 2 Press ENTER to select the ON position Noise elimination You can add the channels you want or delete the channels you do not want manually When you don t want to receive a weak signal broadcast the Blue back screen can be obtained by selecting the NO NOISE BACKGROUND ON When the unit is shipped from the factory the NO NOISE BACKGROUND is set to the ON 3 Press SET UP MENU until the ...

Page 21: ...n The Auto Clock setting will be performed at 6 00 AM 12 00 PM and 6 00 PM everyday when the DVD VCR is turned off If you turn the DVD VCR on during Auto Clock setting the clock is not set With cable box connection if the Auto Clock Setting is unsuccessful please select the PBS channel carrying the XDS information then turn the DVD VCR off After 30 minutes turn the DVD VCR on and if the clock is n...

Page 22: ...O position When the clock is not set Daylight Saving Time setting is not available When there is no Daylight Saving Time in your area always select OFF position in step 2 NOTES Turn ON the TV When a TV is connected with an audio video cable select the video input mode on the TV When a TV is connected only with an antenna cable set to the video channel 3 or 4 Then select VCR position with TV VCR Ma...

Page 23: ...tarts functioning automatically To make corrections any time during the process Press CANCEL repeatedly until the item you want to change blinks then press or Turn ON the TV and set to the video input mode Make sure TV VCR DVD switch has been slided to VCR DVD Then press VCR to select the VCR mode The VCR indicator will light Preparation á Ð ENTER MENUñ MENU TIMER REC SET AUTO REPEAT ON OFF ON OFF...

Page 24: ...nd the erase prevention tab positioned at your left An inverted cassette tape cannot be inserted Erase prevention tab Automatic playback When loading a cassette tape without an erase prevention tab playback will start automatically Automatic power ON When you insert a cassette tape the VCR power will turn ON automatically Unloading 1 2 Use only video cassette tapes marked and T 160 T 120 T 90 T 60...

Page 25: ...ng press STOP To switch to playback directly without STOP press PLAY Forward Reverse picture search mode When the tape is being winded you can switch to picture search mode see next page To do this press REW or FF and hold it down The unit will resume the tape winding as soon as the button is released NOTES This VCR selects the playback tape speed SP or EP automatically The Cassette tape and DVD d...

Page 26: ...omatic tracking adjustment If automatic tracking cannot eliminate noises well during playback press SET to eliminate the noises MANUAL TR will appear Press it briefly for a fine adjustment or press and hold for a coarse adjustment Manual tracking adjustment Repeat playback The entire video tape will be played until its end The tape will then automatically rewind to the beginning and the playback w...

Page 27: ...ndex Search system This function enables you to locate the beginning of any recording made on the VCR Recording an INDEX MARK The Index Search function automatically records an INDEX mark on the tape whenever a recording is initiated INDEX NO up to 9 or is displayed Index Search Press INDEX or during stop or play mode For Succeeding programs Press INDEX For Preceding programs Press INDEX Additiona...

Page 28: ...when both the REC and PLAY are pressed for recording If you wish to watch the DVD playback during the normal recording on VCR press DVD to change to DVD mode and perform the DVD playback see page 37 Turn ON the TV and set it to the video input mode Make sure TV VCR DVD switch has been slided to VCR DVD Then press VCR to select the VCR mode The VCR indicator will light Preparation 00 00 00 SP CH 11...

Page 29: ...TR and TIMER REC It will also eject the tape While the VCR is recording press TV VCR to select the TV position The VCR will go off and recording will continue Select the TV channel you want to watch by using the TV channel selector If the connected TV is JVC s use TV CH after slide TV VCR DVD switch to TV Recording one program while watching another NOTE Some CATV hookups do not permit viewing one...

Page 30: ...nutes Press REC on the VCR or while holding REC press PLAY on the Remote to begin recording Press REC on the VCR again to stop recording after 30 minutes Each additional press of REC will increase recording time as shown in the chart below up to a maximum of 6 hours The ITR and recording time will appear on the screen for about 4 seconds And REC will keep blinking in the display Press STOP or turn...

Page 31: ...EJECT to remove the cassette tape During timer recording standby mode the VCR mode cannot be selected To use the VCR press TIMER at first then press VCR to change to VCR mode After you use the VCR press TIMER again to put the VCR into timer recording standby mode If you press TIMER during timer recording the recording operation will be interrupted If you press TIMER againwithintheprogrammedtime th...

Page 32: ...ode Then press ENTER repeatedly until the á Ð ENTER CANCEL MENUñ DATE START END CH ÐÐÐÐÐÐ Ð ÐÐ Ð ÐÐ ÐÐÐ Ð ÐÐ Ð ÐÐ ÐÐÐ ÐÐÐÐÐÐ Ð ÐÐ Ð ÐÐ ÐÐÐ ÐÐÐÐÐÐ Ð ÐÐ Ð ÐÐ ÐÐÐ ÐÐÐÐÐÐ Ð ÐÐ Ð ÐÐ ÐÐÐ ÐÐÐÐÐÐ Ð ÐÐ Ð ÐÐ ÐÐÐ ÐÐÐÐÐÐ Ð ÐÐ Ð ÐÐ ÐÐÐ ÐÐÐÐÐÐ Ð ÐÐ Ð ÐÐ ÐÐÐ Ð Ð Ð Ð Ð Ð Ð Ð WKL WE If the timer has been activated press TIMER to deactivate the timer The clock symbol will disappear Then press VCR to change to VCR m...

Page 33: ...position if the stereo broadcast or videotape audio is of poor quality The R and L positions allow the audio from the Right or Left Hi Fi channel to be heard over both TV speakers This button has no effect when viewing a MONO videotape or TV program Each time when you press the button OUTPUT SELECTION display appears on the screen for several seconds Refer to the chart below Output selection OUTPU...

Page 34: ...O L IN To AUDIO L OUT AUDIO VIDEO cable supplied Playback VCR To VIDEO OUT To AUDIO R OUT Recording VCR To VIDEO IN To AUDIO R IN AUDIO VIDEO cable not supplied To AUDIO R IN To AUDIO L IN To VIDEO IN Recording VCR To AV Jack Playback Camcorder Connection with second VCR Connection with Camcorder Duplicating a video tape You can record disc material in DVD Video CD Audio CD etc onto a video tape w...

Page 35: ...e Do not wipe the disc round Do not use liquid or aerosol cleaners CHAPTER 1 TITLE1 TITLE2 DVD DISC CHAPTER 2 CHAPTER 2 CHAPTER 3 CHAPTER 1 TRACK 1 TRACK 2 TRACK 3 TRACK 4 TRACK 5 CD Video CD Audio CD The following types of discs can be played on this unit Disc type and logo mark Recorded content Disc size DVD Video Video CD Audio CD CD R CD RW Audio Video Audio CD DA JPEG MP3 WMA file 5 inches 12...

Page 36: ...RETURN If the DVD VCR does not operate properly Static electricity etc may affect the player s operation Disconnect the AC power cord once then connect it again 3 Press ENTER to select OSD Language Then press or to select Other Language Other Enter Setup Return Picture Parental Sound 1 Press DVD to select the DVD mode The DVD indicator will light Reading andthen NoDisc will appear on the screen If...

Page 37: ...isc In this case check your disc again see pages 35 and 50 Some discs may take a minute or so to start playback A Prohibition symbol may appear at the upper left of the screen This symbol means either the feature you tried is not available on the disc or the DVD VCR can not access the feature at this time This does not indicate a problem with the DVD VCR When you set a single faced disc label down...

Page 38: ... the slow x1 2 x1 4 x1 6 x1 7 Slow motion Playback To resume normal playback press PLAY Locating a chapter or track The unit is capable of holding a still video image or On screen display image on your television screen indefinitely If you leave the still video image or On screen display image displayed on your TV for an ex tended period of time you risk permanent damage to your television screen ...

Page 39: ... time recorded on the disc to locate the desired point to play back Press Number keys to change the number If you input a wrong number press CANCEL Refer to the package supplied with the disc to check the numbers 1 Press SEARCH MODE during playback or stop mode 3 Locating desired scene Press ENTER Playback starts 4 When you change the title playback starts from Chapter 1 of the selected title Some...

Page 40: ...The start point is selected 2 Press REPEAT A B again The end point is selected Playback starts at the point that you selected Playback stops at the end point returns to Point A automatically then starts again A B Repeat Playback CD 2 Press ENTER once or twice to select Chapter or Title In case of CD at first press to select Repeat and then press ENTER once or twice to select Track or All DVD Play ...

Page 41: ... Enter 0 9 Cancel Play Mode Clear Program Playback 2 3 5 8 11 3 11 6 9 12 1 7 4 7 10 Repeat Off Play Mode Program Enter 0 9 Cancel Play Mode Turn ON the TV and set it to the video input mode Make sure TV VCR DVD switch has been slided to VCR DVD Then press DVD to select the DVD mode The DVD indicator will light Preparation 1 Press PLAY MODE in the stop mode Random playback Play Mode Off Repeat Off...

Page 42: ...002 3 Refrain from making too many sub folders CAUTION Some MP3 WMA JPEG CDs can not be played back depending on the recording conditions The CD R RW that has no music data or non MP3 WMA JPEG files can not be played back 6 Press STOP to end playback The unit records the stopped point appears on the screen Press PLAY to resume playback from the scene point If you press STOP again or unload the dis...

Page 43: ...t steps 4 5 NOTE The picture menu is displayed when the FUJICOLOR CD or the Kodak Picture CD are played To display the file menu press TITLE 5 Press ENTER The selected picture appears on the TV screen Reading About file menu 1 36 2 3 4 5 Pic 1 CD R Pic 2 Pic 3 Pic 4 Pic 5 8 9 10 11 12 Pic 8 Pic 9 Pic 10 Pic 11 Pic 12 6 Pic 6 13 Pic 13 7 Pic 7 14 Pic 14 Collection 0 9 Enter Play Mode DVD Menu Opera...

Page 44: ...elect your desired time 1 2 3 Press or to select JPEG Interval To make SETUP screen disappear press SET UP MENU 4 Off Plays back one file at a time 5 Seconds Plays back images in the form of a slide show at 5 second intervals 10 Seconds Plays back images in the form of a slide show at 10 second intervals 15 Seconds Plays back images in the form of a slide show in 15 second intervals Tv Screen Disp...

Page 45: ...e 1 2 3 Press or to select Select Files To make SETUP screen disappear press SET UP MENU 4 All Displays all files Music Only Displays only MP3 WMA files Pictures Only Displays only JPEG files When playing back a CD containing a mixture of MP3 WMA and JPEG files only MP3 WMA or JPEG files can be displayed on the file menu Tv Screen Display On JPEG Interval Select Files Enter Setup Return Language P...

Page 46: ...to the right Changing angles You can display JPEG images rotating at 90 degree intervals 1 2 Press ANGLE repeatedly until the desired angle is selected Pressing ANGLE four times returns the image to its original angle Images are displayed at the same angle until the disc is removed Zooming Changing angles JPEG CD Preparation Turn ON the TV and set it to the video input mode Make sure TV VCR DVD sw...

Page 47: ...ng operation The marking is canceled when you open the disc tray or turn the power off Some subtitles recorded around the marker may fail to appear 1 Press MARKER To cancel the mark 2 Press to select the Marker 1 3 3 Press CANCEL To remove this display press MARKER Marker 2 Marker 1 Marker 3 Enter Cancel Marker Marker 2 Marker 1 Marker 3 Enter Cancel Marker 27 00 54 Marker 2 Marker 1 Marker 3 Ente...

Page 48: ...feature is used during playback of Dolby Digital multi channel recorded DVD KARAOKE discs This feature allows you to turn off vocal audio tracks or restore them for background accompaniment When playing Karaoke connect appropriate audio equipment such as an amplifier to the DVD VCR Karaoke playback When playing back a DVD KARAOKE disc you can turn the vocal on or off 1 Press A MONITOR during DVD K...

Page 49: ...s the language is not recorded on the disc Changing soundtrack or subtitle language is cancelled when you open the disc tray The initial default lan guage or available language will be heard and seen if the disc is played back again Depending on the DVD you may be unable to turn on turn off or change the subtitles even if they are recorded on the disc While playing the DVD the subtitle may change ...

Page 50: ...rental Other Sound Language Password Parental Picture Parental Other 8 0 9 Cancel Enter Setup Return Sound Password Parental 1 0 9 Cancel Enter Setup Return Language Picture Parental Other Sound 5 To make SETUP screen disappear press SET UP MENU 1 Select Password step 1 and press Number keys to input your 4 digit password Then press ENTER To unlock the Parental Control Setting 2 If the input passw...

Page 51: ...ur disc exceeds the parental control level 1 e g screen will then appear 3 Enter the password with Number buttons 0 9 Then press ENTER 4 Playback will commence if the entered password was correct 5 NOTE This temporary cancellation of rating level will be kept until the disc is ejected When the disc is ejected the original rating level will be set again automatically Depending on the DVD disc the d...

Page 52: ...ected language is the first priority Menu language Press ENTER Then press or to select Menu 4 You can select the language of the disc menu messages of DVDs Turn ON the TV and set to the video input mode Make sure TV VCR DVD switch has been slided to VCR DVD Then press DVD to select the DVD mode The DVD indicator will light Preparation Press SET UP MENU in the stop mode Press or to select Language ...

Page 53: ...een disappear press SET UP MENU 4 NOTE If the selected language is not recorded on the disc the first priority language is selected The same subtitle language can always be selected even if you replace the disc or turn the power off Press ENTER Then press or to select Subtitle The unit will automatically select the same language in the AUDIO setting When the unit selects the same language as the A...

Page 54: ...er the language code See the Language code list on page 58 Original The unit will select the first priority language of each disc Press ENTER Then press or to select Audio Menu Subtitle Audio English Automatic English Francais English Espanol Other Original Enter Setup Return Language Picture Parental Other Sound Turn ON the TV and set to the video input mode Make sure TV VCR DVD switch has been s...

Page 55: ...ventional TV When playing back a wide screen DVD disc it displays the wide picture with black bands at the top and bottom of screen 4 3 Pan scan It displays the wide picture on the whole screen with left and right edges automatically cut off 16 9 Wide Select this mode when connecting to a wide screen TV A wide screen picture is displayed full size Press ENTER then press or to select Tv Screen You ...

Page 56: ...video input mode Make sure TV VCR DVD switch has been slided to VCR DVD Then press DVD to select the DVD mode The DVD indicator will light Preparation Press SET UP MENU in the stop mode Press or to select Picture 00 34 56 01 12 33 1 9 Title 1 99 1 8 1 32 Chapter 1 999 EngDolby Digital Eng Video CD 34 56 71 33 Track 11 99 00 12 04 32 Track Ð Ð PBC To make status display disappear press OSD again En...

Page 57: ...to control the dynamic range so as to achieve a suitable sound for your equipment Max Full dynamic range is increased Std Full dynamic range is maintained Min Dynamic range is reduced Press or ENTER to select DRC NOTES This function works only during playback of Dolby Digital recorded discs The level of Dynamic Range Reduction may differ depending on DVD video disc Turn ON the TV and set to the vi...

Page 58: ...la 1224 Hebrew 1933 Nepali 2415 Telugu 3015 Bhutani 1436 Hindi 1819 Norwegian 2425 Thai 3018 Bihari 1218 Hungarian 1831 Oriya 2528 Tibetan 1225 Breton 1228 Icelandic 1929 Panjabi 2611 Tigrinya 3019 Bulgarian 1217 Indonesian 1924 Pashto Pushto 2629 Tonga 3025 Burmese 2335 Interlingua 1911 Persian 1611 Turkish 3028 Byelorussian 1215 Irish 1711 Polish 2622 Turkmen 3021 Cambodian 2123 Italian 1930 Por...

Page 59: ...ternal mode No sound Check the unit is connected correctly Check the input selector of the amplifier is set properly The unit is in the Special playback mode 12 15 18 12 17 12 17 26 38 Select proper language in the menu options Display is not shown in your language 36 Playback doesn t start No disc is inserted The disc may be dirty Clean up the disc The unit cannot play DVD ROMs etc 37 35 35 No CA...

Page 60: ... Picture Snowy Picture Auto Clock Setting The XDS signals are carried only by certain broadcast television stations for example the signal is carried by most Public Broadcasting Service stations You must be able to receive a station carrying the XDS signal to use the Auto Clock Setting to set your DVD VCR s internal clock If you live in an area that does not broadcast XDS signals you must set the ...

Page 61: ...ohm UHF VHF IN OUT 75 ohm coaxial 20 Hz to 20 000 Hz More than 90 dB 4 Rotary Heads Hi Fi Sound 2 Tracks MONO Sound 1 Track 181 Channel Freq Synthesized VHF 2 13 UHF 14 69 CATV 14 36 A W 37 59 AA WW 60 85 AAA ZZZ 86 94 86 94 95 99 A 5 A 1 100 125 100 125 01 5A Channel 3 or 4 Switchable Approx 1 minute 48 seconds with T 120 Cassette Tape at 25 C NTSC DVD 12 cm 8 cm CD 12 cm 8 cm DVD 4 Hz 22 kHz CD ...

Page 62: ...62 Memo 2C50801AE 56 Back 7 10 03 10 39 62 ...

Page 63: ...63 Memo 2C50801AE 56 Back 7 10 03 10 39 63 ...

Page 64: ...64 J2C50801A 03 07 U VICTOR COMPANY OF JAPAN LIMITED Printed in Thailand 0703 AH OR OR 2C50801AE 56 Back 7 10 03 10 39 64 ...

Reviews: