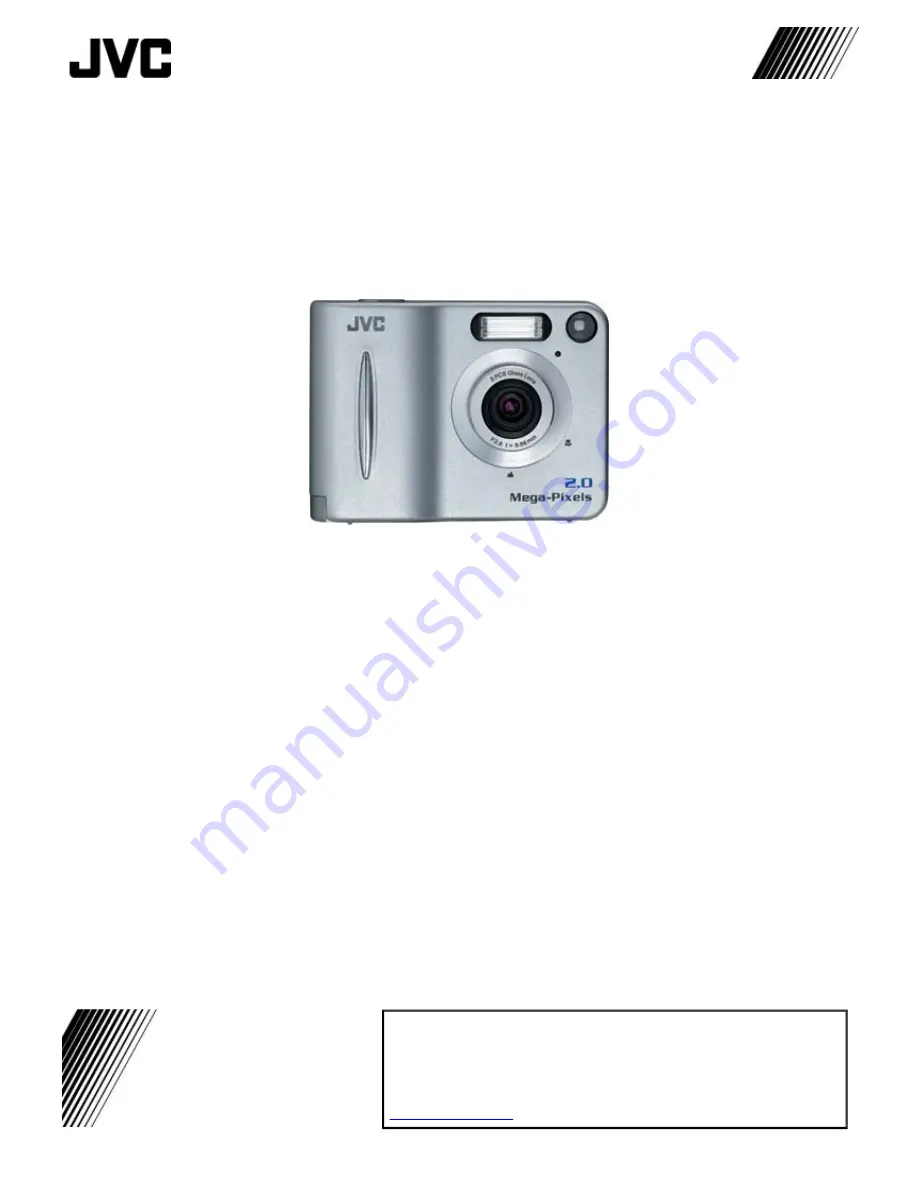
background image


Digital Camera  

GC-A70 

INSTRUCTIONS 

LNT0011-001A

Thank you for purchasing this JVC product. Before beginning to operate this 
unit, please read the instruction manual carefully in order to make sure that the 
best possible performance is obtained. If you have any question, consult your 
JVC dealer. 

To HomePage of JVC


Summary of Contents for GC-A70

Page 1: ...you for purchasing this JVC product Before beginning to operate this unit please read the instruction manual carefully in order to make sure that the best possible performance is obtained If you have any question consult your JVC dealer To HomePage of JVC ...

Page 2: ...ent switched on when it is unattended unless it is specifically stated that it is designed for unattended operation or has a standby mode Switch off using the switch on the equipment and make sure that your family know how to do this Special arrangements may need to be made for infirm or handicapped people DON T use equipment such as personal stereos or radios so that you are distracted from the r...

Page 3: ...nterference will not occur in a particular installation If this equipment does cause harmful interference to radio or television reception which can be determined by turning the equipment off and on the user is encouraged to try to correct the interference by one or more of the following measures z Reorient or relocate the receiving antenna z Increase the separation between the equipment and recei...

Page 4: ...n the literature accompanying the appliance CAUTIONS About moisture condensation You may have observed that pouring a cold liquid into a glass will cause drops of water to form on the glass outer surface This same phenomenon occurs on the lens of the camera when it is moved from a cool place to a warm place after heating a cold room under extremely humid conditions or in a place directly subjected...

Page 5: ... memory card bears the SD or Multimedia Card mark z Make sure the memory card is positioned properly when inserting z While the memory card is being accessed during recording playback deletion formatting etc never unload the memory card or turn off the digital camera z Store memory cards away from heaters or other heat sources out of direct sunlight where they will not be subject to unnecessary sh...

Page 6: ...you actually start to accustom yourself to the camera z We cannot bear any responsibility for an inability to shoot record or play back material normally in the event of a problem with this camera z We shall not be liable for any incidental consequential or exemplary damage loss of profits or any demand made by any third party due to your use of this product or the provided software z Store backup...

Page 7: ...it you can z Take digital pictures video clips in an instant Easily capture digital images and download them to your computer z Videoconference on the Internet Keep in touch with distant family and friends See and talk with people on the Internet face to face z Send captured images with your e mail messages ...

Page 8: ...package If any item is missing please enquire at your nearest JVC authorized dealer Notes z Microsoft and Windows are either registered trademarks or trademarks of Microsoft Corporation in the United States and or other countries z Other trademarks are the properties of their respective owners ...

Page 9: ... USB Port z Minimum RAM 32 MB Windows XP 128 MB z 250 MB of available hard disk space z Color display 800x600 or better z CD ROM drive Notes z Microsoft and Windows are either registered trademarks or trademarks of Microsoft Corporation in the United States and or other countries z Other trademarks are the properties of their respective owners ...

Page 10: ...e A Digital Still Camera usable as a movie camera Video Clip AVI w o Sound or Webcam as well as a Multi Digital Camera Built in Digital Memory Equipped with built in 8 MB flash memory that retain images even in the absence of a power supply and SD MMC compatible memory slot the number of images can be increase simply by adding memory card Power Supply Supplied by easily purchased AA size alkaline ...

Page 11: ...utton OK ZOOM button Strap holder Normal Macro switch dial RESOLUTION Quality Left button MENU button POWER button Self Timer Down button Flash mode Right button DISPLAY Up button LCD monitor MODE button Viewfinder Status indicator Self Timer lamp Tripod socket USB Port Cover USB port Battery Memory Card compartment door ...

Page 12: ...cator appears as shown above the batteries are weak and need to be replaced Attaching the Hand Strap or Neck Strap Always use the provided hand strap or neck strap when carrying the camera Please note that the company cannot be held responsible for any accidental drop of the camera due to improper use of the hand strap or neck strap To attach the strap to your camera 1 Slide the Battery Memory car...

Page 13: ... the camera is on do not open the battery cover to replace the memory card or batteries as this may cause irrecoverable corruption of card data z The memory card is a sensitive device so it should not be subject to any shock Do not touch the metal part of the card with your hand z When the memory card is write protected it cannot be used A message WRITE PROTECT will appear on the LCD monitor You h...

Page 14: ...n the LCD monitor When the camera is in the Video Clip Mode the LCD monitor cannot be turned off either z When no operation is performed within a certain time interval user set value 1min 3min 5min 10min Cancel Default value 3min the camera will automatically turn off The LCD monitor is automatically activated when the power is switched on However since the LCD monitor consumes battery power fast ...

Page 15: ...MODE Shooting Basics Shooting Basics Play Basics Customized Shooting z Zooming z Using Flash z Using Self Timer z Setting the Image Resolution Quality Customized Shooting is not applicable to the Video Clip and Play Erase Mode Menu Settings z SETUP MENU z QUICK VIEW z EV WHITE BALANCE z SETUP MENU z EV WHITE BALANCE z SETUP MENU z SLIDE SHOW z ERASE z COPY TO CARD z DPOF ...

Page 16: ...le resolution 1280x960 Pixels Low resolution 640x480 Pixels 2 Memory Card Indicator Appears when SD Card is inserted Appears when MMC card is inserted No Indicate Will not be displayed when no memory card is being inserted Uses internal memory 3 Number Indicator Number of images that can be stored 4 Built in Flash Indicator The flash fires automatically according to the photography conditions is s...

Page 17: ... be displayed 2 0 2 0 It is not displayed at default value 0 8 White Balance Indicator Adjust the White Balance by EV White Balance setting and the adjusted value will be displayed It is not displayed at default value AUTO 9 Battery Indicator Battery Life 40 20 Battery Life 40 10 Battery Life 20 Battery Life 10 Status Led flash 5 sec and then power off 10 Macro Indicator It is displayed when the N...

Page 18: ...tions Hence a single shot may reduce the value by two or not change the value at all This is not a malfunction of the LCD monitor Also upon the camera being turned on memory adjustments are made and the indicated remaining value may actually be higher than when the camera was last turned off z When you take pictures in bright locations or in clear fine weather lines may appear on the monitor This ...

Page 19: ...your subject Then press the shutter button fully down For details see Shooting Basics 2 Using Flash The flash is designed to fire automatically when required Default setting Auto To suit the different conditions however you can change the flash mode Press the Flash mode button until the desired flash mode Auto Red Eye Reduction Off is indicated Procedures 1 Ensure that the camera is turned on 2 Se...

Page 20: ...in low light conditions Flash Off Used where the use of flash is prohibited or when utilizing the night view indoor lighting for shooting The flash mode can also be turned off when the distance to the subject is too far away for the flash to have any effect 3 Using Self Timer This unit includes 2 seconds and 10 seconds Self Timer function With the 10 seconds Self Timer function the photographer to...

Page 21: ...ber of storable images The following shows the approximate number of storable images based on 8 MB of available memory when the camera is first turned on as the image quality and resolution is varied Notes z The number of recordable images also varies with the subject and the capacity of the memory card z The number of remaining images that can be recorded shown on the LCD monitor will decrease by...

Page 22: ...ake pictures in Macro mode z Flash cannot be used during Macro function It automatically becomes Flash Off z Do not turn the Normal Macro switch dial unnecessarily It may become malfunction z Please take note not to touch the lens when turning the dial Normal Setting This is usually used when shooting It is in focus with the subject that is about 1 9 m away Macro Setting For shooting the subject a...

Page 23: ...g time changes in accordance with the images of the Video Clip taken LCD monitor status display Resolution Quality Indication on LCD monitor Initial Estimated available recording time 320x240 320 46 sec Video Clip mode Indicator Memory Card Indicator Resolution Quality Indicator Rec icon White Balance Indicator Battery Indicator Macro Indicator EV Level Indicator 1 Resolution Quality Indicator Vid...

Page 24: ...ss 5 EV Level Indicator Adjust the EV Level by EV White Balance setting and the adjusted value will be displayed 2 0 2 0 It is not displayed at default value 0 6 White Balance Indicator Adjust the White Balance by EV White Balance setting and the adjusted value will be displayed It is not displayed at default value AUTO 7 Battery Indicator Battery Life 40 20 Battery Life 40 10 Battery Life 20 Batt...

Page 25: ...o load the images from the memory to the LCD monitor for replay z Never open the Battery Memory Card compartment door when the status indicator is lit for this may cause damage z Please format new Memory cards with this camera before using them z In the Video Clip mode the following functions are not possible Voice sound recording Use of flash Self Timer Zoom Image Quality setting The Video Clip m...

Page 26: ...Erase mode with the MODE button 3 The latest captured image or the starting scene of the latest captured video clip will be displayed on the LCD monitor As you press the DISPLAY Up button the LCD screen changes as follows Still Image Image Info OFF DISPLAY Up button pressed Image Info ON DISPLAY Up button pressed Thumbnail display Video Clip Image Info ON Thumbnail display DISPLAY Up button presse...

Page 27: ...M button to stop playing Thumbnail display function During the Play Erase mode the captured still images video clips will be displayed on the LCD monitor Toggle the DISPLAY Up button until the thumbnail screen appears The user can select a thumbnail image using the buttons Upon pressing the OK ZOOM button the chosen image video clip will be displayed on the LCD screen in full size ...

Page 28: ...s you can perform various settings for your camera Procedures 1 Use the buttons to highlight the desired item 2 The setting of the item with options displayed at the bottom of the screen can be change by pressing button As for setting of the other items press OK ZOOM button to proceed 3 Press MENU button to return to the previous screen ...

Page 29: ...rect the setting The time setting can be change in steps of 1 minute by the button by pressing and holding the button for more than 5 seconds it can be change in steps of 30 minutes This is convenient when there is a significant change in value for time setting 4 When all settings are complete return to the MENU screen by pressing the OK ZOOM button Note z Please be sure to correct the date and ti...

Page 30: ...ry when copying into the PC thus preventing any accidental deletion AUTO POWER OFF ON Record the lost file number OFF Reset file number to DSC_0001 This will automatically turn off the camera after the lapse of a certain time interval set by the user during which no operation is performed LIGHT FREQUENCY Through this setting you are able to avoid image flicker due to the fluorescent light FACTORY ...

Page 31: ...ken After the preview this camera will return to the Camera mode The QUICK VIEW setting will be retained even after the camera is turned off Note z With QUICK VIEW set to ON the time interval before the next possible shooting will be prolong after the current shooting ON Enables QUICK VIEW OFF Disables QUICK VIEW ...

Page 32: ...EV at 0 5 EV steps White Balance As the intensity of the light changes our eyes adapt such that white objects will remain white Digital cameras can also see the white objects as being white by averaging out the light around the object You may select from the following settings After completing the setting press OK ZOOM button to end the setting The changed setting value except the default value EV...

Page 33: ......

Page 34: ...d pressing the OK ZOOM button will start the slide show Images hitherto captured will be displayed in sequence at intervals of the user set delay time 1 3 5 7 9 sec To interrupt the slide show press the OK ZOOM button The delay time setting will be retained even after the camera is turned off ...

Page 35: ...ear on the LCD monitor Pressing the OK ZOOM button will cause the selected still image video clip to be erased from memory To abort this action press the MENU button 2 ERASE ALL This will allow you to erase ALL recorded still images video clips in the memory at once Use the buttons to choose the YES or NO option and then press the OK ZOOM button to confirm Note If no still image video clip is stor...

Page 36: ...lips from the internal memory to the external memory card COPY Copies all captured still images video clips from the internal memory to the external memory card If a card has not been inserted in the camera the message NO CARD will be displayed on the LCD monitor CANCEL Cancel the operation ...

Page 37: ... when ONE BY ONE is selected and confirmed by pressing the OK ZOOM button Select the images by button and set the print quantity 0 9 by button Printing cannot be performed if the setting is 0 The default value is 0 After completing all image setting press OK ZOOM button to confirm and return to the Menu screen ALL 1 PCS Sets the print quantity of all the images in the memory to 1 PCS convenient fo...

Page 38: ...OM drive Note z Please connect the camera directly to the PC Camera performance is not guaranteed in the case that the camera is connected to the PC via a USB Hub Connecting the Camera to Your Computer For Windows 98 98SE users it is necessary to install the Mass Storage Driver contained in the supplied CD ROM before connecting the camera to the PC for image data download For Windows Me 2000 XP us...

Page 39: ...ally and the USB MODE screen appears on the LCD monitor as follows Select DISK DRIVE and press the OK ZOOM button 5 Your computer will recognize the camera as a newfound hardware Setup for this new hardware will proceed automatically This Setup process is performed only once and will not be necessary for subsequent connections When complete your camera will be indicated as a Removable Disk in your...

Page 40: ...ay a message screen as below In this case please click on Open folder to view files and proceed by clicking the OK button This screen is from Windows XP Downloading Pictures 1 Click on the My Computer icon on your PC screen You will then see a drive icon labeled Removable Disk ...

Page 41: ...t displayed your camera has not been properly connected to the computer In this case go to Connecting the Camera to Your Computer and repeat the procedures 3 Double click on the DCIM folder icon A new window with a JVCGC folder icon opens represents a number in the range of 100 999 Your recorded images will be in this folder ...

Page 42: ...files in the folder double click on the icon to reveal the files into your computer s hard drive or any other storage media available in your PC system Just select the folder or files and use the usual cut and paste functions available in the Edit menu This screen is from Windows XP ...

Page 43: ...ppear on the PC monitor as shown below Click on Webcam Driver Install 3 Follow the on screen instructions to complete the installation 4 Reboot your computer Using your camera as a USB PC camera with Microsoft Netmeeting or Windows Messenger 1 Make sure you have installed the WebCam Driver 2 Make sure that your camera is turned off Then connect the USB cable to the camera and your computer s USB p...

Page 44: ...mputer first before disconnecting the camera from it Notes z The PC camera Application software is not included in the CD ROM Use a commercially available videoconferencing software such as the above mentioned Microsoft Netmeeting or Windows Messenger For more information about video conferencing software please refer to the respective software s help functions z To videoconference over the Intern...

Page 45: ... the Video Clip or Play mode Set camera to Camera mode Flash is set to off Set to Auto Red eye Shooting in bright light situation The flash does not fire in bright light situation Possible Cause Rectifications The camera is held under bright sunlight Use your hand to cover the monitor from sunlight Alternatively use the viewfinder The LCD monitor is not activated Press the DISPLAY Up button to act...

Page 46: ...etting incorrect Set the White Balance according to the lighting condition Possible Cause Rectifications The lens is partially covered by fingers or the strap Remove obstructing fingers or strap from lens Shooting distance too close Use the LCD monitor and the zoom function Possible Cause Rectifications Camera movement during still image capture Press the shutter button down steadily The lens is d...

Page 47: ... the same token the number will decrease by more than 1 if the file size is too large 1600x1200 pixels Fine quality Approx 10 pcs 1600x1200 pixels Normal quality Approx 20 pcs 1280x960 pixels Approx 40 pcs 640x480 pixels Approx 80 pcs 320x240 pixels Approx 46 sec USB Frame Rate WebCam 320x240 USB1 1 Recording Media SD or Multimedia card Lens Fixed focus 2x 3x 4x digital zoom F 2 8 f 9 96 mm equiva...

Page 48: ... Design and Specifications are subject to change without notice Dimension Approx 82 mm x 60 mm x 30 5 mm 3 2 inches W x 2 4 inches H x 1 2 inches D ...

Reviews: