Juplink EC4-1200, Manual
The Juplink EC4-1200 user manual is essential for maximizing the potential of your device. With our free download, you can easily access a comprehensive, detailed guide to help you make the most of its features. Get your manual from manualshive.com and unlock the full potential of your Juplink EC4-1200 device.
Share
Download


Reviews:
No comments
Related manuals for EC4-1200

2000
Brand: Bartscher Pages: 16

Crispin ST-FP9076
Brand: Saturn Pages: 11

BLSTSR-PZ0
Brand: Oster Pages: 12

CSB-78 - Cordless Rechargeable Hand Blender
Brand: Cuisinart Pages: 49
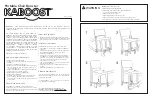
CHA-001
Brand: KABOOST Pages: 2

SoloCAT Z57-1.3
Brand: Zektop Pages: 11

PUV-1620A-RX
Brand: CYP Pages: 68

1180R
Brand: Audio Authority Pages: 12

HKM01
Brand: SC&T Pages: 9

HD-TX-USB-2000-C
Brand: Crestron Pages: 2

EXT-FW-1394BP
Brand: Gefen Pages: 20

38264
Brand: Lindy Pages: 24

BUM060030
Brand: Abus Pages: 7

DevicePort Series
Brand: Sunix Pages: 51

SP3022
Brand: Icron Pages: 18

CRD220SS
Brand: CLEAN ROOM DEVICES Pages: 11

MOBILE M2M
Brand: SmoothTalker Pages: 4

HEX100CS-TX
Brand: BluStream Pages: 4


