


Reviews:
No comments
Related manuals for JWM6ABK

7 Series
Brand: G-Tek Pages: 28

LECTFACVFC
Brand: Displays2go Pages: 3
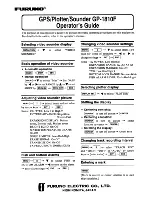
GP-1810F
Brand: Furuno Pages: 2

VIPER TIG 200P
Brand: Xcel-Arc Pages: 36

Medialon MAS Pro Dante D
Brand: 7th Sense Pages: 2

N-Com MCS III
Brand: Nolan Pages: 48

SC Express Series
Brand: National Instruments Pages: 36

DS-75D16 Swingarc
Brand: Miller Electric Pages: 48

MM2040 TOUCHBOX
Brand: Manta Pages: 16

ICRI/2P
Brand: COMMUNICATIONS-APPLIED TECHNOLOGY Pages: 30

DHT-S514
Brand: Denon Pages: 11

Jellyball FT12JB
Brand: Fenton Pages: 16

Magnum Alert-854
Brand: NAPCO Pages: 16

AMI-208MC
Brand: Daewoo Pages: 48

K-RCD 110
Brand: Grundig Pages: 16

CV1005
Brand: Rosen Pages: 4

DKW-3
Brand: Nady Systems Pages: 2

Scoopy+ S
Brand: AETA Pages: 136


