Janome JP760 -, Instruction Book
The Janome JP760 - Instruction Book is a comprehensive manual designed to guide you through the usage and maintenance of your sewing machine. This user-friendly manual is available for free download from our website, ensuring you have easy access to the information you need to master your machine.
Share
Download


Reviews:
No comments
Related manuals for JP760 -

KX-FB421
Brand: Panasonic Pages: 2

HQ Sweet Sixteen
Brand: Handiquilter Pages: 41

HQ Amara 20
Brand: handi quilter Pages: 2

GARUDAN GF-1107-147 MH
Brand: Anita Pages: 73

Sew Reach ABF Series
Brand: Siruba Pages: 74

F-16B
Brand: XPower Pages: 12

157-1
Brand: Singer Pages: 10

W4 Series
Brand: Jack Pages: 58

Sensor Mono
Brand: Babolat Pages: 28

RHINO RD 160
Brand: ROOTS Pages: 164
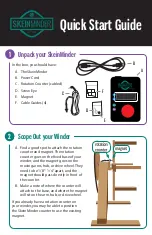
Skeinminder
Brand: Alpenglow Yarn Pages: 4

333-712/02
Brand: Pfaff Pages: 30

LAVINA ELITE L13GE
Brand: Superabrasive Pages: 27

Minoltafax 1400
Brand: Konica Minolta Pages: 157

3574-2/02
Brand: Pfaff Pages: 90

d-COPIA 4004MF
Brand: Olivetti Pages: 216

FAX LAB 650
Brand: Olivetti Pages: 16

LSS 339
Brand: Tivax Pages: 6


