

Limited Warranty
j5create offers a limited 1-year warranty. User’s wear & tear damage is not
included.
The user shall call or email j5create customer service with defect information of
theproduct and obtain a return authorization number.Users are responsible for
one way return freight cost and we will take care of one way freight back. In
order to obtain a return authorization number, users should have the following
information handy when calling or emailing the service team:
(i) a copy of the original purchase invoice to verify your warranty
(ii) a product serial number
(iii) a description of the problem
(iv) customer’s name, address, and telephone number
j5create does not warrant that the operation of the product will be
uninterrupted or error-free. j5create is not responsible for damage arising from
failure to follow instructions relating to the product’s use. This warranty does
not apply to:(a) consumable parts, unless damage has occurred due to a defect
in materials or workmanship; (b) cosmetic damage, including but not limited to
scratches, dents ,and broken plastic on ports; (c) damage caused by use with
non-j5create products; (d) damage cause by natural disasters ( flood, fire,
earthquake, lighting strike, typhoon etc.,)(e) damage caused by human misuse(
lost, accident, abuse, misuse or other external causes) (f) damage caused by
operating the product outside the permitted or intended uses described by
j5create ; (g) damage caused by service (including upgrades and expansions)
performed by anyone who is not a representative of j5create or a j5create
Authorized Service Provider; (h) a product or part that has been modified to
alter functionality or capability without the written permission of j5create; or (i)
if any j5create serial number on the product has been removed or defaced.
If such a situation occurs, j5create will calculate the cost of materials and repair
for your reference. This warranty is given by j5create in lieu of any other
warranties express or implied.
Copyright© 2014 j5create. All rights reserved. All trade names are registered
trademarks of their respective owners. Features and specifications are subject
to change without notice. Product may not be exactly as shown in the
diagrams.
EN : Quick Installation Guide
ES : Guía De Instalación Rápida
DE : Kurzanleitung Für Installation
FR : Guide D'installation Rapide
JP : イックインストールガイド
TC : 快速安裝手冊
English
Español
Deutsch
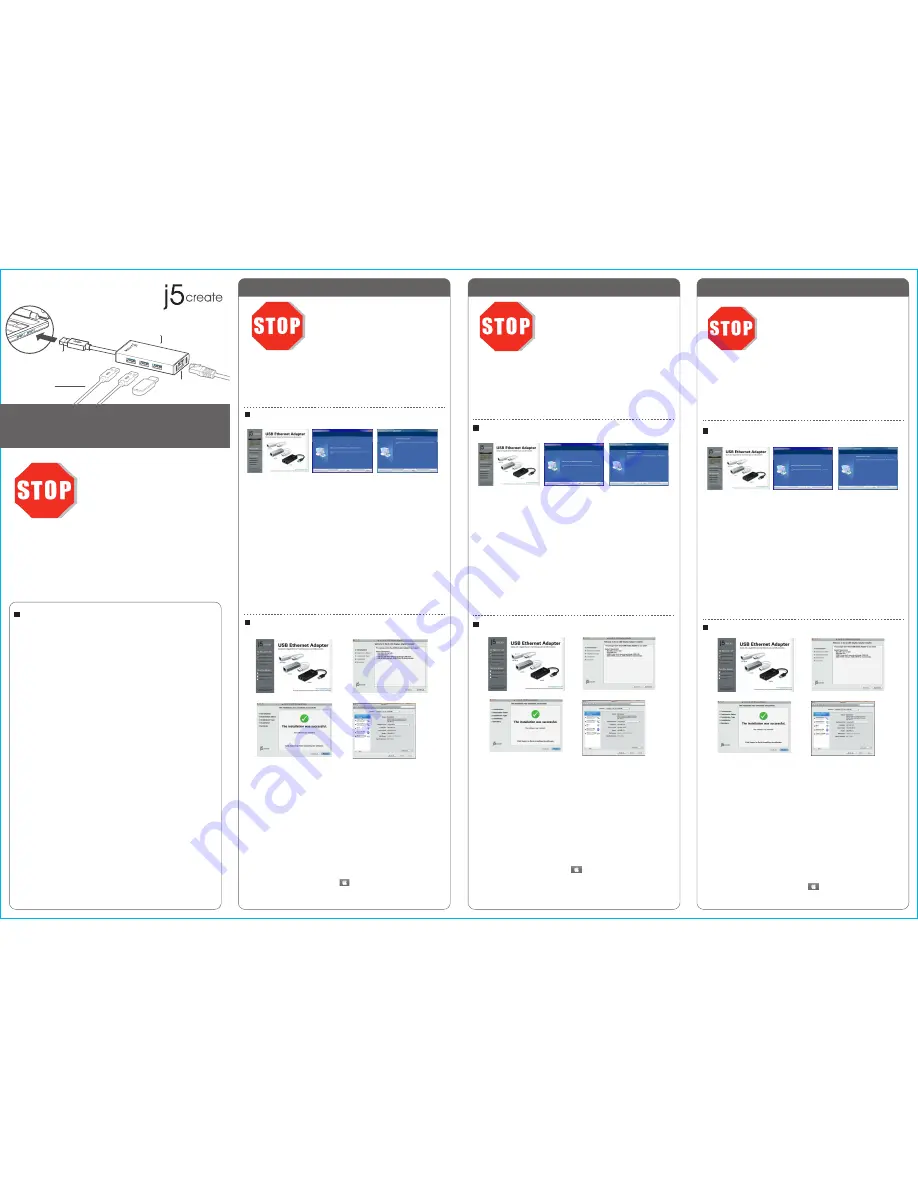
Windows XP / Vista / 7 / 8 - Driver Installation
Mac 10.5~10.9 - Driver Installation
Step 1.
Step 3
Step 2.
Schritt 1.
Schritt 3
Schritt 2.
Step 1.
If you have internet access it is
highly recommended
that you download the
latest
driver
from www.j5create.com under
Support & Services
–scroll down to the
product’s driver you are installing and download the latest driver for your operating
system.
If you do not have internet access insert the Driver CD into your computer’s CD-ROM
drive. (The setup program should launch automatically) If not, go to
my computer
and click on your optical drive and manually run the setup CD by double-clicking on
Setup.exe.
(the prompt may take a minute to appear).
Step 2.
Follow the prompts to install driver. (You may have to click on
My Computer >
downloads
and choose
j5UsbEthernetAdapter
to begin installation.) .Once the
driver has been installed choose Yes and click Finish to
restart
your computer and
complete driver installation.
Step 3.
Connect the
LAN cable
to the RJ-45 connector of the j5create USB 3.0 Multi-Adapter
and
then to the host computer
. Software processing will take a few minutes. After
the software processing is complete, you will be ready to use j5create USB 3.0
Multi-Adapter!
Step 1.
Step 3
Step 2-1
Step 2-2
Schritt 1
Schritt 3
Schritt 2-2
Schritt 2-1
Windows XP / Vista / 7 / 8 - Installation Für Gerätetreiber
Mac 10.5~10.9 - Installation Für Gerätetreiber
Schritt 1.
Treiber update gibt es auf www.j5create.com unter
„support & Service“.
Legen Sie zunä chst die Treiber-CD in das CD-ROM-Laufwerk des Computers ein.
Das Setup-Programm wird jetzt automatisch gestartet. Wenn die Anwendung nicht
automatisch gestartet wird, gehen Sie zu
“Computer”
, klicken Sie auf das Symbol fü
r das optische Laufwerk, in dem sich die CD befindet, und starten Sie das
Setup-Programm manuell, indem Sie doppelt auf
“Setup.exe”
klicken.
Schritt 2
Folgen Sie den Anweisungen, um die Treiber zu installieren. (Eventuell müssen Sie
auf
Arbeitsplatz> Downloads
Taste und wählen Sie
j5UsbEthernetAdapter
Installation zu beginnen.)Wenn der InstallShield-Assistent abgeschlossen ist, klicken
Sie auf
Fertig stellen
, um den Computer neu zu starten.
Schritt 3
Wenn der Computer neu gestartet wurde, schließen Sie den j5create USB 3.0
Multi-Adapter an den
LAN Gigabit
. Connectez le connecteur du câble USB 3.0 à
l'ordinateur portable hôte.
Warten Sie ein paar Minuten für die Verarbeitung,
dann können Sie den USB Multi Adapter nutzen.
Do
NOT
plug the j5create USB
adapter into the computer
until the driver is completely
installed.
Installieren Sie zuerst den Treiber
erst vollstä ndig, bevor Sie das
USB-Kabel des USB adapters an den
Computer anschließen.
USB 3.0 Multi Adapter
JUH470
Windows XP / Vista / 7 / 8 - Instalació N Para
Mac 10.5~10.9 - Driver Installation
Paso 1.
Paso 3
Paso 2.
Paso 2.
Siga las instrucciones para instalar el controlador. (Es posible que tenga que hacer clic
en
Mi PC>Descargas
y seleccione
j5UsbEthernetAdapter
para comenzar la
instalación)Una vez que el controlador se ha instalado seleccione Sí y haga clic en
"Finalizar"
para reiniciar el ordenador y completar la instalación del controlador.
Paso 3.
Una vez reiniciado el ordenador, conecte el j5create USB 3.0 Multi-Adaptador a la
LAN
y luego a la
computadora
. Después de esperar algunos minutes a que el
software proceses, está listo para usar el USB 3.0 Multi Adapter.
Paso 1.
Paso 3.
Paso 2-1
Paso 2-2
NO
conecte el adaptador USB
j5create en la computadora hasta
que el conductor esté
completamente instalado.
Paso 1.
Actualice controladores está disponible en www. j5create.com en el área
“Support &
Services”.
Si usted no tiene acceso a Internet, inserte el CD de instalación en la unidad de
CD-ROM del ordenador. (El programa de instalación debería iniciarse automática-
mente) sino,
Vaya a Mi PC
y haga clic en la unidad óptica y ejecutar manualmente el
CD de instalación haciendo doble clic en
Setup.exe.
(el indicador puede tardar un
minuto en aparecer).
JUH470
Gigabit Ethernet & HUB
USB 3.0 Multi-Adapter
USB 3.0 2.0 Devices
Hard Driver, Camera,
Mouse, Keyboard
USB 3.0
HOST
Gigbit
Ethernet
Step 1.
If you have internet access it is
highly recommended
that you download the
latest
driver
from www.j5create.com under
Support & Services
–scroll down to the
product’s driver you are installing and download the latest driver for your operating
system. (Note: If you have trouble downloading this driver your security settings may
need to be adjusted to allow for “downloading from anywhere”)
If you do not have internet access insert the Driver CD into your computer’s CD-ROM
drive. Click on
Finder
under
Devices
choose
j5create
. Click on
“mac_install”
folder
and open dmg file.
Step 2
Choose the correct operating system for your system and follow the prompts to
install the driver. (You may have to click on
My Computer > downloads
and choose
j5UsbEthernetAdapter
to begin installation).Once initial installation has completed,
click
Restart
to finish installing the software.
Step 3
Connect the
LAN cable
to the RJ-45 connector of the j5create USB 3.0 Multi-Adapter
and then
to the host computer.
Go to ( ) and then “System Preferences”. Choose
the “Network” tab to adjust. Select
"AX88179 USB 3.0 to Gigabit Ethernet"
. Now
you are ready to j5create USB 3.0 Multi-Adapter!
Schritt 1.
Treiber update gibt es auf www.j5create.com unter
„support & Service“.
(Hinweis: Wenn Sie Schwierigkeiten haben, dem Herunterladen des Treibers Ihre
Sicherheitseinstellungen möglicherweise angepasst werden, um für "Download von
überall" ermöglichen)
Wenn Sie keinen Internetzugang haben die Treiber-CD in das CD-ROM-Laufwerk des
Computers einlegen. Klicken Sie auf
Finder
unter
Geräte
wählen
j5create.
Klicken
Sie auf
"mac_install"
-Ordner und öffnen Sie die
dmg
-Datei.
Schritt 2
Wählen Sie das richtige Betriebssystem für Ihr System und befolgen Sie die
Anweisungen, um die Treiber zu installieren. (Eventuell müssen Sie auf
Arbeitsplatz>
Downloads
Taste und wählen Sie
j5UsbEthernetAdapter
Installation zu
beginnen.)Sobald die Installation abgeschlossen ist, klicken Sie auf
“Neustart”,
um
die Installation der Software.
Schritt 3
Wenn der Computer neu gestartet wurde, schließen Sie den j5create USB 3.0
Multi-Adapter an den
LAN Gigabit.
Connectez le connecteur du câble USB 3.0 à
l'ordinateur portable hôte
. Gehen Sie auf ( ) und dann auf
„Systempräferen-
zen“.
Wählen Sie „Netzwerk“ zur Justage aus.wählen
"AX88179 USB 3.0 to Gigabit
Ethernet"
. Dann können Sie den USB Multi Adapter nutzen.
Paso 1.
Actualice controladores está disponible en www. j5create.com en el área
“Support
& Services”.
(Nota: Si tiene problemas para descargar el controlador puede ser
necesario ajustar para tener en cuenta "la descarga desde cualquier lugar" la
configuración de seguridad)
Si usted no tiene acceso a internet, inserte el CD de instalación en la
unidad de CD-ROM del ordenador. Haga clic en Buscador en
Dispositivos
elegir
j5create
. Haga clic en la carpeta
"mac_install"
y el archivo dmg abierta.
Paso 2
Elija el sistema operativo correcto para su sistema y siga el instrucciones para
instalar el controlador.
(Es posible que tenga que hacer clic en
Mi PC > Descargas
y
seleccione
j5UsbEthernetAdapter
para comenzar la instalación.)
Una vez que la
instalación inicial se haya completado, haga clic en
Reiniciar
para finalizar la
instalación del software.
Paso 3
Una vez reiniciado el ordenador, conecte el j5create USB 3.0 Multi-Adaptador a la
LAN
y luego a la
computadora
. Vaya a ( ) y luego
“Preferencias de Sistema”
Elija la etiqueta “Red” para ajustar. Seleccionar
"AX88179 USB 3.0 to Gigabit
Ethernet"
. Ahora ya está listo para su uso j5create USB 3.0 Multi-Adapter!
●
Thank you for purchasing the
j5create USB Multi-Adapter
! This adapter acts as
an external graphics card for your MAC or PC. It allows you to add an additional
display and 3 USB 3.0 ports through your USB port.
● When you connect with high power-consumption external HDD or USB devices
that need bus power more than 150mA. We recommend you to attach the
AC/DC
power adapter
included in your devices, or purchase JUH470 AC/DC power adapter.
(sold separately)
●
Gracias por comprar el
j5create USB Multi-Adapter
! Este adaptador actúa como
tarjeta de vídeo externa para su PC oportá til compatible con MAC o Windows. Le
permite añadir un monitor o pantalla HDMI/VGA y 3 puertos USB 3.0 adicional atravé
s de cualquier puerto USB 3.0 disponible.
●
Cuando se conecta con un alto poder de consumo de disco duro USB o dispositivos
externos que necesitan alimentación del bus superior a 150 mA. Le recomendamos
que conecte el
adaptador de corriente AC / DC
incluido en los dispositivos, o
comprar adaptador de corriente JUH470 AC / DC. (se vende por separado)
●
Danke, dass Sie sich für den
j5create USB 3.0 Multi Adapter
entschieden haben!
Dieser Adapter wird als externe Grafikkarte Ihres MAC oder PC verwende, können Sie
über den USB-Anschluss zusätzlich ein USB-Computer-Peripheriegerät, oder ein einen
VGA-Monitor.
●
Wenn Sie mit hohem Stromverbrauch externe Festplatte oder USB-Geräte, die
Bus-Power mehr als 150mA brauchen verbinden. Wir empfehlen Ihnen, die
AC /
DC-Netzadapter
in Ihre Geräte enthalten befestigen, oder kaufen JUH470 AC /
DC-Netzteil. (separat erhältlich)
Do
NOT
plug the j5create USB
adapter into the computer until
the driver is completely installed.


