


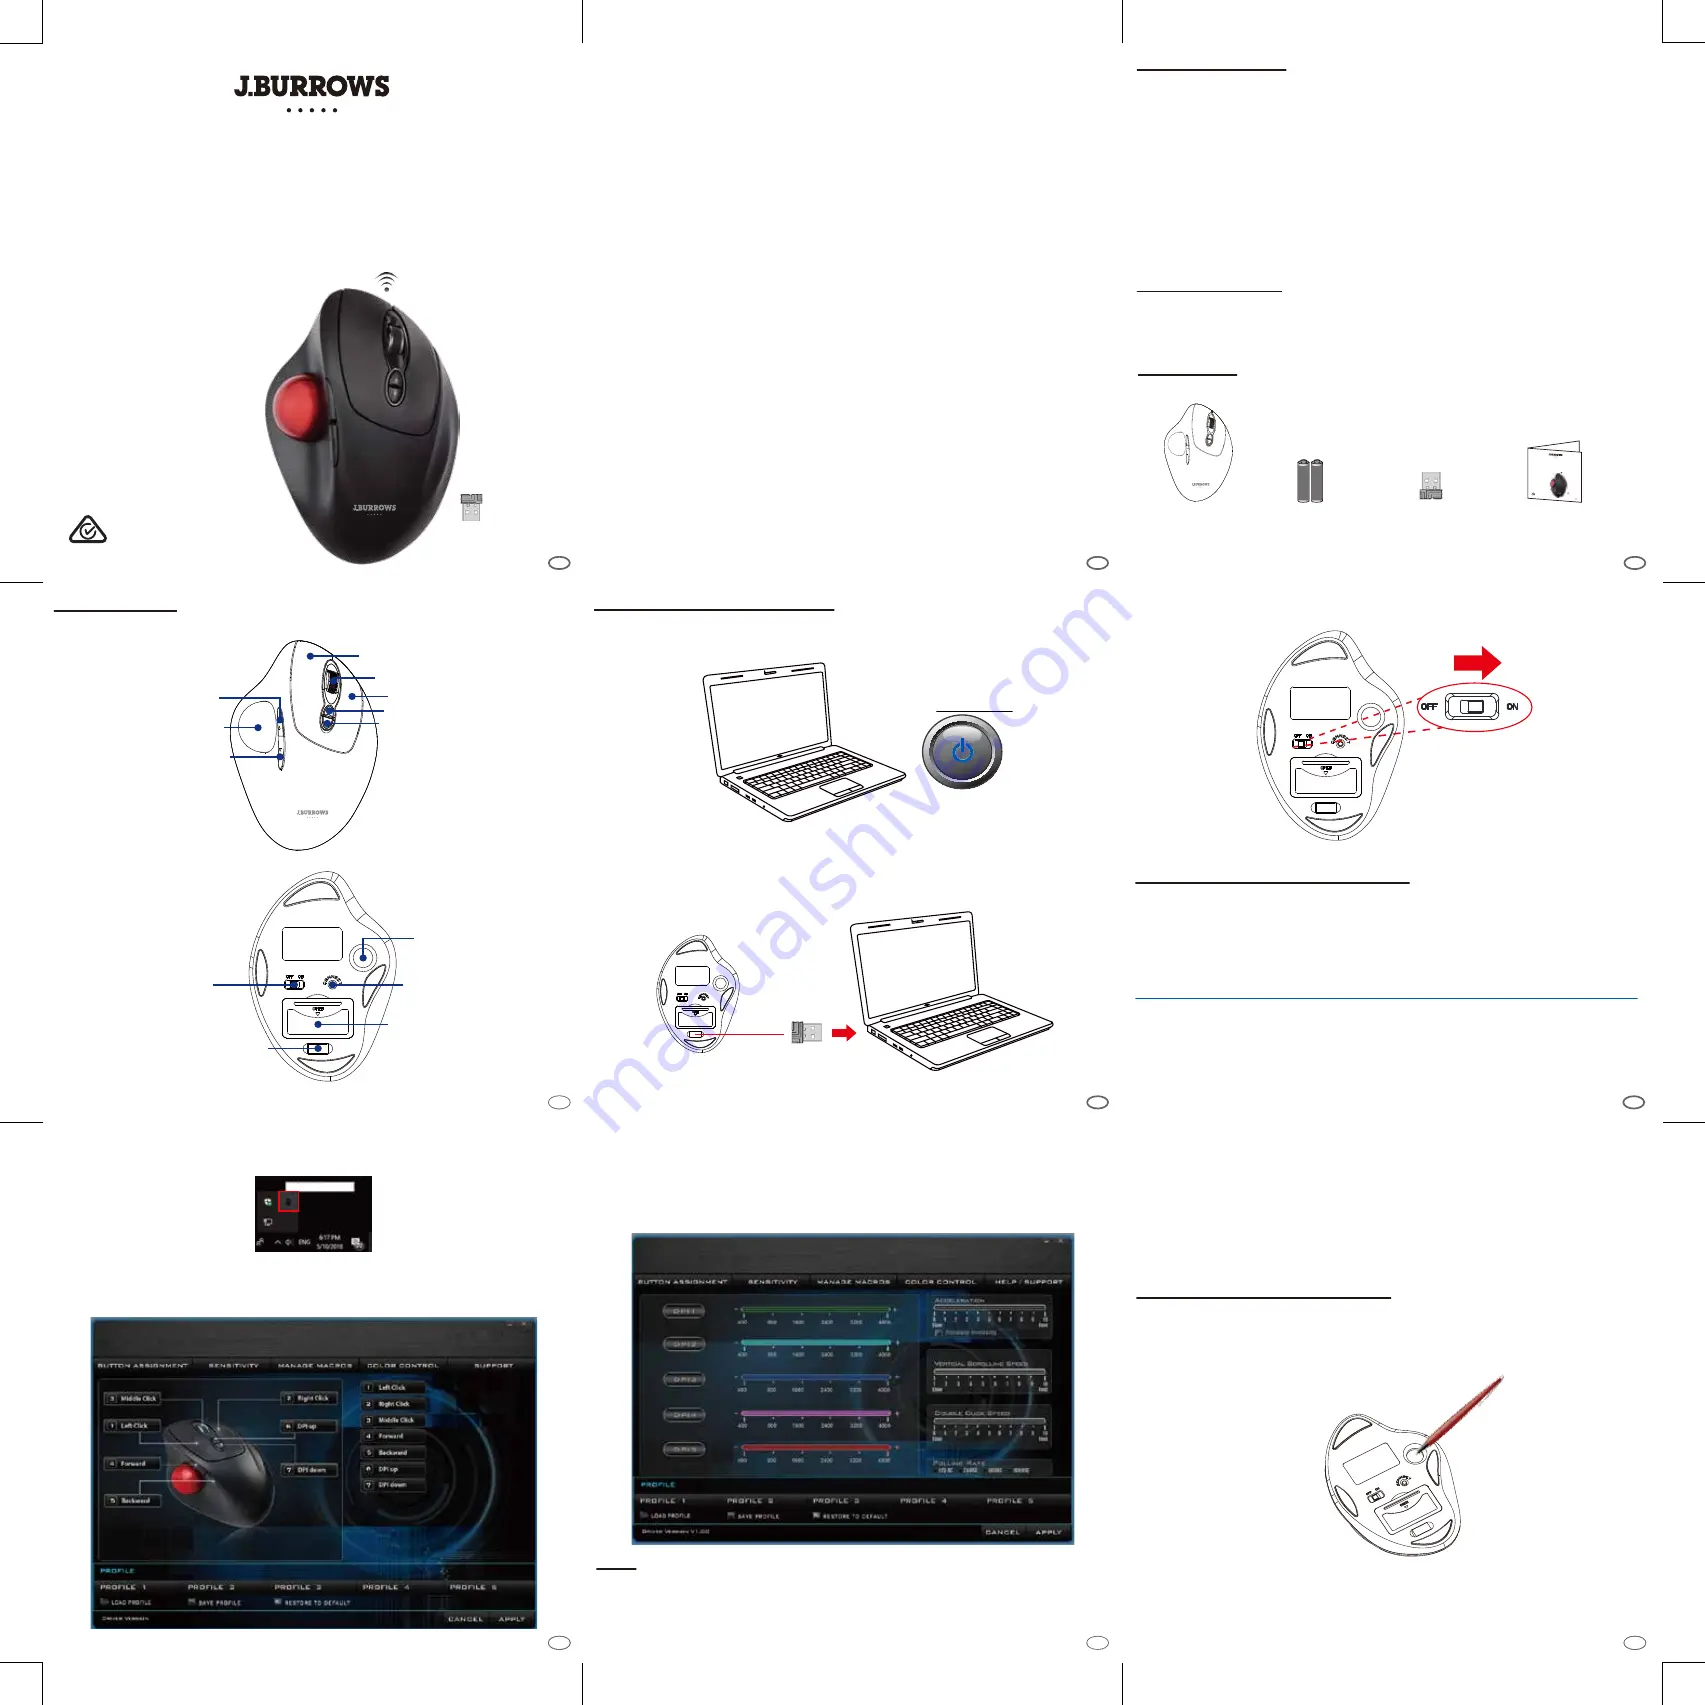
DESCRIPTION
Trackball
Backward
Forward
Left Click
Scroll Wheel Click
Right Click
DPI Up
DPI Down
On/Off
Switch
Receiver Storage
Trackball
Removal
Hole
Connect
Button
Battery
Cover
4. Once you have followed the installation steps, go into your “system tray” by
clicking on the arrow located to the left of your Windows clock and click on the
Trackball Mouse Icon
5. Once you click on the Trackball Mouse Icon, it will bring up the driver menu
as shown below. Click on “Button Assignment” to change your mouse buttons
6. Click on “Sensitivity” to change the speed of your mouse cursor as well as
adjust DPI settings, “Manage Macros” to assign macro keys for your mouse,
“Colour Control” to change the colour of the scroll wheel, and “Support” for
product support information.
7. Click on "RESTORE TO DEFAULT" to resume default settings.
TIPS
SPECIFICATIONS
REQUIREMENTS
CONTENTS
Hand Orientation:
Connection:
DPI Resolution:
Working Range:
Battery:
Buttons:
Trackball Diameter:
Dimensions:
Weight:
•
Operating System: Window
®
7 or above
• An available USB port for the usb wireless receiver
Right Handed
2.4 GHz Radio Frequency Wireless Technology
400-4,800 DPI Range
up to 10 meters
2 AAA Batteries
7 buttons(Forward & Backward, Left & Right, Scroll
Wheel, DPI UP/Down) Custom buttons
34 mm
140 x 98 x 51 mm
135g
AAA B
att
er
ies
AAA B
att
er
ies
(2) AAA
Batteries
USB Wireless
Receiver
Ergonomic
Trackball
Instruction Manual
1
1. Turn on your computer.
1. Place the mouse upside down on a flat surface and locate the hole where the
trackball is enclosed, then use a pen or a finger to apply pressure to “pop out” the
trackball.
The device comes with a driver which allows you to customise your
mouse buttons. Change the DPI colours, reassign mouse buttons, and
assign macro keys.
2. Use a microfiber cloth to wipe the trackball and the trackball compartment.
Return the trackball by putting it back to its compartment. Make sure it is placed
securely and properly before returning to operate the device.
•
To re-establish connection between the device and the receiver. Follow below
steps:
1. Insert the wireless USB receiver into a new USB port.
2. Turn off the device and reinsert fresh batteries.
3. Turn of the device and press the connect button within 30cm of the wireless
receiver.
4. Your device should now be connected and ready to use.
ADVANCED DRIVER FEATURES
REMOVING THE TRACKBALL
HARDWARE INSTALLATION
2. Remove the back battery cover on the mouse and locate the wireless USB
receiver. Insert the USB receiver into your computer’s USB port, and your
operating system will automatically detect and install the device.
3. Turn on your device with the ON/OFF switch. The device will automatically
pair with the inserted USB receiver.
Power On
USB Wireless
Receiver
Wireless Ergonomic Trackball Mouse
INSTRUCTION MANUAL
34mm detachable
trackball
Choose the speed or precision
of pointer
2.4GHz RF wireless
technology with on/off switch
1. Insert below URL link into your web browser to download the Driver:
http://www.downloadmydriver.com/j.burrows/Trackball_T30_driver.zip
2. When the driver has finished downloading, locate the zipped folder
and unzip it to locate the setup.exe file.
3. Then execute the setup.exe to begin driver installation. Follow the
installation wizard prompt to finish the installation process.
OFFICEWORKS LTD
236-262 EAST BOUNDARY ROAD
EAST BENTLEIGH VIC 3165 AUSTRALIA
Windows is a trademark of the Microsoft Corporation in the
United States and other countries.
JBTRACMSE
Wireless Trackball Mouse
1
Wireless Ergonomic Trackball Mouse
INSTRUCTION MANUAL
34mm detachable
trackball
Choose the speed or precision
of pointer
2.4GHz RF wireless
technology with on/off switch
JBTRACMSE
•
When low on batteries, the Scroll Wheel LED light will flash RED repeatedly.
• To conserve battery power, please turn “
OFF
” the device when it’s not in use.
•
The mouse will enter Sleep Mode after 5 minutes of idle time to save power.
• The mouse can wake up in 0.1 second by moving trackball.
2
9
3
4
5
3
3
6
3
7
3
6
3
6
3
8


