Installation Guide
Version 01
2014.10
3
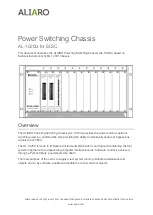
POWER LED
HDD ON/OFF SWITCH & LED
CAM LOCK
120mm FAN
CENTRONIC
POWER SWITCH
AC INLET
110V/ 220V SWITCH
POWER LED
HDD ON/OFF SWITCH & LED
CAM LOCK
120mm FANx2
CENTRONIC x2
POWER
SWITCH
AC INLET 110V/ 220V SWITCH
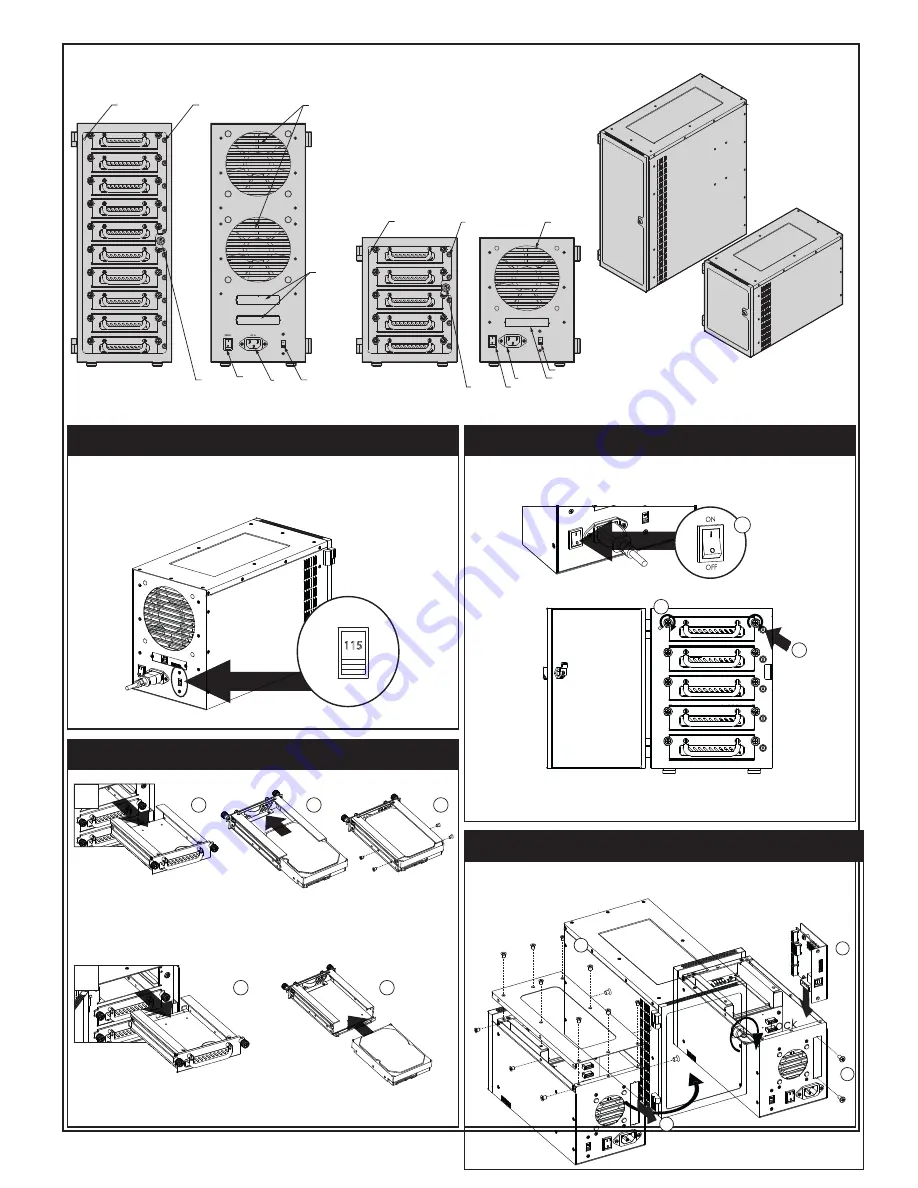
Installing 3.5” Hard Drive
1
2
2
3
A. Installing 3.5” Hard Drive with Standard Tray
1. Pull HDD tray out
2. Install 3.5 HDD onto tray
3. use four #6-32 screws to secure 3.5” HDD to tray
B. Installing 3.5” Hard Drive with Tool-Free Tray (optional)
1. Pull HDD tray out
2. Insert 3.5” HDD directly to tray
1
B
A
1. Turn the key clockwise to lock the door
2. Turn the key counterclockwise to unlock the door
Locking and Unlocking Door
Switching Power Supply Voltage
1. Switch to right voltage setting before turning on power switch
*CAUTION:
Ensure the power supply voltage selector switch is correctly set for
your region before use
Wrong voltage setting will cause damages on devices
115
230
Centronics Bridge Card
1. Loose 14 screws to remove top cover
2. Remove Centronics Cover
3. Install Centronics Bridge Card
4. Tighten M3 screws to secure Centronics Bridge Card
*AN-EX258 has two Centronics Slots.
3
1
2
4
Powering ON/OFF System
*CAUTION:
To prevent drive failures or data loss,
unmount the device in OS before powering off hard disk bay
2. Tighten two hand screws to secure HDD tray
3. Push individual power buttons to power on each hard drive
4. Push power buttons again to power off hard drives
1. Make sure power switch in the back of chassis is in ON position
3
2
1
AN-EX3510
AN-EX355
AN-EX355
AN-EX3510