FOR OUTDOOR USE ONLY
NOT FOR USE IN HAZARDOUS ATMOSPHERES
IMPORTANT: Read instruction sheet carefully before installing fixture.
Retain instructions for future reference.
ELECTRICAL REQUIREMENTS
A qualified electrician should complete all required wiring. This fixture will accept 120 volt AC and must be properly
grounded for safety. A mounting suitable for outdoor use and rated for wet locations is required. Follow all applicable
electrical codes and regulations.
WARNING: Electric shock hazard
Disconnect power at circuit breaker or fuse box before installing or servicing light.
WARNING: Fire hazard
USE MIN 75ºC SUPPLY CONDUCTORS.
CONNECT TO SUPPLY IN EXTERNAL JUNCTION BOX ONLY.
Lamp and housing become very hot during use.
Ensure free air circulation around unit to dissipate heat.
Avoid enclosed locations and locations where flammable debris (leaves, cut grass, etc.) might collect.
Avoid locations where humans or animals might accidentally touch fixture.
WARNING: Explosion hazard
Never operate light without securing the lens door. When light is operating, the gas in the
lamp inner arc tube is at high pressure.
Never operate light if the fixture lens or outer glass envelope of the lamp is broken or missing.
WARNING: Explosion hazard
Wear safety glasses and gloves when handling lamp, Mercury Vapor outer envelope is pressurized and
could explode if broken.
WARNING: UV hazard
The type of lamp used in this fixture can cause serious skin burn and eye inflammation from short wave ultra
violet radiation if outer envelope of the lamp is broken or punctured, and the arc tube continues to operate. Do
not use where people will remain for more than a few minutes. Certain types of lamps that will automatically
extinguish when the outer envelope is broken or punctured are commercially available.
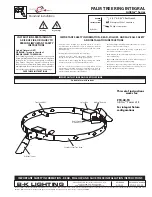
MOUNTING & WIRING
1. Attach the two-piece mounting bracket to the
extension arm by interlocking the halves and
securing with the bolt and hex nut provided.
Leave approximately one inch of the
extension arm protruding from the bottom of
the bracket. (See Figure 1)
2. Place the mounting bracket and arm
assembly on the desired mounting surface.
Mark the four hole locations required for
mounting. Put the assembly aside and
prepare the marked locations for attaching
the mounting bracket and arm assembly.
HID Dusk-To-Dawn - DD Series
INSTALLATION INSTRUCTIONS
Lamp Types: Mercury Vapor 175 Watt
Models: DD175MV
Figure 1
Photocontrol
Receptacle/socket
Photocontrol
Fixture
Mounting Bracket
Clamp
Extension arm
Lag Bolts (4)
Conduit Connector
(Not Provided)
Conduit
(Not Provided)
Mounting screws
for reflector
Lens
Reflector
Bulb Socket
Connection Plug
(Not Provided)