background image


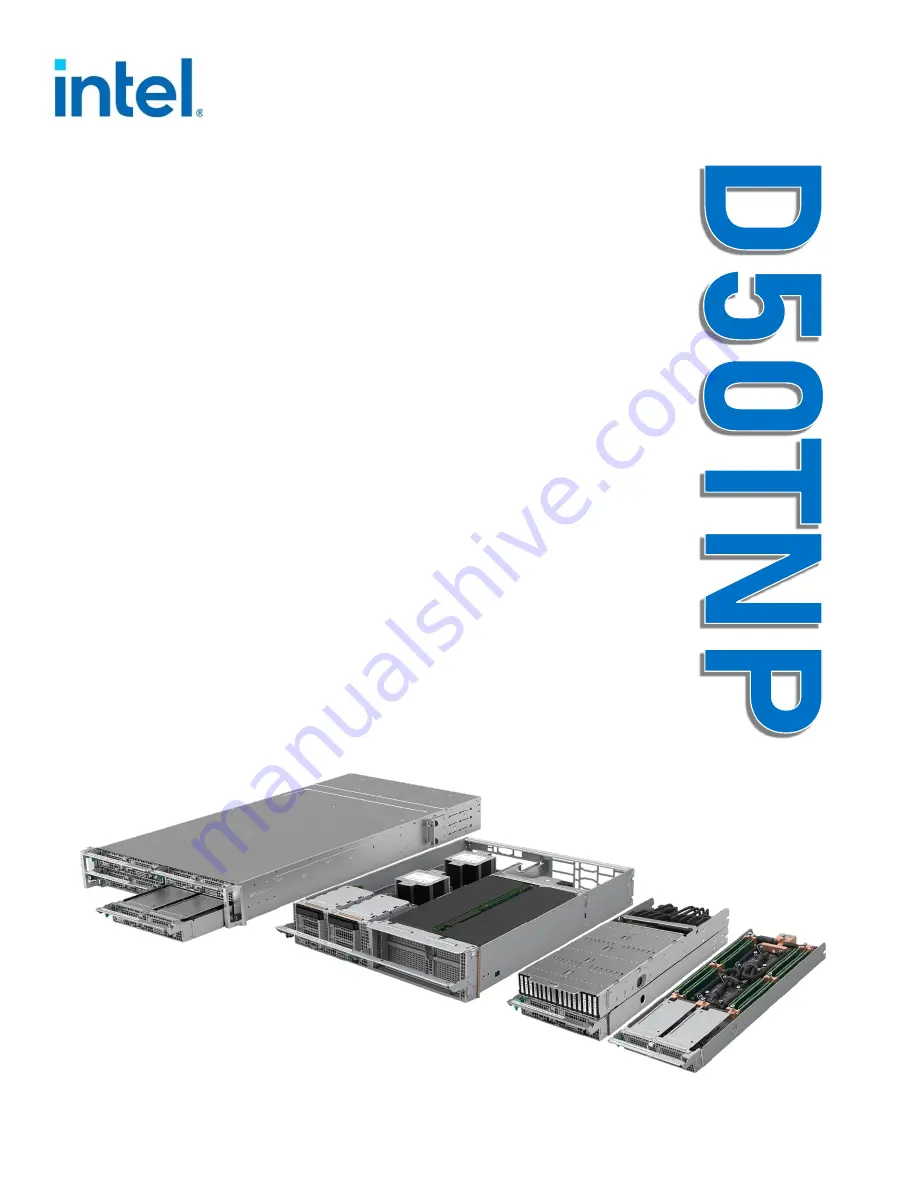
Intel® Server D50TNP 
Family


Intel® Server Board D50TNP Family 
Intel® Module D50TNP Family 
Intel® Server System D50TNP Family 

Integration and Service Guide


A guide providing instructions for the insertion and 
extraction of system components and available Intel 
accessories and spares. 

Rev. 1.0


May 2021 


Delivering Breakthrough Data Center System Innovation 


Experience What’s Inside!


Summary of Contents for D50TNP

Page 1: ... Intel Server System D50TNP Family Integration and Service Guide A guide providing instructions for the insertion and extraction of system components and available Intel accessories and spares Rev 1 0 May 2021 Delivering Breakthrough Data Center System Innovation Experience What s Inside ...

Page 2: ...2 This page intentionally left blank ...

Page 3: ...Intel Server D50TNP Family Integration and Service Guide 3 Document Revision History Date Revision Changes May 2021 1 0 Initial production release ...

Page 4: ...or errors known as errata which may cause the product to deviate from published specifications Current characterized errata are available on request Intel disclaims all express and implied warranties including without limitation the implied warranties of merchantability fitness for a particular purpose and non infringement as well as any warranty arising from course of performance course of dealin...

Page 5: ...cased conductor that slips over two jumper pins Some jumpers have a small tab on top that you can grip with your fingertips or with a pair of fine needle nosed pliers If your jumpers do not have such a tab take care when using needle nosed pliers to remove or install a jumper grip the narrow sides of the jumper with the pliers never the wide sides Gripping the wide sides can damage the contacts in...

Page 6: ...m from the sides or using a mechanical lift or a cart when moving the system from one location to another If your system has rack handles installed do not lift or carry the system by the rack handles When lifting or moving a chassis always grasp it by all four corners Do not grasp the chassis by two points at opposing diagonal corners doing so may damage the internal components If you can only gra...

Page 7: ...opted the new IEC 62368 1 3rd Edition standard restricted access locations are required Access in these locations is permitted only by technically trained and qualified personnel who are aware of potential safety hazards Note This requirement applies only to Intel server system products released in 2019 or later Legacy Intel server system products released in 2018 or earlier provide safeguards tha...

Page 8: ... Modules 52 2 5 2 DDR4 DIMM Installation for liquid Cooled Modules 54 2 6 Module Installation 56 2 6 1 Storage Module Installation iPC D50TNP2MHSTAC Only 57 3 System Options Accessory Kit Installation 58 3 1 Installing the Chassis Into a Rack 59 3 1 1 Installing the Fixed Rail Kit 59 3 1 2 Installing the Chassis Into a Rack 60 3 2 Module Removal Installation 61 3 2 1 Module Removal 61 3 2 2 Module...

Page 9: ...he BIOS Setup Utility 90 4 1 1 Entering BIOS Setup 90 4 1 2 No Access to the BIOS Setup Utility 90 4 1 3 Navigating the BIOS Setup Utility 90 5 System Packaging Assembly Instructions 92 6 System Module Features Overview 96 6 1 System Feature Identification 96 6 2 Front Panel Features 98 6 3 Front Control Panel Features 99 6 4 System Component Identification 100 6 5 Server Board Features 103 7 FRU ...

Page 10: ...t 175 7 15 Trusted Power Module TPM Replacement 175 7 16 Power Supply Replacement 177 7 17 Server Board Replacement 178 7 18 System Fan Replacement 180 7 19 Chassis Plumbing Assembly Replacement Liquid Cooled Systems Only 182 7 20 Power Distribution Board PDB Assembly Replacement 188 7 21 Internal Chassis Rail Replacement 193 7 22 System Battery Replacement 194 Appendix A Getting Help 196 Appendix...

Page 11: ...Removal 32 Figure 17 PHM Alignment with the Socket Assembly 33 Figure 18 PHM Installation onto the Server Board 33 Figure 19 Tighten Heat Sink Fasteners 34 Figure 20 Processor Components and Processor Socket Reference Diagram with EVAC Heat Sink 35 Figure 21 Installing the Processor Carrier Clip onto the Processor Part 1 36 Figure 22 Installing the Processor Carrier Clip onto the Processor Part 2 ...

Page 12: ... the Internal Chassis Rail 57 Figure 56 Installing the Internal Chassis Rail 57 Figure 57 System Directional Reference 58 Figure 58 Securing the Front of the Rack Rail 59 Figure 59 Securing the Back of the Rail 60 Figure 60 Installing the Chassis into the Rack 60 Figure 61 Removing a Module 61 Figure 62 Installing a Module 62 Figure 63 Removing the Internal Chassis Rail 63 Figure 64 Installing the...

Page 13: ...ure 97 Drive Carrier Extraction from the Chassis 81 Figure 98 2 5 Drive Carrier Assembly Drive Blank Removal 82 Figure 99 2 5 Drive Carrier Assembly Drive Installation into the Carrier 82 Figure 100 2 5 Drive Carrier Assembly Alignment Features 83 Figure 101 Drive Carrier Installation into the Chassis 83 Figure 102 Installing Air Cooled M 2 SSD 84 Figure 103 Installing Air Cooled M 2 Heat Sink 85 ...

Page 14: ...137 Installing the Internal Chassis Rail 108 Figure 138 Removing the Air Duct 109 Figure 139 Installing the Air Duct 109 Figure 140 Removing the Air Duct 110 Figure 141 Removing the Air Duct 111 Figure 142 Processor Heat Sink Handling 112 Figure 143 PHM Assembly Removal from Processor Socket 112 Figure 144 Reinstall the Socket Cover 113 Figure 145 Processor Removal from PHM Assembly 113 Figure 146...

Page 15: ...ocessor Carrier Clip onto Processor Part 2 132 Figure 180 Socket Protective Cover Removal 132 Figure 181 Processor Installation onto Server Board 133 Figure 182 Assembling the Manual Applicator 133 Figure 183 Applying Center VR Thermal Gap Filler 134 Figure 184 Reinstalling Processor Cold Plate 134 Figure 185 Securing Processor Cold Plate 135 Figure 186 Removing the DIMM from an Air Cooled System ...

Page 16: ...2 Installing Front VR Blocks 155 Figure 223 Assembling the Manual Applicator 156 Figure 224 Applying Center VR Thermal Gap Filler 156 Figure 225 Installing Liquid Cooling Loop 157 Figure 226 Securing the Processor Cold Plates 157 Figure 227 Removing the Liquid Cooling Loop Carrier 158 Figure 228 Securing the Conduction Plate 158 Figure 229 Securing the Quick Disconnect Block and Memory Cooler 159 ...

Page 17: ...odule TPM 176 Figure 262 Removing the Power Supply 177 Figure 263 Installing the Power Supply 177 Figure 264 Server Board Removal 178 Figure 265 Server Board Installation 179 Figure 266 System Fan Configuration Liquid Cooled System 180 Figure 267 System Fan Configuration Air Cooled System 180 Figure 268 Removing the System Fan 181 Figure 269 Installing the System Fan 181 Figure 270 Removing the Qu...

Page 18: ...ments and Support Collaterals 20 Table 2 Intel D50TNP Module Family 22 Table 3 BIOS Setup Keyboard Command Bar 91 Table 4 Intel Optane Persistent Memory 200 Series Module Support 198 Table 5 Standard DDR4 DIMMs Compatible with Intel Optane PMem Modules 198 Table 6 Power Sleep LED Functional States 199 Table 7 Intel D50TNP Module Status LED State Definitions 200 Table 8 POST Progress Code LED Examp...

Page 19: ... and service technicians with instructions for the installation and removal of system components The document also provides available Intel accessories supported by this server system The document is organized into two sections The first section Chapters 2 through 4 is focused on the installation of system components and accessories into an L6 or L9 integrated server system1 The second section Cha...

Page 20: ...teral Document Classification For technical information about this product family Intel Server D50TNP Family Technical Product Specification Public For system integration instructions and service guidance Intel Server D50TNP Family Integration and Service Guide Public For server configuration guidance and compatibility Intel Server D50TNP Family Configuration Guide Public For information on the In...

Page 21: ...y 200 Series Operations Guide Intel Confidential For setup information for Intel Optane persistent memory 200 Intel Optane Persistent Memory Startup Guide Public For latest system software updates BIOS and Firmware Intel System Update Package SUP for Intel Server D50TNP Family Public Intel System Firmware Update Utility SYSFWUPDT Various operating system support Intel System Firmware Update Utilit...

Page 22: ... comes with 1600 W or 2100 W power supply units pre installed Each module within a system configuration is independently operated from the others The Installed modules within a system chassis share resources like power and cooling Table 2 describes the different ways an Intel Server System D50TNP can be configured For additional information regarding configuration options see the Intel Server Syst...

Page 23: ...ure 1U air cooled Compute Module shown Figure 1 System Directional Reference Instruction Format Each procedure described in this chapter follows an illustration first format This format gives the reader the option to follow a quicker path to component integration by first seeing an illustration of the intended procedure If necessary the reader can then follow the step by step instructions that acc...

Page 24: ...CRAC D50TNP2MHSVAC and D50TNP2MFALAC Required Tools and Supplies Anti static wrist strap and conductive workbench pad recommended 2 1 1 Air Duct Removal Figure 2 Removing the Air Duct 1 Press the latches on both sides of the module inwards see Letter A 2 Carefully lift the front edge of the air duct away from the module see Letter B 3 Pull the air duct away from the module see Letter C 2 1 2 Air D...

Page 25: ...the module contains the processors memory and add in cards This section provides instructions to open and close the top tray of the storage module Required Tools and Supplies Anti static wrist strap and conductive workbench pad recommended 2 2 1 Opening the Top Tray Figure 4 Removing the Air Duct 1 Unlock the latches on both sides of the top tray see Letter A 2 Lift the front edge of the top tray ...

Page 26: ...ule uses 1U height heat sinks Even though the Storage Module is a 2U height module it uses the 1U height heat sinks The Management Module and Accelerator Module use 2U height heat sinks There are two types of 2U heat sinks front heat sink and back heat sink There are three types of 1U heat sinks front heat sink back heat sink and Enhanced Volume Air Cooling EVAC heat sink front position only The h...

Page 27: ...rd back heat sink for CPU 1 Figure 7 1U Supported EVAC Processor Heat Sinks Figure 8 2U Heat Sinks The following figure displays a module with 1U front and back heat sinks installed Only 1U standard front heat sink and 1U back heat sink are shown However the concept applies to modules using 1U EVAC front heat sink and 1U back heat sink or 2U front heat sink and 2U back heat sink ...

Page 28: ...d by Intel Required Tools and Supplies Anti static wrist strap and conductive workbench pad recommended T 30 Torx screwdriver ESD Gloves Note The installation figures in this section only display the 1U front heat sink However the processor installation procedure is the same regardless of the size of the heat sink A processor heat sink module PHM assembly and processor socket assembly or loading m...

Page 29: ...tions assume that all the PHM components are new and the Thermal Interface Material TIM is already applied to the bottom of the heat sink 2 3 1 1 Processor Heat Sink Module PHM Assembly Caution Full ESD precautions should be followed to perform reassembly of the PHM and reinstallation of the PHM to the server board At no time should the processor itself be handled Each component within the PHM ass...

Page 30: ...p onto the Processor Part 2 1 With the processor still in its tray place the processor carrier clip over the processor 2 Ensure the pin 1 indicator on the processor carrier clip is aligned with the pin 1 indicator of the processor 3 Gently press down simultaneously on two opposite sides of the processor carrier clip until it clicks in place 4 Repeat step 3 for the other two sides ...

Page 31: ...ring the following procedures Caution Processor heat sinks are easily damaged if handled improperly See the following image for proper handling Figure 13 Removing the Heat sink from its Packaging 6 Place the heat sink bottom side up onto a flat surface 7 Remove the plastic protective film from the Thermal Interface Material TIM Figure 14 Processor Heat Sink Anti tilt Wires in the Outward Position ...

Page 32: ... are securely latched to the processor carrier clip tabs 2 3 1 2 PHM Installation If installed remove the plastic cover from the processor socket Caution Do not touch the socket pins The pins inside the processor socket are extremely sensitive A damaged processor socket may produce unpredictable system errors Figure 16 Socket Protective Cover Removal Remove the socket protective cover by squeezing...

Page 33: ...lation onto the Server Board 1 Set all four anti tilt wires on the heat sink to the inward position see Letter A 2 Align the pin 1 indicators of the processor carrier clip and processor with the pin 1 indicator on the socket assembly bolster plate 3 Carefully lower it onto the bolster plate s alignment pins see Letter B 4 Ensure the PHM is sitting flat and even on the bolster plate 5 Set all four ...

Page 34: ...rocessors Processor carrier clips 1U EVAC processor heat sink front and 1U standard processor heat sink back Processor tray as shipped by Intel Required Tools and Supplies Anti static wrist strap and conductive workbench pad recommended T 30 Torx screwdriver ESD Gloves Phillips head screwdriver 2 Note The procedures below show the installation for the 1U EVAC processor heat sink front To install t...

Page 35: ...ons assume that all the PHM components are new and the Thermal Interface Material TIM is already applied to the bottom of the heat sink 2 3 2 1 Processor Heat Sink Module PHM Assembly Caution Full ESD precautions should be followed to perform reassembly of the PHM and reinstallation of the PHM to the server board At no time should the processor itself be handled Each component within the PHM assem...

Page 36: ...p onto the Processor Part 2 1 With the processor still in its tray place the processor carrier clip over the processor 2 Ensure the pin 1 indicator on the processor carrier clip is aligned with the pin 1 indicator of the processor 3 Gently press down simultaneously on two opposite sides of the processor carrier clip until it clicks in place 4 Repeat step 3 for the other two sides ...

Page 37: ...ring the following procedures Caution Processor heat sinks are easily damaged if handled improperly See the following image for proper handling Figure 23 Removing the Heat Sink from its Packaging 6 Place the heat sink bottom side up onto a flat surface 7 Remove the plastic protective film from the Thermal Interface Material TIM Figure 24 Processor Heat Sink Anti tilt Wires in the Outward Position ...

Page 38: ... heat sink label 10 Gently press down the heat sink onto the processor carrier clip until it clicks into place 11 Ensure all four heat sink corners are securely latched to the processor carrier clip tabs 2 3 2 2 EVAC PHM Installation 1 Remove the riser assembly on the right side of the module Figure 26 Removing a Riser Assembly Remove the three screws that secure the riser assembly to the module s...

Page 39: ...y sensitive A damaged processor socket may produce unpredictable system errors Figure 27 Socket Protective Cover Removal Remove the socket protective cover by squeezing the finger grips see Letter A and pulling the cover up see Letter B Ensure the socket is free of damage or contamination before installing the PHM Caution If debris is observed blow it away gently Do not remove it manually such as ...

Page 40: ...cing the PHM onto the processor socket Do not drop it Figure 29 PHM Installation onto the Server Board 3 Set all four anti tilt wires on the heat sink to the inward position see Letter A 4 Align the pin 1 indicators of the processor carrier clip and processor with the pin 1 indicator on the socket assembly bolster plate 5 Carefully lower it onto the bolster plate s alignment pins see Letter B ...

Page 41: ...n lb see Letter E Figure 31 Installing a Riser Assembly 10 Align the riser card edge connector to the riser slot on the server board see Letter A 11 Carefully push down on the riser assembly until the riser card is securely seated into the riser slot 12 Ensure the three screw holes of the riser assembly are aligned and flush with the mounting holes of the module 13 With three screws secure the ris...

Page 42: ...rocessor is cooled through cold plates that are part of a liquid cooling loop The following steps only cover the processor and processor carrier clip installation to the socket assembly The installation of the processor cold plates is explained in Section 2 4 Caution Wear ESD gloves to prevent electrostatic damage and oxidation or foreign material on processor package and land pads Figure 32 Insta...

Page 43: ...e pins inside the processor socket are extremely sensitive A damaged processor socket may produce unpredictable system errors Figure 34 Socket Protective Cover Removal 4 Remove the socket protective cover by squeezing the finger grips see Letter A and pulling the cover up see Letter B 5 Ensure the socket is free of damage or contamination before installing the PHM Caution If debris is observed blo...

Page 44: ...Intel coolant distribution unit that supports Staubli SCG 06 quick disconnect couplings The internal cooling is done using a liquid cooling loop To maintain system thermals for liquid cooled modules the liquid cooling loop must always be in place when the system is operational The installation of the liquid cooling loop assumes that the processors and the processor clips are already installed in t...

Page 45: ...P Liquid Cooling VR TIMM Application Tools iPC TNPLCVRTLS D50TNP Liquid Cooling VR TIMM Application Nozzles iPC TNPLCVRTNZ D50TNP Liquid Cooling VR TIMM Compound iPC TNPLCVRCMPD The liquid cooling loop package comes with two cooling blocks for the front Voltage Regulator VR components on the board These cooling blocks will be installed before installing the liquid cooling loop see following steps ...

Page 46: ...Block s Protective Covers 1 Carefully unpack the front Voltage Regulator VR cooling blocks Remove the protective covers on both ends and ensure the Thermal Interface Material TIM is in place and intact Note Ensure the TIM in the VR cooling blocks is not touched during subsequent installation steps ...

Page 47: ...following the orientation shown see Letter A 3 Using the fastener screws secure the front VR cooling blocks to the server board see Letter B Tighten to 3 in lb Figure 40 Assembling the Manual Applicator 4 Assemble the Bergquist SS95407 applicator Bergquist GF3500S35 thermal gap filler cartridge and Bergquist SS95437 nozzle as shown in the figure above ...

Page 48: ... the protective covers on the PCIe add in card cold plate CPU 0 and CPU 1 cold plates and front VR cold plate 8 Ensure the Thermal Interface Material TIM for each cold plate is in place and the plastic protective film is removed Important Note The liquid cooling loop comes with a plastic carrier attached from the factory The carrier is used during the installation and removal of the liquid cooling...

Page 49: ...ooling loop to the inward position see Letter A 10 With your fingers hold the liquid cooling loop and carefully place it into the module see Letter B ensuring that processor cold plates are properly aligned with the bolster plate s alignment pins Important Note Make sure the screw holes for the cooling loop on the board do not have screws in place ...

Page 50: ...oop to the outward position see Letter A 12 Using a T30 Torx screwdriver tighten the cold plate fasteners to 8 in lb see Letter B No specific sequence is needed for tightening Figure 44 Removing Liquid Cooling Loop Carrier 13 Unscrew all 16 captive screws on the plastic carrier see Letter A and carefully lift the carrier up and away from the module see Letter B ...

Page 51: ...r board Tighten to 3 in lb Figure 46 Securing the Quick Disconnect Block and Memory Cooler 15 Using four fastener screws see Letter A secure the quick disconnect block to the server board Tighten to 3 in lb 16 Using four fastener screws see Letter B secure the memory cooler to the server board Start threading but do not tighten until the memory DIMMs are installed ...

Page 52: ...ng instructions Note The system requires that all memory slots be populated with either a memory module or a DIMM blank Pre installed DIMM blanks should only be removed when replacing it with an actual memory module When removing a memory module from the system it must be replaced with an equivalent device or a DIMM blank Note See Appendix B for general memory population rules 2 5 1 DIMM Installat...

Page 53: ...t the bottom edge of the memory module with the key in the memory slot see Letter B 5 Insert the memory module into the memory slot Using even pressure along the top edge push down on the memory module See letter C until the ejection tabs of the memory slot snap into place see Letter D 6 Ensure that the ejection tabs are firmly in place see Letter E Note Intel Optane PMem devices require additiona...

Page 54: ...Memory replacement tool and retention clip see Figure 50 The liquid cooled modules only support standard DDR4 DIMMs Intel Optane PMem modules are not supported Before installing the standard DDR4 DIMMs ensure that the liquid cooling loop is already installed in the modules and the memory cooler mounting screws are loosened see following figure Figure 49 Loosen Memory Cooler Screws Figure 50 Memory...

Page 55: ...odule from its packaging taking care to only handle it by its outer edges 4 Align the notch at the bottom edge of the memory module with the key in the memory slot see Letter B 5 Insert the memory module into the memory slot Using even pressure along the top edge push down on the memory module see Letter C until the ejection tabs snap into place see Letter D 6 Ensure that the ejection tabs are fir...

Page 56: ...tion section If no other installations are required the module must be installed in the chassis using the following steps Required Tools and Supplies Anti static wrist strap and conductive workbench pad recommended Figure 54 Installing a Module 1 Ensure the lever in front of the module is lowered If not press the green latch inward and lower the lever see Letter A 2 Align the module to its corresp...

Page 57: ... both sides of the chassis 2 Release the rail latch see Letter A 3 Slide the rail towards the front of the chassis to remove it see Letter B Do not reinstall the internal chassis rails if the chassis is used only for Intel Storage Module For any other type of module installation the internal chassis rails need to be reinstalled Follow the instructions below to reinstall the internal chassis rails ...

Page 58: ...f this document System Reference In the following procedures all references to left right front top and bottom assume the reader is facing the front of the chassis and front of a module Figure 57 System Directional Reference Instruction Format Each procedure described in this chapter follows an illustration first format This format gives the reader the option to follow a quicker path to component ...

Page 59: ...e Intel Server System D50TNP family includes a fixed rail kit that serves as a shelf for the system upon installation into the rack When a system is installed onto the fixed rails it can be secured to both the rail and the rack via a pair of thumbscrews on the front of the server system Figure 58 Securing the Front of the Rack Rail 1 Remove the chassis rail kit from the packaging 2 Locate the rail...

Page 60: ... Rack Important Safety Note Due to the weight of a fully configured system Intel recommends use a mechanical lift to aid with the installation of the system into the rack and or use at least two people to install the system into the rack or remove all installed modules from the system before attempting to install the system into the rack Figure 60 Installing the Chassis into the Rack 1 Insert the ...

Page 61: ...nded 3 2 1 Module Removal 1 Power down the module using the power button on the front panel of the module to be integrated Figure 61 Removing a Module 2 Press the green latch inward see Letter A and lower the lever in front of the module see Letter B 3 Grasp the lever and pull out the module from the chassis see Letter C Note To keep the system operating within its thermal limits module bays must ...

Page 62: ...ver see Letter A 2 Align the module to its corresponding bay and push it into the chassis until the key pins in the lever are inside the chassis inner wall key hole 3 Raise the lever to secure the module see Letter B 3 2 2 1 Storage Module Installation D50TNP2MHSTAC Only Important When installing an Intel Storage Module in the chassis for the very first time the internal chassis rails need to be r...

Page 63: ...o not reinstall the internal chassis rails if the chassis is used only for Intel Storage Module For any other type of module installation the internal chassis rails need to be reinstalled Follow the instructions below to reinstall the internal chassis rails Figure 64 Installing the Internal Chassis Rail 4 Place the new rail inside the chassis aligning the keying pins of the rail with the chassis i...

Page 64: ...P2MFALAC Required Tools and Supplies Anti static wrist strap and conductive workbench pad recommended 3 3 1 Air Duct Removal Figure 65 Removing the Air Duct 1 Press the latches on both sides of the module inwards see Letter A 2 Carefully lift the front edge of the air duct away from the module see Letter B 3 Pull the air duct away from the module see Letter C 3 3 2 Air Duct Installation Figure 66 ...

Page 65: ...se of the module contains the processors memory and add in cards This section provides instructions to open and close the top tray of the Storage Module Required Tools and Supplies Anti static wrist strap and conductive workbench pad recommended 3 4 1 Opening the Top Tray Figure 67 Removing the Air Duct 1 Unlock the latches on both sides of the top tray see Letter A 2 Lift the front edge of the to...

Page 66: ...ow profile PCIe add in cards This section provides assembly and installation procedures for modules that require low profile add in card installation The following procedures apply to both 1U and 2U modules in both air cooled and liquid cooled configurations Note The D50TNP Accelerator Module has additional support for up to four full height full length double width PCIe accelerator cards Follow t...

Page 67: ...HCPAC and D50TNP2MHSTAC Figure 70 1U Riser Assembly and Riser Card Features D50TNP1MHCRAC D50TNP1MHCRLC and D50TNP1MHEVAC Figure 71 2U Riser Assembly and Riser Card Features D50TNP2MHSVAC and D50TNP2MFALAC Required Tools and Supplies Anti static wrist strap and conductive foam pad recommended Phillips head screwdriver 1 ...

Page 68: ...Add in Card 1 Remove the module to be serviced from the server chassis and place it onto an anti static work surface see Section 3 2 1 2 Remove the selected riser assembly from the module see Section 3 5 1 3 If present carefully remove the rear metal filler plate from the metal frame of the riser assembly see Letter A 4 Align the rear bracket of the add in card to the rear opening of the riser ass...

Page 69: ...iser slot on the server board see Letter A 2 Carefully push down on the riser assembly until the riser card is securely seated into the riser slot 3 Ensure the three screw holes of the riser assembly are aligned and flush with the mounting holes of the module 4 With three screws secure the riser assembly to the module using 8 in lb of torque on each screw see Letter B 1U air cooled module shown ...

Page 70: ...the thermal pad is installed on top of the add in card as shown below Refer to the add in card documentation for instructions to install the thermal pad Figure 75 Mellanox Liquid Cooled Add in Card with Thermal Pad 2 Ensure the foam pads are installed on the bottom side of the add in card Note If the foam pads are not installed the following steps can be performed in conjunction with the instructi...

Page 71: ...eight full length double width PCIe add in cards for acceleration solutions The Accelerator Module riser assembly is on the right side of the module Figure 77 Air Cooled Accelerator Module The Accelerator Module riser assembly houses two riser cards shown in the following figures where each riser card supports up to two add in cards Both riser cards come pre installed in the Accelerator Module ris...

Page 72: ...ble Acceleration Card with Intel Stratix 10 SX FPGA Note Mixed types in a single module is not supported Required Tools and Supplies Anti static wrist strap and conductive foam pad recommended Phillips head screwdriver 1 The Accelerator Module riser cards are connected to the server board using onboard OCuLink connectors As part of installing the Accelerator Module add in card one of the two low p...

Page 73: ...rews that secure the right side 2U riser assembly to the module see Letter A 2 Carefully remove the riser assembly by lifting it up away from the module see Letter B Figure 82 Removing the Bracket from the Chassis 3 Remove the screws that secure the bracket to the chassis see Letter A 4 Remove the bracket see Letter B ...

Page 74: ...the screw from the metal plate that holds two OCuLink cables along the inside of the chassis see Letter A 6 Carefully move the metal plate to create a slight opening to remove the two OCuLink cables see Letter B Figure 84 Removing the OCuLink Cables 7 Disconnect all the OCuLink cables from the connectors on the server board ...

Page 75: ...r card power cables from the connectors on the Accelerator Module power board Figure 86 Removing the Accelerator Module Riser Assembly 9 Loosen the four captive screws on the Accelerator Module riser assembly see Letter A 10 Carefully remove the Accelerator Module riser assembly by lifting it up away from the module see Letter B ...

Page 76: ...comes with the extension bracket install it on the accelerator add in card Figure 88 Installing the Accelerator Add in Card in the Riser Assembly 15 Remove the screw that holds the flap and lift the flap up on the front side of the riser assembly 16 Align the bracket of the accelerator add in card to the opening of the riser assembly 17 Install the power cables on the add in card 18 Route the acce...

Page 77: ...erator add in card is in the top slot or bottom slot of the riser assembly 22 Repeat the steps 11 through 21 to install other accelerator add in cards as needed Figure 90 Installing the Accelerator Module Riser Assembly 23 Install the Accelerator Module riser assembly by first aligning the captive screws to the mounting holes on the module Then carefully lower the riser assembly to module see Lett...

Page 78: ...Figure 91 Connecting the Riser Card Power Cables 25 Connect the riser card power cables to the connectors on the power board Figure 92 Connecting the Add in Card Power Cable 26 Connect the accelerator add in card power cables to the connectors on the power board ...

Page 79: ...nk cable has the number printed on it Connect each OCuLink cable to the OCuLink connector on the server board that has the same number Figure 94 Installing the Inside Screws for OCuLink Cables 28 For the two OCuLink cables that go along the inside of the chassis insert them under the metal plate and hold the plate to the chassis see Letter A 29 Fasten the screw to secure the metal plate to the cha...

Page 80: ...Installing Riser Assembly into the Chassis 31 Align the riser card edge connector to the riser slot on the server board 32 Carefully push down on the riser assembly until the riser card is securely seated into the riser slot see Letter A 33 Ensure the three screw holes of the riser assembly are aligned and flush with the mounting holes of the module 34 With three screws secure the riser assembly t...

Page 81: ...lled into a tool less drive carrier This section provides instructions for drive extraction from the chassis drive assembly and drive installation into the chassis Required Tools and Supplies Anti static wrist strap and conductive foam pad recommended 3 8 1 Drive Carrier Extraction Figure 97 Drive Carrier Extraction from the Chassis 1 Press the button on the carrier face plate to release the lever...

Page 82: ...shing the drive up from the bottom as shown in Figure 98 Figure 99 2 5 Drive Carrier Assembly Drive Installation into the Carrier 2 Carefully unpack the new drive taking care not to touch any of the connector pins on the back side of the drive 3 Position the rear drive connector toward the back of the drive carrier 4 Align and position the mounting holes on one side of the drive over the mounting ...

Page 83: ...ion Failure to properly install a drive blank may result in the carrier assembly not fitting properly into the drive bay 3 8 3 Drive Carrier Installation Figure 101 Drive Carrier Installation into the Chassis 1 Align the drive assembly with the open drive bay 2 With the lever in the open position insert the drive assembly into the drive bay see Letter A and push forward until the drive contacts wi...

Page 84: ... strap and conductive foam pad recommended Phillips head screwdriver 1 3 9 1 M 2 SSD Installation for Air Cooled Configurations Figure 102 Installing Air Cooled M 2 SSD 1 If present remove the screw from the M 2 mounting standoff on the left side of the riser assembly 2 Align the notch within the SSD edge connector with the key in the M 2 connector and insert the SSD into the connector see Letter ...

Page 85: ...figurations Due to a different cooling mechanism for M 2 SSD between air cooled and liquid cooled configurations the M 2 SSD for the liquid cooled configuration requires the installation of Thermal Interface Material TIM on the rear side of the M 2 SSD as shown below The TIM pad installation is required only for M 2 SSDs with 110 mm form factor M 2 SSDs with 80 mm form factor do not require the TI...

Page 86: ...d screw see Letter C 3 9 4 M 2 Cold Plate Installation Liquid Cooled Configurations Only Due to the mechanical differences between the air cooled and liquid cooled configurations the M 2 SSD cold plate is used to absorb the heat generated by the SSD in a liquid cooled configuration instead of a heat sink Figure 106 Installing the M 2 cold Plate 1 If present peel off the protective film from the th...

Page 87: ... drive from the module it must be replaced with an equivalent drive or EDSFF blank Required Tools and Supplies Anti static wrist strap and conductive foam pad recommended 3 10 1 EDSFF Drive Extraction Figure 107 EDSFF Drive Extraction from the Chassis 1 Press the button on the top of the EDSSF drive to release the lever see Letter A 2 Using the lever pull the EDSFF drive from the drive bay see Let...

Page 88: ...the riser assembly from Riser Slot 2 see Section 3 5 1 3 Remove the Intel VROC Upgrade Key from its packaging 4 Locate the white 4 pin key connector near the right edge of the server board 5 Place the key over the connector and confirm that the orientation of the key matches that of the connector 6 Press the key down onto the connector until it locks into place 3 12 Trusted Platform Module TPM Ins...

Page 89: ...ff with the fastener screw see Letter C 3 13 Ethernet Management Port Module EMP Module iPC AXXFCEMP Your system may or may not come preconfigured with an Ethernet Management Port Module This section provides instructions for the installation and removal of this accessory option The EMP module is hot swap capable and can be installed or removed without powering down the system or any of its module...

Page 90: ...ion key during boot time when the OEM or Intel Logo Screen or the POST Diagnostic Screen is displayed Note At initial system power on a USB Keyboard will not be functional until the USB Controller has been initialized during the power on self test POST process When the USB controller is initialized the system will beep once Only after that time will the key strokes from a USB keyboard be recognize...

Page 91: ...row is used to select the next value in a menu item s option list or a value field s pick list The selected item must then be activated by pressing the Enter key Select Menu The left and right arrow keys are used to move between the major menu pages The keys have no effect if a sub menu or pick list is displayed Tab Select Field The Tab key is used to move between fields For example Tab can be use...

Page 92: ...eused all the original packaging material must be used including both boxes and each inner packaging component In addition all inner packaging components must be reinstalled in the proper location to ensure adequate protection of the system for subsequent shipment Note The design of the inner packaging components does not prevent improper placement within the packaging assembly Only one correct pa...

Page 93: ... front of the system left piece in the following illustration and the red rear foam in the rear of the system right piece in the following illustration 4 Carefully place the system into the shipping bag and tape the bag shut 5 Carefully lower the system into the inner shipping box as shown below ...

Page 94: ...Intel Server D50TNP Family Integration and Service Guide 94 6 Put the front foam on the left top and the rear foam on the right top as shown below 7 Place the accessory box in the middle as shown below ...

Page 95: ...x closed end flaps first followed by side flaps Note By design the two side flaps will not meet Do not tape side flaps shut 9 Fold the top flaps of the outer box closed end flaps first followed by the side flaps 10 Tape the outer box using an H pattern Across the center first followed by both ends ...

Page 96: ...ture Identification All systems within the Intel Server System D50TNP family feature front loading modules The illustrations on the following pages provide a quick reference identifying the key features of all supported system configurations Figure 113 Module Identification for four Module System Configuration Figure 114 Module Identification for Two Module System Configuration Figure 115 Module I...

Page 97: ...entification for One Module System Configuration Systems are offered with either liquid cooling or air cooling options The following illustrations identify key system features for both cooling options Figure 117 Liquid Cooled System Back View Figure 118 Air Cooled System Back View ...

Page 98: ...and Service Guide 98 6 2 Front Panel Features Figure 119 1U Compute Module Front Panel Feature Identification Figure 120 2U Management Module Front Panel Feature Identification Figure 121 2U Storage Module Front Panel Feature Identification ...

Page 99: ...Integration and Service Guide 99 Figure 122 2U Accelerator Module Front Panel Feature Identification 6 3 Front Control Panel Features Figure 123 Front Control Panel Features Figure 124 I O Breakout Cable Connector Identification ...

Page 100: ...0TNP Family Integration and Service Guide 100 6 4 System Component Identification The following illustrations provide a quick reference to identify system components Figure 125 Server Chassis Component Identification ...

Page 101: ...Intel Server D50TNP Family Integration and Service Guide 101 Figure 126 1U liquid Cooled Compute Module Component Identification Figure 127 1U air Cooled Compute Module Component Identification ...

Page 102: ...Intel Server D50TNP Family Integration and Service Guide 102 Figure 128 2U Management Module Component Identification Figure 129 2U Storage Module Component Identification ...

Page 103: ... 130 2U Accelerator Module Component Identification 6 5 Server Board Features The following figures provide a general overview of the physical server boards identifying key features and component locations Figure 131 Intel Server Board D50TNP1SB Feature Identification ...

Page 104: ...llowing figure During the module boot process the BIOS executes many module configuration steps each of which is assigned a specific hex POST code number As each configuration step is started the BIOS displays the given POST code to the POST code diagnostic LEDs The purpose of these LEDs is to assist in troubleshooting a system hang condition during the POST process The diagnostic LEDs can be used...

Page 105: ...ion board Chassis plumbing assembly When service is necessary for any of the individual modules within the server system it is necessary to power off the selected module before removing it from the server chassis Before You Begin Before integration of any system components review all the safety and ESD precautions found in the Safety Warnings section at the beginning of this document System Refere...

Page 106: ...igure 134 Removing a Module 2 Press the green latch inward see Letter A and lower the lever in front of the module see Letter B 3 Grasp the lever and pull out the module from the chassis see Letter C Note To keep the system operating within its thermal limits module bays must be populated with either a module or blank when any of the installed modules are operational 7 1 2 Module Installation Requ...

Page 107: ...and push it into the chassis until the key pins in the lever are inside the chassis inner wall key hole 3 Raise the lever to secure the module see Letter B 7 1 2 1 Storage Module Installation D50TNP2MHSTAC Only Important Note When installing an Intel Storage Module in the chassis for the very first time the internal chassis rails need to be removed Required Tools and Supplies Anti static wrist str...

Page 108: ...not reinstall the internal chassis rails if the chassis is used only for the Intel Storage Module For any other type of module installation the internal chassis rails need to be reinstalled Follow the instructions below to reinstall the internal chassis rails Figure 137 Installing the Internal Chassis Rail 4 Place the new rail inside the chassis aligning the keying pins of the rail with the chassi...

Page 109: ...2MFALAC Required Tools and Supplies Anti static wrist strap and conductive workbench pad recommended 7 2 1 Air Duct Removal Figure 138 Removing the Air Duct 1 Press the latches on both sides of the module inwards see Letter A 2 Carefully lift the front edge of the air duct away from the module see Letter B 3 Pull the air duct away from the module see Letter C 7 2 2 Air Duct Installation Figure 139...

Page 110: ...the module contains the processors memory and add in cards This section provides instructions to open and close the top tray of the storage module Required Tools and Supplies Anti static wrist strap and conductive workbench pad recommended 7 3 1 Opening the Top Tray Figure 140 Removing the Air Duct 1 Unlock the latches on both sides of the top tray see Letter A 2 Lift the front edge of the top tra...

Page 111: ...ocessor Replacement 7 4 1 Processor Replacement for Standard Air Cooled Heat Sinks Components Required for each faulty processor New 3rd Gen Intel Xeon Scalable processor included shipping tray Existing processor carrier clip Existing processor heat sink new thermal interface material TIM Required Tools and Supplies Anti static wrist strap and conductive workbench pad recommended ESD Gloves recomm...

Page 112: ...ly Removal from Processor Socket 2 Ensure the heat sink anti tilt wire located over each of the four heat sink fasteners are in the outward position see Letter A 3 Using T 30 Torx screwdriver fully loosen all four heat sink fasteners in any order see Letter B 4 Set all four anti tilt wires on the heat sink to the inward position see Letter C 5 Carefully grasp the PHM and lift it straight up and of...

Page 113: ...e and onto the processor socket see Letter B Release finger grips to lock the cover in place Ensure the socket cover is locked in place Caution Do not press down on the center of the socket cover 7 4 1 2 PHM Disassembly Figure 145 Processor Removal from PHM Assembly 1 While holding down the PHM rotate the lever see Letter A from left to right until the processor lifts free from the processor carri...

Page 114: ...e following sections must be followed in the order specified These instructions assume that the processor heat sink new or reuse of existing has the necessary Thermal Interface Material TIM Honeywell PTM7000 already applied to the bottom of the heat sink Caution Full ESD precautions should be followed to perform reassembly of the PHM and reinstallation of the PHM to the server board At no time sho...

Page 115: ...wo opposite sides of the processor carrier clip until it clicks in place 4 Repeat step 3 for the other two sides 5 Locate the processor heat sink To avoid damage grasp it by its narrower sides as shown below Figure 149 Processor Heat Sink Handling 6 Place the heat sink bottom side up onto a flat surface If reusing an existing heat sink Properly clean off existing thermal interface material TIM fro...

Page 116: ...151 Pin 1 Indicator of Processor Carrier Clip 8 Align the pin 1 indicator of processor carrier clip with one of the diagonally cut corners on the base of the heat sink Or if present look for the Pin 1 indicator on the corner of the heat sink label 9 Gently press down the heat sink onto the processor carrier clip until it clicks into place 10 Ensure all four heat sink corners are securely latched t...

Page 117: ... Figure 152 Socket Protective Cover Removal 2 Remove the protective cover by squeezing the finger grips see Letter A and pulling the cover up see Letter B 3 Ensure the socket is free of damage or contamination before installing the PHM Caution If debris is observed blow it away gently Do not remove it manually such as with tweezers Figure 153 PHM Alignment with Socket Assembly Caution Processor so...

Page 118: ...lster plate alignment pins see Letter B 7 Ensure the PHM is sitting flat and even on the bolster plate 8 Set all four anti tilt wires on the heat sink to the outward position see Letter C Figure 155 Tighten Heat Sink Fasteners 9 Using a T30 Torx screwdriver tighten the heat sink fasteners to 8 in lb No specific sequence is needed for tightening 10 Reinstall the air duct and module see Sections 7 2...

Page 119: ...kbench pad recommended ESD Gloves recommended T 30 Torx screwdriver Phillips head screwdriver 2 Note The procedures below show the replacement for the 1U EVAC processor heat sink front To replace the 1U standard processor heat sink back follow the procedures in Section 7 4 1 Caution Fin edges of the processor heat sink are very sharp Intel recommends wearing thin ESD protective gloves when handlin...

Page 120: ...ule see Letter A Carefully remove the riser assembly by lifting it up away from the module see Letter B Figure 158 Loosen EVAC Heat Sink Fasteners 2 Using a Phillips screwdriver fully loosen the heat sink extension screws see Letter A 3 Ensure the heat sink anti tilt wire located over each of the four heat sink fasteners are in the outward position see Letter B 4 Using T 30 Torx screwdriver fully ...

Page 121: ...rd position see Letter D 6 Carefully grasp the PHM and lift it straight up and off the server board see Letter E 7 With the processor facing up set the PHM down onto a flat surface 8 Visually inspect that the processor socket is free of damage or contamination Caution If debris is observed blow it away gently Do not use tweezers or any other hard tools to remove the debris ...

Page 122: ...e and onto the processor socket see Letter B c Release finger grips to lock the cover in place d Ensure the socket cover is locked in place Caution Do not press down on the center of the socket cover 7 4 2 2 PHM Disassembly Figure 161 Processor Removal from PHM Assembly 1 While holding down the PHM rotate the lever see Letter A from left to right until the processor lifts free from the processor c...

Page 123: ...he following sections must be followed in the order specified These instructions assume that the processor heat sink new or reuse of existing has the necessary Thermal Interface Material TIM Honeywell PTM7000 already applied to the bottom of the heat sink Caution Full ESD precautions should be followed to perform reassembly of the PHM and reinstallation of the PHM to the server board At no time sh...

Page 124: ...wo opposite sides of the processor carrier clip until it clicks in place 4 Repeat step 3 for the other two sides 5 Locate the processor heat sink To avoid damage grasp it by its narrower sides as shown below Figure 165 Processor Heat Sink Handling 6 Place the heat sink bottom side up onto a flat surface If reusing an existing heat sink Properly clean off existing thermal interface material TIM fro...

Page 125: ...167 Pin 1 Indicator of Processor Carrier Clip 8 Align the pin 1 indicator of processor carrier clip with one of the diagonally cut corners on the base of the heat sink Or if present look for the Pin 1 indicator on the corner of the heat sink label 9 Gently press down the heat sink onto the processor carrier clip until it clicks into place 10 Ensure all four heat sink corners are securely latched t...

Page 126: ... Figure 168 Socket Protective Cover Removal 2 Remove the protective cover by squeezing the finger grips see Letter A and pulling the cover up see Letter B 3 Ensure the socket is free of damage or contamination before installing the PHM Caution If debris is observed blow it away gently Do not remove it manually such as with tweezers Figure 169 PHM Alignment with Socket Assembly Caution Processor so...

Page 127: ...er plate 6 Carefully lower the PHM over the four bolster plate alignment pins see Letter B Figure 171 PHM Installation onto Server Board 7 Ensure the PHM is sitting flat and even on the bolster plate 8 Set all four anti tilt wires on the heat sink to the outward position see Letter C 9 Using a T30 Torx screwdriver tighten the heat sink fasteners to 8 in lb see Letter D No specific sequence is need...

Page 128: ...processors are installed If only one processor is installed do not install a processor heat sink on an empty socket 7 4 3 Processor Replacement for Liquid Cooled Configurations Components Required for each faulty processor New 3rd Gen Intel Xeon Scalable processor included shipping tray Existing processor carrier clip Existing processor cold plate new thermal interface material TIM Required Tools ...

Page 129: ...74 Removing Processor Cold Plate 3 Loosen the center Velcro piece in the middle between the left and right processor cold plates 4 While holding the processor cold plate lift it slightly and carefully rotate it off the server board see Letter C Do not touch the processor pins 5 After removing the cold plate visually inspect that the socket is free of damage or contamination Caution If debris is ob...

Page 130: ...inger grips Ensure the socket cover is locked in place Note Do not press down on the center of the socket cover Figure 176 Processor Removal from Processor Carrier Clip and Processor Cold Plate 7 While holding down the processor cold plate without stretching the hose rotate the lever see Letter A from left to right until the processor lifts from the processor carrier clip 8 Holding down the proces...

Page 131: ... in the order specified These instructions assume that the processor cold plate has the necessary Thermal Interface Material TIM DOW CORNING TC 5622 already applied to the bottom of the cold plate Caution Full ESD precautions should be followed to perform reassembly of the PHM and reinstallation of the PHM to the server board At no time should the processor itself be handled New processor processo...

Page 132: ...cks in place 14 Repeat step 12 for the other two sides Caution Do not touch the socket pins The pins inside the processor socket are extremely sensitive A damaged processor socket may produce unpredictable system errors Figure 180 Socket Protective Cover Removal 15 Remove the socket protective cover by squeezing the finger grips and pulling the cover up 16 Ensure the socket is free of damage or co...

Page 133: ...to the processor socket Do not drop it 17 Align pin 1 indicators of the processor carrier clip and processor with pin 1 indicator on the bolster plate Place the processor carrier clip and processor on the socket see Letter A Figure 182 Assembling the Manual Applicator 18 Assemble the Bergquist SS95407 applicator Bergquist GF3500S35 thermal gap filler cartridge and Bergquist SS95437 nozzle as shown...

Page 134: ...sor Voltage Regulator VR components see Letter B Apply the filler only on the VR associated with the processor currently being replaced Note Apply enough thermal gap filler 0 3 cubic centimeters to fully cover the VR components with a minimum thickness of 1 mm Figure 184 Reinstalling Processor Cold Plate 20 Carefully reinstall the processor cold plate back onto the bolster plate s alignment pins s...

Page 135: ...d Modules The Intel Server Boards D50TNP1SB and D50TNP1SBCR support standard DDR4 RDIMMs and LDRIMMs In addition the D50TNP1SB server board supports Intel Optane persistent memory 200 series modules also known as Intel Optane PMem Note See Appendix B for general memory population rules Required Tools and Supplies Anti static wrist strap and conductive workbench pad recommended The figures below sh...

Page 136: ... Figure 187 Installing the DIMM in an Air Cooled System 5 Ensure that the ejection tabs at both ends of the memory slot are pushed outward to the open position see Letter A 6 Carefully unpack the replacement memory module taking care to only handle the device by its outer edges 7 Align the notch at the bottom edge of the memory module with the key in the memory slot see Letter B 8 Insert the memor...

Page 137: ...ools and Supplies Anti static wrist strap and conductive workbench pad recommended Phillips head screwdriver 2 Memory replacement tool and retention clip see Figure 188 Figure 188 Memory Replacement Tools and Retention Clip Figure 189 Loosen Memory Cooler Mounting Screws 1 Ensure the memory cooler mounting screws are loosened ...

Page 138: ... DIMM retention clip and the liquid cooling loop see Letter A 4 Lift the DIMM retention clip from the liquid cooling loop see Letter B Figure 191 Removing the DIMM from a Liquid Cooled System 5 Using the memory replacement tool open the ejection tabs at both ends of the memory slot see Letters A and B The memory module will slightly lift from the slot 6 Hold the memory module by its edges and lift...

Page 139: ...g care to only handle it by its outer edges 9 Align the notch at the bottom edge of the memory module with the key in the memory slot see Letter B 10 Insert the memory module into the memory slot Using even pressure along the top edge push down on the memory module see Letter C until the ejection tabs snap into place see Letter D 11 Ensure that the ejection tabs are firmly in place see Letter E Fi...

Page 140: ...rconnected to the internal plumbing of the liquid cooling loop Each heat spreader is positioned in between two DIMMs Thermal pads are affixed to both sides of a heat spreader to ensure efficient heat dissipation from the DIMMs to the heat spreader Should a thermal pad become damaged while installing or removing a DIMM or become damaged or worn for other reasons the following sections provide the i...

Page 141: ...ure that no thermal pad residue remains Figure 196 Installing a Thermal Pad 4 Apply a new thermal pad to the heat spreader by aligning the thermal pad s cut out edges with the heat spreader s shape see Letter A 5 Fold the thermal pad to the opposite side of the heat spreader see Letter B 6 Use a plastic tweezers or the included DIMM removal tool to apply pressure along the thermal pad from one sid...

Page 142: ...D is attached to see Section 7 8 Figure 197 Removing Air Cooled M 2 Heat Sink 1 Locate the heat sink on the left side of the riser assembly and remove the screw see Letter A 2 Slide the heat sink in the direction shown to remove it see Letter B Figure 198 Removing Air Cooled M 2 SSD 3 Remove the screw from the M 2 mounting standoff on the left side of the riser assembly see Letter A 4 Carefully ro...

Page 143: ...the M 2 connector and insert the SSD into the connector see Letter A 10 Push the free edge of the SSD towards the riser assembly see Letter B and secure the SSD to the M 2 mounting standoff with the previously removed screw see Letter C Figure 200 Installing Air Cooled M 2 Heat Sink 11 If installing a new heat sink peel off the protective film from the thermal interface material 12 Align the heat ...

Page 144: ...s the installation of Thermal Interface Material TIM BERGQUIST TGP 1000VOUS on the rear side of the M 2 SSD Figure 201 Removing the Liquid Cooled M 2 Cold Plate 1 Locate the cold plate on the left side of the riser assembly and remove the screw see Letter A 2 Slide the cold plate in the direction shown to remove it see Letter C Figure 202 Removing liquid Cooled M 2 SSD 3 Remove the screw from the ...

Page 145: ...h 110 mm form factor Center the pad vertically and horizontally The TIM can be re used from the previous M 2 SSD for up to 10 times before it has to be replaced Note Skip this step for M 2 SSD with 80 mm form factor Figure 204 Installing the M 2 SSD 9 If installed remove the screw from the M 2 mounting standoff on the left side of the riser assembly 10 Align the notch within the SSD edge connector...

Page 146: ...section provides assembly and installation procedures for modules that require low profile add in card installation The following procedures apply to both 1U and 2U modules in both air cooled and liquid cooled configurations Note The D50TNP Accelerator Module has additional support for up to four full height full length double width PCIe accelerator cards Follow the replacement procedures in Secti...

Page 147: ...ure 206 1U Riser Assembly and Riser Card Features D50TNP1MHCPAC and D50TNP2MHSTAC Figure 207 1U Riser Assembly and Riser Card Features D50TNP1MHCRAC D50TNP1MHCRLC and D50TNP1MHEVAC Figure 208 2U Riser Assembly and Riser Card Features D50TNP2MHSVAC and D50TNP2MFALAC ...

Page 148: ...emove the riser assembly by lifting it up and away from the module see Letter B 7 8 2 PCIe Add in Card Replacement Figure 210 Add in Card Removal 1 Carefully remove the add in card from the PCIe slot see Letter A 2 If not installing a new add in card carefully install the original metal filler plate over the opening on the metal frame of the riser assembly see Letter B 1U air cooled module shown 1...

Page 149: ...ated 7 Reinstall the riser card assembly into the module see Section 7 8 3 7 8 3 Riser Assembly Installation Figure 212 Installing a Riser Assembly 1 Align the riser card edge connector to the riser slot on the server board see Letter A 2 Carefully push down on the riser assembly until the riser card is securely seated into the riser slot 3 Ensure the three screw holes of the riser assembly are al...

Page 150: ...ory slots before replacing the liquid cooling loop see Section 7 5 2 The cooling components for liquid cooled systems are shown in the following figure Figure 213 Liquid Cooling Loop Components Required Tools and Supplies Anti static wrist strap and conductive foam pad recommended Phillips head screwdriver 2 Torx T 30 screwdriver D50TNP Liquid Cooling VR TIMM Application Tools iPC TNPLCVRTLS D50TN...

Page 151: ... on Quick Disconnect Block and Memory Cooler 1 Remove all fastener screws used to secure the quick disconnect block and memory cooler to the server board Figure 215 Removing the Screws on the Conduction Plate 2 Remove all fastener screws used to secure the conduction plate to the server board ...

Page 152: ...e installation and removal of the liquid cooling loop in the module 3 Align the captive screws on the plastic carrier with the screw holes on the liquid cooling loop see Letter A 4 Fasten all the screws see Letter B Figure 217 Loosening Processor Cold Plates 5 Ensure all the anti tilt wires on the cold plates are in the outward position see Letter A 6 Fully loosen all four fasteners on the cold pl...

Page 153: ...ach the processor carrier clip from the liquid cooling loop cold plate a Unlatch the hook on each corner of the processor carrier clip and lift it from the cold plate 11 Ensure each socket is free of damage or contamination before reinstalling the processor and processor carrier clip Caution If debris is observed blow it away gently Do not remove it manually such as with tweezers Figure 219 Align ...

Page 154: ...ont VR Cooling Blocks 13 Remove the front Voltage Regulator VR cooling blocks 14 Carefully unpack the new front VR cooling blocks from the liquid cooling loop replacement package Remove the protective covers on both ends Ensure the Thermal Interface Material TIM is in place and intact ...

Page 155: ...Removing front VR Cooling Blocks Protective Covers Note Ensure the TIM in the VR cooling blocks is not touched during subsequent installation steps Figure 222 Installing Front VR Blocks 15 Align the front VR cooling blocks to the screw holes following the orientation shown see Letter A 16 Using the fastener screws secure the front VR cooling blocks to the server board see Letter B Tighten to 3 in ...

Page 156: ...ts with a minimum thickness of 1 mm 19 Carefully unpack a new liquid cooling loop 20 Remove the protective covers on the PCIe add in card cold plate CPU 0 and CPU 1 cold plates and front VR cold plate 21 Ensure the Thermal Interface Material TIM for each cold plate is in place and the plastic protective film is removed Important Note The liquid cooling loop comes from the factory with a plastic ca...

Page 157: ...iquid cooling loop carrier and carefully place it into the module see Letter B Ensure the processor cold plates are properly aligned with the bolster plate s alignment pins Figure 226 Securing the Processor Cold Plates 24 Set all anti tilt wires on the cold plates to the outward position see Letter A 25 Tighten the fasteners on the cold plates using a T30 Torx screwdriver to 8 in lb No specific se...

Page 158: ...g Loop Carrier 26 Unscrew all 16 captive carrier screws on the plastic carrier see Letter A and carefully lift the carrier up and away from the module see Letter B Figure 228 Securing the Conduction Plate 27 Using the fastener screws secure the conduction plate to the server board Tighten to 3 in lb ...

Page 159: ...LC supports certain models of Mellanox add in cards Ensure the replacement add in cards are compatible with liquid cooled modules Required Components New Mellanox add in cards compatible with Intel Server System D50TNP liquid cooled module Required Tools and Supplies Anti static wrist strap and conductive foam pad recommended 1 Remove the riser assembly containing the Mellanox add in card and remo...

Page 160: ... installed the following steps can be performed in conjunction with the instruction in the add in card documentation Figure 231 Installing the Mellanox Add in Card Foam Pads 5 Prepare the foam pads and peel the liner off on the adhesive side 6 Attach the adhesive side of the foam pads to the bottom side of the Mellanox add in card 7 Install the Mellanox add in card on the riser assembly following ...

Page 161: ...mmended Phillips head screwdriver 1 Figure 232 Removing a Riser Assembly 1 Remove the three screws that secure the right side 2U riser assembly to the module see Letter A 2 Carefully remove the riser assembly by lifting it up away from the module see Letter B Figure 233 Removing the Bracket from the Chassis 3 Remove the screws that secure the bracket to the chassis see Letter A 4 Remove the bracke...

Page 162: ... the screw from the metal plate that holds two OCuLink cables along the inside of the chassis see Letter A 6 Carefully move the metal plate to create a slight opening to remove the two OCuLink cables see Letter B Figure 235 Removing the OCuLink Cables 7 Disconnect all the OCuLink cables from the connectors on the server board ...

Page 163: ...6 Disconnecting the Riser Card Power Cables 8 Disconnect the riser card power cables from the connectors on the accelerator power board Figure 237 Disconnecting Add in Power Cable 9 Disconnect the accelerator add in card power cables from the connectors on the power board ...

Page 164: ...ptive screws on the Accelerator Module assembly see Letter A 11 Carefully remove the Accelerator Module riser assembly by lifting it up away from the module see Letter B Figure 239 Lifting the Flap up on the Front Side of the Riser Assembly 12 Remove the screw that holds the flap and lift the flap up on the front side of the riser assembly ...

Page 165: ...the back side to detach the accelerator add in card from the riser assembly Figure 241 Removing the Accelerator Add in Card from the Riser Assembly 14 Remove the screw on the metal bracket of the existing accelerator add in card see Letter A 15 Carefully disengage the add in card from the PCIe slot and pull it away from the riser assembly see Letter B Flap not shown in figure ...

Page 166: ...9 If the existing accelerator add in card has the extension bracket remove it and install it on the new accelerator add in card Figure 243 Installing the Accelerator Add in Card in the Riser Assembly 20 Align the bracket of the accelerator add in card to the opening of the riser assembly 21 Install the power cables on the new add in card 22 Route the accelerator add in card power cable through the...

Page 167: ...elerator add in card is in the top slot or bottom slot of the riser assembly 26 Repeat steps 16 through 25 to install other accelerator add in cards as needed Figure 245 Installing the Accelerator Module Riser Assembly 27 Install the Accelerator Module riser assembly by first aligning the captive screws to the mounting holes on the module Then carefully lower the riser assembly to module see Lette...

Page 168: ... Figure 246 Connecting the Riser Card Power Cables 29 Connect the riser card power cables to the connectors on the power board Figure 247 Connecting Add in Card Power Cable 30 Connect the accelerator add in card power cables to the connectors on the power board ...

Page 169: ...cable has the number printed on it Connect each OCuLink cable to the OCuLink connector on the server board that has the same number Figure 249 Installing the Inside Screws for OCuLink Cables 32 For the two OCuLink cables that go along the inside of the chassis insert them under the metal plate and hold the metal plate to the chassis see Letter A 33 Fasten the screws to secure the metal plate to th...

Page 170: ...1 Installing Riser Assembly into the Chassis 35 Align the riser card edge connector to the riser slot on the server board 36 Carefully push the riser assembly until the riser card is securely seated into the riser slot see Letter A 37 Ensure the three screw holes of the riser assembly are aligned and flush with the mounting holes of the module 38 With three screws secure the riser assembly to the ...

Page 171: ...tor Module Follow steps 1 through 11 of Section 7 11 2 Remove the accelerator add in card from the accelerator riser assembly Follow steps 12 through 15 of Section 7 11 Figure 252 Accelerator Riser Assembly Rear Bracket Removal 3 Using Phillips head screw driver 1 remove the screws that secure the rear bracket to the riser assembly see Letter A 4 Slide the rear bracket and remove it from the riser...

Page 172: ...ecure the accelerator riser card to the riser assembly see Letter B Figure 255 Accelerator Riser Assembly Rear Bracket Installation 10 Slide the rear bracket into the riser assembly see Letter A 11 Using Phillips head screw driver 1 fasten the screws to secure the rear bracket to the riser assembly see Letter B 12 Reinstall the accelerator add in card to the accelerator riser assembly Follow steps...

Page 173: ...trap and conductive foam pad recommended Phillips head screwdriver 2 1 Remove the accelerator riser assembly from the Accelerator Module Follow steps 1 through 11 of Section 7 11 Figure 256 Accelerator Module Power Connector Board Removal 2 Remove the black screw and the silver screws that secure the power connector board to the Accelerator Module see Letter A 3 Carefully remove the power connecto...

Page 174: ... Lower the power connector board into the slot in the module and slide it until all the screw holes are aligned see Letter A 6 Secure the power connector board to the module using the black screw and the silver screws 7 Reinstall the Accelerator riser assembly to the Accelerator Module Follow steps 27 through 38 of Section 7 11 ...

Page 175: ...e Key 4 Locate the Intel VROC upgrade key near the right edge of the server board 5 Using the key pull tab carefully pull up on the key until it disengages from the connector Figure 259 Installing the Intel VROC Upgrade Key 6 Remove the Intel VROC upgrade key from its packaging 7 Place the key over the connector and confirm that the orientation of the key matches that of the connector 8 Press the ...

Page 176: ... 7 If needed remove the plastic stand off from the server board mounting hole Figure 261 Installing the Trusted Platform Module TPM 8 Remove the new TPM module from its packaging 9 If not already installed insert the plastic stand off into the server board mounting hole see Letter A 10 Place the TPM module over the connector and confirm the orientation of the module 11 Press the module down onto t...

Page 177: ...lty power supply 2 Detach the power cord from the power supply to be removed 3 Push and hold the green latch in the direction shown see Letter A 4 Use the handle to pull the power supply module from the system fan assembly see Letter B Figure 263 Installing the Power Supply 5 Insert the power supply module into the system fan assembly see Letter A 6 Push the power supply module into the system fan...

Page 178: ...crewdriver 2 Figure 264 Server Board Removal 1 Remove the module from the chassis see Section 7 1 1 2 For air cooled modules remove the air duct see Section 7 2 1 3 Remove riser card assemblies see Section 7 8 4 Remove all options installed onto the server board including if installed the Intel VROC 7 5 key see Section 3 11 5 Remove all DIMMs see Section 7 5 6 For liquid cooled module remove the l...

Page 179: ...with the standoffs in the module tray see Letter A 13 Fasten the server board to the module tray using all the screws see Letter B Tighten to 5 in lb 14 Reinstall processors see Section 7 4 15 For liquid cooled module reinstall the liquid cooling loop see Section 7 9 16 Reinstall DIMMs see Section 7 5 17 Reinstall riser card assemblies see Section 7 8 18 Reinstall all options previously removed fr...

Page 180: ...stem thermal controls to maintain system thermals below maximum limits Depending on the system configuration the system fans are designed to be hot swappable In air cooled configurations the two outer 80 mm system fans are hot swappable In liquid cooled and air cooled system configurations three 60 mm system fans share the same assembly housing as a power supply module The power supply module must...

Page 181: ...e Letter A use the handle to pull the system fan assembly out of the bay see Letter B Figure 269 Installing the System Fan 3 Ensure no power supply is pre installed in the system fan assembly 4 Insert the system fan assembly into the open fan assembly bay see Letter A Note 80 mm fans must be installed on the sides air cooled system only 60 mm fans must be installed in the three center bays 5 Push ...

Page 182: ...d conductive foam pad recommended Phillips head screwdriver 2 1 Power down all nodes in the server chassis 2 Remove the server chassis from the rack and place it on a flat surface Important Safety Note Due to the weight of a fully configured system Intel recommends use a mechanical lift to aid with the removal of the server chassis from the rack and or use at least two people to remove the server ...

Page 183: ...rews that secure each of the quick connect couplings to the covers Figure 272 Removing Quick Connect Covers 9 Pull the quick connect covers upwards then out Figure 273 Removing the Back Cover 10 Locate the chassis back cover and remove the four screws with a Phillips head screwdriver see Letter A 11 Slide the cover towards the back and lift it up see Letter B ...

Page 184: ...mbing Assembly 12 Using a Phillips head screwdriver remove the six screws on the top brace of the plumbing assembly and loosen the four captive screws on the sides of the brace see Letter A 13 Carefully pull towards the front of the chassis and then up to remove the plumbing assembly see Letter B ...

Page 185: ...e plumbing assembly inside the chassis and slide the quick connect couplings into their respective bays see Letter A 15 Align and secure the plumbing assembly to the chassis Use a Phillips head screwdriver and the six screws provided on the top brace and tighten the four captive screws on the sides of the brace see Letter B ...

Page 186: ...vers 16 Install the quick connect covers by sliding them into the chassis and then pressing down Figure 277 Securing the Quick Connect Couplings to the Covers 17 Align and secure the quick connect couplings to the covers using a Phillips head screwdriver and the four screws provided for each coupling ...

Page 187: ...t couplings in the back of the chassis 19 Install the system fans see Section 7 18 20 Install the power supplies see Section 7 16 Figure 279 Securing the Back Cover 21 Place the back cover on top of the chassis and slide it towards the front see Letter A 22 Secure the back cover with a Phillips head screwdriver and the four screws provided see Letter B ...

Page 188: ... system Intel recommends use a mechanical lift to aid with the removal of the system from the rack and or use at least two people to remove the system from the rack or remove all installed modules from the system before attempting to remove the system from the rack Figure 280 Removing the Back Cover 2 Make sure all modules are removed from the server chassis see Section 7 1 1 3 Locate the chassis ...

Page 189: ...tem fan power cables from the power distribution board by pressing inwards on each clip and lifting them up 6 Remove the power supplies see Section 7 16 7 Remove the system fans see Section 7 18 8 Remove the EMP module or EMP module blank if installed see Section 3 13 9 If the system is liquid cooled remove the chassis plumbing see Section 7 19 ...

Page 190: ...moving the Power Distribution Board 10 Remove the screws securing the power distribution board to the chassis with a Phillips head screwdriver see Letter A 11 Remove the PDB by lifting it upwards tilting up the front side of the PDB and then lifting the board out see Letter B ...

Page 191: ... then sliding the board to the front see Letter A 14 Secure the power distribution board using a Phillips head screwdriver and the provided screws see Letter B 15 If the system is liquid cooled install the chassis plumbing see Section 7 19 16 Install the EMP module if available or an EMP module blank see Section 3 13 17 Install the system fan assemblies see Section 7 18 18 Install the power suppli...

Page 192: ...system fan cables by pressing inwards on each clip and pressing them down into the appropriate connector Figure 285 Securing the Back Cover 20 Place the back cover over the top of the chassis and slide it towards the front see Letter A 21 Secure the back cover with a Phillips head screwdriver and the four screws provided see Letter B ...

Page 193: ...rails at once 1 Power the modules down 2 Remove the server chassis from the rack and place it on a flat surface Important Safety Note Due to the weight of a fully configured system Intel recommends use a mechanical lift to aid with the removal of the system from the rack and or use at least two people to remove the system from the rack or remove all installed modules from the system before attempt...

Page 194: ...pad recommended Before following the instructions in this section remove the selected module from the server chassis see Section 7 1 1 and then remove the riser assemblies from the module see Section 7 8 Figure 288 Removing the System Battery 1 Locate the battery on the server board see above figure 2 Gently move the metal clip outward to release the battery see Letter A 3 Remove the old battery f...

Page 195: ...ling the System Battery 7 Insert the battery into the battery socket see above figure 8 Reinstall the riser assemblies see Section 7 7 9 Reinstall the module in the chassis see Section 7 1 2 10 Use the BIOS setup utility to restore BIOS settings and reset the system time and date ...

Page 196: ...g one of the support phone numbers available at https www intel com content www us en support contact support html charges may apply Intel also offers Partner Alliance Program members around the clock 24x7 technical phone support on Intel server boards server chassis server RAID controller cards and Intel Server Management at https www intel com content www us en partner alliance overview html Not...

Page 197: ...pplied commonly for each installed processor For best system performance memory must be installed in all eight channels for each installed processor For best system performance in dual processor configurations installed DDR4 DIMM type and population for DDR4 DIMMs configured to CPU 1 must match DDR4 DIMM type and population configured to CPU 0 B 2 Intel Optane Persistent Memory 200 Series Module R...

Page 198: ...3 2666 2400 Gold 6300 processors 128 256 512 3200 2933 2666 2400 Platinum 8300 processors 128 256 512 3200 2933 2666 2400 Table 5 Standard DDR4 DIMMs Compatible with Intel Optane PMem Modules Type Ranks per DIMM and Data Width DIMM Size GB 8 Gb DRAM density 16 Gb DRAM density RDIMM PTH up to 2933 MT s SMT up to 3200 MT s SR x8 N A N A SR x4 16 32 DR x8 16 32 DR x4 32 64 3DS RDIMM PTH up to 2933 MT...

Page 199: ...aved any context to the hard disk On S0 Module and the operating system are up and running Module ID button w integrated LED Toggles the integrated blue ID LED on and off The module ID LED is used to identify an Intel D50TNP Module within a chassis for maintenance when installed in a rack of similar server systems The module ID LED can also be toggled on and off remotely using the IPMI Chassis Ide...

Page 200: ...able Errors over a threshold and migrating to a spare DIMM memory sparing This indicates that the module no longer has spared DIMMs a redundancy lost condition In mirrored configuration when memory mirroring takes place and the module loses memory redundancy Battery failure BMC executing in uBoot Indicated by module ID LED blinking at 3 Hz while Status blinking at 1 Hz Module in degraded state no ...

Page 201: ...de DIMM Thermal Trip or equivalent SSB Thermal Trip or equivalent Processor ERR2 signal asserted BMC Video memory test failed module ID LED shows blue solid on for this condition Both uBoot BMC firmware images are bad module ID LED shows blue solid on for this condition 240 VA fault Fatal Error in processor initialization o Processor family not identical o Processor model not identical o Processor...

Page 202: ...l jumper blocks to configure protect or recover specific features of the server board The following figure identifies the location of each jumper block on the server board Pin 1 of each jumper is identified by the arrowhead silkscreened on the server board next to the pin The following sections describe how each jumper is used Figure 291 Reset and Recovery Jumper Block Location ...

Page 203: ...ime not set 5220 BIOS Settings reset to default settings The system time and date will need to be reset D 2 Password Clear Jumper PASSWD_CLR J12 This jumper causes both the user password and the administrator password to be cleared if they were set The operator should be aware that this condition creates a security gap until passwords have been configured again through the BIOS Setup utility This ...

Page 204: ...d requires reinstallation Note The Intel ME firmware update files are included in the system update packages SUP posted to Intel s download center See Table 1 To use the Intel ME firmware force update jumper perform the following steps 1 Power down the Intel D50TNP Module 2 Remove the module from the chassis 3 Remove the riser assemblies from the module 4 Move the ME FRC UPDT J13 jumper from pins ...

Page 205: ...ser assemblies from the module 13 Move the BMC FRC UPDT J2X4 jumper back to pins 1 2 default 14 Reinstall the riser assemblies 15 Reinstall the module in the chassis 16 Power on the module 17 Boot to the EFI shell 18 Change directories to the folder containing the update files 19 Reinstall the board system SDR data by running the FRUSDR utility 20 After the SDRs have been loaded reboot the module ...

Page 206: ...n Downgrading to a BMC version with lower SVN may result in the loss of functionality and security features that are present in a higher SVN but was not implemented in the lower SVN Caution When downgrading to an older version of BMC modules may end up with a firmware stack combination that is not supported and therefore could experience unpredictable behavior Note Latest system update packages ar...

Page 207: ...ed by eight LEDs four green LEDs and four amber LEDs The POST codes are divided into two nibbles an upper nibble and a lower nibble The upper nibble bits are represented by amber diagnostic LEDs and the lower nibble bits are represented by green diagnostics If the bit is set the corresponding LED is lit If the bit is clear the corresponding LED is off For each set of nibble bits LED 0 represents t...

Page 208: ...ers on the channel level B6 1 0 1 1 0 1 1 0 Perform the JEDEC defined initialization sequence B7 1 0 1 1 0 1 1 1 Train DDR4 ranks 1 0 0 0 0 0 0 0 1 Train DDR4 ranks 2 0 0 0 0 0 0 1 0 Train DDR4 ranks Read DQ DQS training 3 0 0 0 0 0 0 1 1 Train DDR4 ranks Receive enable training 4 0 0 0 0 0 1 0 0 Train DDR4 ranks Write DQ DQS training 5 0 0 0 0 0 1 0 1 Train DDR4 ranks DDR channel training done B8...

Page 209: ...nnels of all sockets are disabled due to hardware memtest error 03h No memory installed All channels are disabled E9 1 1 1 0 1 0 0 1 Memory is locked by Intel TXT and is inaccessible EA 1 1 1 0 1 0 1 0 DDR4 channel training error 01h Error on read DQ DQS Data Data Strobe init 02h Error on Receive Enable 03h Error on Write Leveling 04h Error on write DQ DQS Data Data Strobe EB 1 1 1 0 1 0 1 1 Memor...

Page 210: ...ting AA 1 0 1 0 1 0 1 0 Protocol layer and other uncore settings AB 1 0 1 0 1 0 1 1 Transition links to full speed operation AE 1 0 1 0 1 1 1 0 Coherency settings AF 1 0 1 0 1 1 1 1 KTI initialization done PEI Phase 10 0 0 0 1 0 0 0 0 PEI Core 11 0 0 0 1 0 0 0 1 CPU PEIM 15 0 0 0 1 0 1 0 1 Platform Type Init 19 0 0 0 1 1 0 0 1 Platform PEIM Init Integrated I O Progress Codes E0 1 1 1 0 0 0 0 0 Int...

Page 211: ...A 1 1 0 0 1 0 1 0 Internal Use CB 1 1 0 0 1 0 1 1 Check RAS support CC 1 1 0 0 1 1 0 0 Pmem ADR Init CD 1 1 0 0 1 1 0 1 Internal Use CE 1 1 0 0 1 1 1 0 Memory Late Init CF 1 1 0 0 1 1 1 1 Determine MRC boot mode D0 1 1 0 1 0 0 0 0 MKTME Early Init D1 1 1 0 1 0 0 0 1 SGX Early Init D2 1 1 0 1 0 0 1 0 Memory Margin Test D3 1 1 0 1 0 0 1 1 Internal Use D5 1 1 0 1 0 1 0 1 Internal Use D6 1 1 0 1 0 1 1...

Page 212: ...egin A6 1 0 1 0 0 1 1 0 DXE SCSI reset A7 1 0 1 0 0 1 1 1 DXE SCSI detect A8 1 0 1 0 1 0 0 0 DXE SCSI enable AB 1 0 1 0 1 0 1 1 DXE SETUP start AC 1 0 1 0 1 1 0 0 DXE SETUP input wait AD 1 0 1 0 1 1 0 1 DXE Ready to Boot AE 1 0 1 0 1 1 1 0 DXE Legacy Boot AF 1 0 1 0 1 1 1 1 DXE Exit Boot Services B0 1 0 1 1 0 0 0 0 RT Set Virtual Address Map Begin B1 1 0 1 1 0 0 0 1 RT Set Virtual Address Map End ...

Page 213: ...ontinues booting in a degraded state The user may want to replace the erroneous unit The POST Error Pause option setting in the BIOS Setup does not have any effect on this error Major An error message is displayed to the Error Manager screen and an error is logged to the SEL If the BIOS Setup option Post Error Pause is enabled operator intervention is required to continue booting the system If the...

Page 214: ...jor 8131 CPU 1 disabled Major 8160 CPU 0 unable to apply microcode update Major 8161 CPU 1 unable to apply microcode update Major 8170 CPU 0 failed Self Test BIST Major 8171 CPU 1 failed Self Test BIST Major 8180 CPU 0 microcode update not found Minor 8181 CPU 1 microcode update not found Minor 8190 Watchdog timer failed on last boot Major 8198 OS boot watchdog timer failure Major 8300 Baseboard M...

Page 215: ...lization CPU0_DIMM_H2 Remove the disabled DIMM Major 8537 Memory failed test initialization CPU0_DIMM_H3 Remove the disabled DIMM Major 8538 Memory failed test initialization CPU1_DIMM_A1 Remove the disabled DIMM Major 8539 Memory failed test initialization CPU1_DIMM_A2 Remove the disabled DIMM Major 853A Memory failed test initialization CPU1_DIMM_A3 Remove the disabled DIMM Major 853B Memory fai...

Page 216: ...ilure CPU0_DIMM_A1 Major 8561 Memory encountered a Serial Presence Detection SPD failure CPU0_DIMM_A2 Major 8562 Memory encountered a Serial Presence Detection SPD failure CPU0_DIMM_A3 Major 8563 Memory encountered a Serial Presence Detection SPD failure CPU0_DIMM_B1 Major 8564 Memory encountered a Serial Presence Detection SPD failure CPU0_DIMM_B2 Major 8565 Memory encountered a Serial Presence D...

Page 217: ...failed test initialization CPU1_DIMM_C3 Remove the disabled DIMM Major 85C1 Memory failed test initialization CPU1_DIMM_D1 Remove the disabled DIMM Major 85C2 Memory failed test initialization CPU1_DIMM_D2 Remove the disabled DIMM Major 85C3 Memory failed test initialization CPU1_DIMM_D3 Remove the disabled DIMM Major 85C4 Memory failed test initialization CPU1_DIMM_E1 Remove the disabled DIMM Maj...

Page 218: ...nce Detection SPD failure CPU1_DIMM_D2 Major 85E3 Memory encountered a Serial Presence Detection SPD failure CPU1_DIMM_D3 Major 85E4 Memory encountered a Serial Presence Detection SPD failure CPU1_DIMM_E1 Major 85E5 Memory encountered a Serial Presence Detection SPD failure CPU1_DIMM_E2 Major 85E6 Memory encountered a Serial Presence Detection SPD failure CPU1_DIMM_E3 Major 85E7 Memory encountered...

Page 219: ...tup error message is displayed on the BIOS Setup Error Manager screen An error is logged to the system event log SEL with the POST error code The POST Error Pause option setting in the BIOS Setup does not have any effect on this error If the system is not able to boot the system generates a beep code consisting of three long beeps and one short beep The system cannot boot unless the error is resol...

Page 220: ...rts the BMC to set the system status LED to steady amber Does not disable the processor Displays 0197 Processor speeds unable to synchronize message in the error manager Takes fatal error action see above and does not boot until the fault condition is remedied Processor Intel UPI link frequencies not identical Fatal If the link frequencies for all Intel Ultra Path Interconnect Intel UPI links can ...

Page 221: ...plugs into shall be installed near the equipment and shall be easily accessible SAFETY STEPS Whenever you remove the chassis covers to access the inside of the system follow these steps 1 Turn off all peripheral devices connected to the system 2 Turn off the system by pressing the power button 3 Unplug all AC power cords from the system or from wall outlets 4 Label and disconnect all cables connec...

Page 222: ...ssis parts Contact should be made with care Consider wearing protective gloves Danger of explosion if the battery is incorrectly replaced Replace only with the same or equivalent type recommended by the equipment manufacturer Dispose of used batteries according to manufacturer s instructions The system is designed to operate in a typical office environment Choose a site that is Clean and free of a...

Page 223: ...pour accéder à l intérieur du système suivez les consignes suivantes 1 Mettez hors tension tous les périphériques connectés au système 2 Mettez le système hors tension en mettant l interrupteur général en position OFF bouton poussoir 3 Débranchez tous les cordons d alimentation c a du système et des prises murales 4 Identifiez et débranchez tous les câbles reliés aux connecteurs d E S ou aux accès...

Page 224: ...n aux broches aiguës des cartes et aux bords tranchants du capot Nous vous recommandons l usage de gants de protection Danger d explosion si la batterie n est pas remontée correctement Remplacer uniquement avec une batterie du même type ou d un type équivalent recommandé par le fabricant Disposez des piles usées selon les instructions du fabricant Le système a été conçu pour fonctionner dans un ca...

Page 225: ...g abnehmen um an das Systeminnere zu gelangen sollten Sie folgende Schritte beachten 1 Schalten Sie alle an Ihr System angeschlossenen Peripheriegeräte aus 2 Schalten Sie das System mit dem Hauptschalter aus 3 Ziehen Sie den Stromanschlußstecker Ihres Systems aus der Steckdose 4 Auf der Rückseite des Systems beschriften und ziehen Sie alle Anschlußkabel von den I O Anschlüssen oder Ports ab 5 Trag...

Page 226: ...seteile scharfe Spitzen und Kanten aufweisen Arbeiten an Platinen und Gehäuse sollten vorsichtig ausgeführt werden Sie sollten Schutzhandschuhe tragen Bei falschem Einsetzen einer neuen Batterie besteht Explosionsgefahr Die Batterie darf nur durch denselben oder einen entsprechenden vom Hersteller empfohlenen Batterietyp ersetzt werden Entsorgen Sie verbrauchte Batterien den Anweisungen des Herste...

Page 227: ...io per accedere all interno del sistema seguire i seguenti passi 1 Spegnere tutti i dispositivi periferici collegati al sistema 2 Spegnere il sistema usando il pulsante spento acceso dell interruttore del sistema 3 Togliere tutte le spine dei cavi del sistema dalle prese elettriche 4 Identificare e sconnettere tutti i cavi attaccati ai collegamenti I O od alle prese installate sul retro del sistem...

Page 228: ...caldati Fare attenzione alla presenza di piedini appuntiti e parti taglienti sulle schede e sul telaio È consigliabile l uso di guanti di protezione Esiste il pericolo di un esplosione se la pila non viene sostituita in modo corretto Utilizzare solo pile uguali o di tipo equivalente a quelle consigliate dal produttore Per disfarsi delle pile usate seguire le istruzioni del produttore Il sistema è ...

Page 229: ...ndo extraiga la tapa del chasis para acceder al interior del sistema siga las siguientes instrucciones 1 Apague todos los dispositivos periféricos conectados al sistema 2 Apague el sistema presionando el interruptor encendido apagado 3 Desconecte todos los cables de alimentación CA del sistema o de las tomas de corriente alterna 4 Identifique y desconecte todos los cables enchufados a los conector...

Page 230: ...ene tener en cuenta que en el chasis o en el tablero puede haber piezas cortantes o punzantes Por ello se recomienda precaución y el uso de guantes protectores Existe peligro de explosión si la pila no se cambia de forma adecuada Utilice solamente pilas iguales o del mismo tipo que las recomendadas por el fabricante del equipo Para deshacerse de las pilas usadas siga igualmente las instrucciones d...

Page 231: ...חשב ים החשמל כבל י בקלות נגיש ויהיה לציוד שמסירי פעם בכל בטיחות שלבי הבאים הצעדים את לבצע יש המערכת של הפנימי לחלק לגשת כדי המעטפת מכסי את ם 1 למערכת שמחוברים ההיקפיים ההתקנים כל את לכבות 2 ההפעלה מתג על לחיצה ידי על המערכת את לכבות 3 ז ח חשמל כבלי כל את לנתק הקיר משקעי או מהמערכת 4 א פלט קלט למחברי המחוברים הכבלים כל את לתייג אותם ולנתק המערכת בגב ליציאות ו 5 אלקטרוסטטיות מפריקות מסוימת הגנה לספק...

Page 232: ...ם ומפזר המיקרו מעבד לוח בחלקי חדים וקצוות סיכות ייתכנו כן כמו פועלת כשהמערכת לוהטים מגן כפפות עטיית לשקול יש בזהירות לגעת יש שונים ומעטפת יש הציוד יצרן ידי על שמומלץ ערך שווה או סוג באותו רק להחליף יש שגוי באופן מוחלפת הסוללה אם פיצוץ סכנת סוללות להשליך היצרן הוראות פי על משומשות שהוא אתר לבחור יש טיפוסית משרדית בסביבה לפעול נועדה המערכת בחדר רגיל באופן שקיים אבק למעט באוויר נישאים מחלקיקים וחופשי...

Page 233: ...re Interface EMP module Ethernet Management Port module ESD Electrostatic discharge FRU Field replacement unit PHM Processor heat sink module MRC Memory Reference Code NVMe Non Volatile Memory Express OOB Out of Band PCIe Peripheral component interconnect express PDB Power distribution board POST Power On Self Test PTH Plated Through Hole Rack Casing containing one or multiple chassis SDR Sensor d...

Reviews: