background image

Intel

®

 Solid-State Drive

Installation Guide

1


Intel

®

 Solid-State Drive

Installation Guide

Overview

Installing an Intel SSD consists of three main steps:

Before you Begin 

Download and save


the Intel Data Migration Software to your current storage device:

http://www.intel.com/go/ssdinstallation

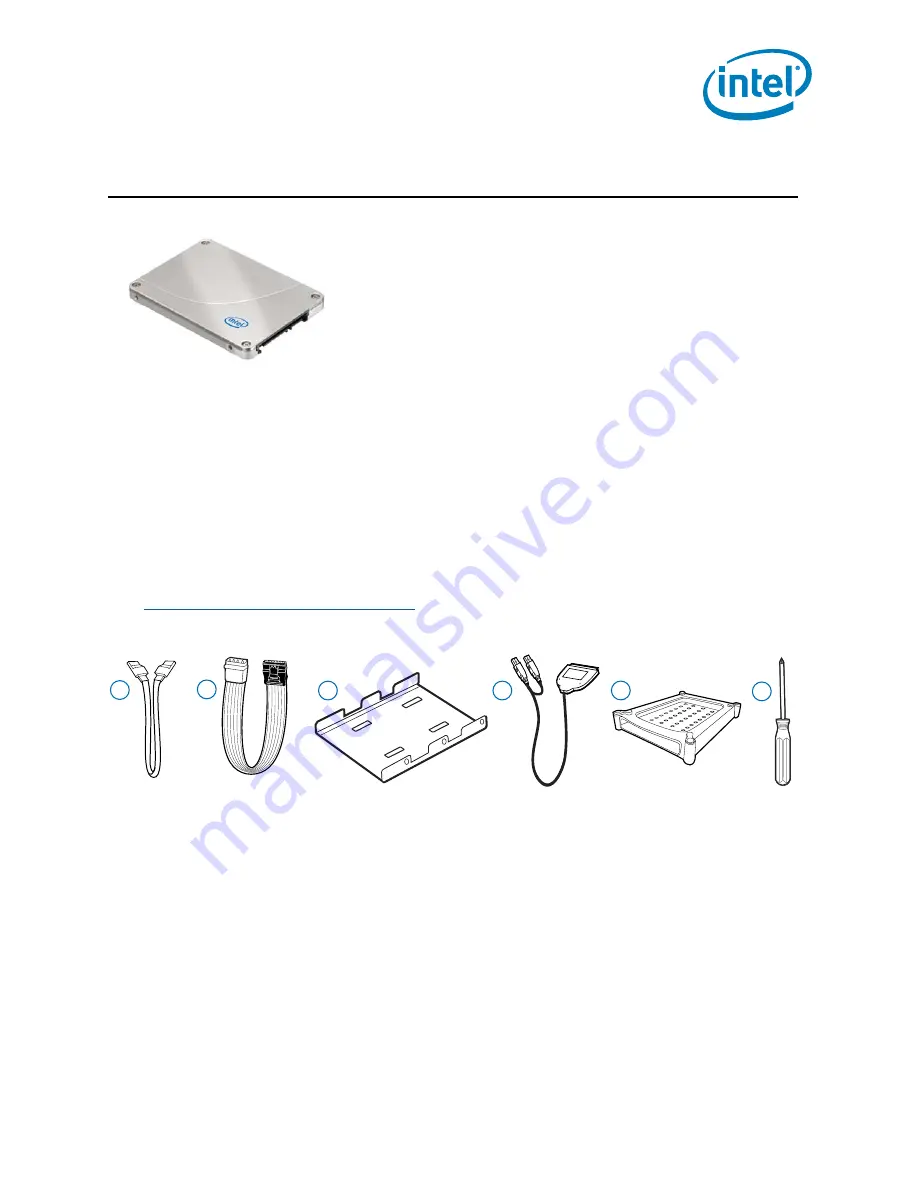
Confirm you have the necessary hardware for installation: 

Note:

Contents vary based on package purchased.

This guide explains how to install an Intel

®

 Solid-State Drive 

(Intel

®

 SSD) in a SATA-based desktop or notebook computer. 

The instructions include migrating your data from your current 

storage device (such as a hard disk drive) to your new Intel SSD 

using Intel

®

 Data Migration Software. 

1.

Connect the Intel SSD to your computer.

2.

Migrate your data from your current storage device to your new Intel SSD.

3.

Swap the placement of your current storage device with your new Intel SSD.

Hardware item

Required for 

1.  SATA-to-SATA interface cable

Desktop computers

2. SATA power adapter

Desktop computers without a SATA power cable

3. 3.5-inch mounting adapter and screws

Desktop computers with 3.5-inch drive bay

4. USB-to-SATA cable

Notebook computers

5. Drive sleeve

Notebook computers (optional - for use with your old 
storage device after the SSD is installed)

6. Phillips screwdriver

Most computers

2

1

3

4

5

6

Summary of Contents for 530 Series

Page 1: ...ing your data from your current storage device such as a hard disk drive to your new Intel SSD using Intel Data Migration Software 1 Connect the Intel SSD to your computer 2 Migrate your data from your current storage device to your new Intel SSD 3 Swap the placement of your current storage device with your new Intel SSD Hardware item Required for 1 SATA to SATA interface cable Desktop computers 2...

Page 2: ...rs next section Notebook Computers on page 4 Desktop Computers 1 If your desktop computer has a 3 5 inch drive bay attach the Intel SSD to the mounting adapter This helps the SSD fit securely in a drive bay If your desktop computer has a 2 5 inch drive bay you do not need to attach the mounting adapter Go to step 2 in this section a With the SSD right side up Intel logo showing place the Intel SSD...

Page 3: ...uter does not have a SATA power cable and instead uses a 4 pin power connector use a SATA power adapter The SATA power adapter comes with certain packages or can be purchased separately Figure 2 Connect SATA interface and power cables 6 Slide the connected Intel SSD with mounting adapter into an available 3 5 inch drive bay or secure the Intel SSD to the computer by inserting one screw in each of ...

Page 4: ...the Intel SSD See Figure 4 Figure 4 Connect USB to SATA cable to Intel SSD 3 Power on the computer if necessary and wait for the operating system to recognize the Intel SSD A message appears when the operating system recognizes the Intel SSD Note SATA devices may draw more power than some systems are capable of delivering through USB ports If the Intel SSD is not recognized remove other USB device...

Page 5: ... files or data from your current storage device to reduce its image size 2 After downloading double click the Intel Data Migration Software icon to start the installation 3 When the Intel Data Migration Software installation screen appears choose Install Intel Data Migration Software Figure 5 Intel Data Migration Software Installation screen The Intel Data Migration Software wizard starts and guid...

Page 6: ...cut icon on your desktop 2 Complete the registration form when prompted and then click Register Now After registering the software the Intel Data Migration Software screen appears Figure 6 Intel Data Migration Software screen 3 Click Start Now Intel Data Migration Software automatically detects both drives and the Clone Now screen appears Figure 7 Clone Now screen ...

Page 7: ...one Now The data migration starts During this process you will be prompted to reboot your computer Figure 8 Reboot screen 5 Click Reboot As your computer reboots the migration process continues View the progress bar to see the status of the data migration The length of the procedure corresponds to the amount of data on the drive being transferred 6 Once the operation completes shut down your compu...

Page 8: ...omputers Changing the Boot Order of the Drives on page 9 For notebook computers remove the current storage device and replace it with the Intel SSD see Notebook Computers Swapping the Drives on page 9 Desktop Computers Physically Swapping the Drives 1 Make sure the computer is powered off 2 Swap the SATA cable placement of the Intel SSD and your current storage device Figure 10 Swap drives 3 If de...

Page 9: ...efore your old storage device 4 Save the settings and exit the BIOS setup menu 5 Restart the computer As your computer boots to the Intel SSD for the first time a notification that the data migration process completed successfully appears when the operating system starts Enjoy your new high performing Intel Solid State Drive Notebook Computers Swapping the Drives 1 Make sure the computer is powere...

Page 10: ...leeve with caution Intel is not responsible for data loss or damage to system components As your computer boots to the Intel SSD for the first time a notification that the data migration process completed successfully appears when the operating system starts Enjoy your new high performing Intel Solid State Drive Additional Support For more help with Intel SSDs go to http www intel com support For ...

Page 11: ...Intel Solid State Drive Installation Guide 11 Intel Solid State Drive ...

Page 12: ...ely on the absence or characteristics of any features or instructions marked reserved or undefined Intel reserves these for future definition and shall have no responsibility whatsoever for conflicts or incompatibilities arising from future changes to them The information here is subject to change without notice Do not finalize a design with this information The products described in this document...

Reviews: