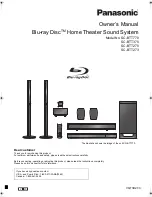
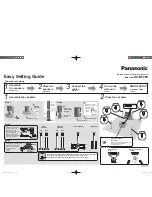
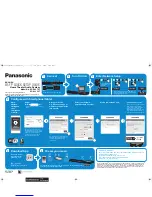
background image

Owner’s Guide 

CAS 3.1 

AND

CAS 2.1

Summary of Contents for CAS 2.1

Page 1: ...Owner s Guide CAS 3 1 AND CAS 2 1 ...

Page 2: ...vibration Noryl Baffle and Cast Aluminum Woofers The baffle of most in wall speakers is typically made of ABS plastic which is prone to flexing Yet another resonance for our engineers to tame After exhaustive research a two pronged attack was chosen First the CAS baffles are constructed of Noryl a high stiffness thermoplastic resin Noryl is 40 stiffer than typical ABS and has higher internal dampi...

Page 3: ...nd packing materials for future use Included 3 CAS 3 1 CAS 2 1 BAFFLE ASSEMBLY MOUNTING FRAME GRILLE MOUNTING FRAME BAFFLE ASSEMBLY GRILLE CAS 3 1 CAS 2 1 GRILLE INSERTS 4 CARDBOARD SHIM SCREWS 4 INSERTS 4 MOUNTING FRAME BAFFLE ASSEMBLY GRILLE MOUNTING FRAME GRILLE BAFFLE ASSEMBLY CARDBOARD SHIM INSERTS 4 SCREWS 4 TEMPLATE FIBERGLASS INSULATION GRILLE INSERTS 4 EXTRA LOGOS ...

Page 4: ...scribed above perpendicular to the middle row of seating The rear speakers should be placed along the rear wall facing the front of the room Each rear speaker should be about 1 3 of the way into the room but never to the outside of the listening area See Figure 3 SOFA FRONT LEFT LEFT SIDE LEFT REAR FRONT RIGHT RIGHT SIDE RIGHT REAR TV 4 CAS 3 1 CAS 2 1 PLACEMENT SOFA LEFT SURROUND RIGHT SURROUND I...

Page 5: ...to trace a pattern on the wall where you want to mount the speaker system Take care to locate the system roughly centered between wall studs allowing at least 1 between the cutout and wall studs Cut the mounting hole being careful not to cut into any electrical wiring or plumbing Run the wiring from your system to the hole NOTE Be sure to comply with local wiring codes BAFFLE ASSEMBLY MOUNTING FRA...

Page 6: ...se fashion hand tighten each of the 12 clamp screws ONLY until almost snug If needed adjust the mounting frame so it is level and centered in the cutout Go around once more and hand tighten each screw as needed Before proceeding to Step 5 verify that each of the clamp screws is tight Note how the clamp will push closed while being inserted into the hole in the wall and spring open again once past ...

Page 7: ... speaker wires are clear of the woofer basket and do not get pinched between the baffle and the mounting frame Insert the four screws through the inserts into the holes and tighten by hand just until snug WARNING If you overtighten these screws it may cause the isolators to become overcompressed and they will no longer function correctly Maximum tightening of these screws is no more than 16 inch p...

Page 8: ...r grommets from the holes to access screws It is best to use a 2 Phillips screwdriver to gently pry the grommet out Unscrew the four baffle retaining screws and carefully remove the speaker housing Disconnect the speaker wires Step 3a Fully unscrew all of the clamps around the speaker housing The clamp screws have a stop on them so you do not have to worry about accidental disassembly Now move the...

Page 9: ...ceiver Speaker Outputs INPUT CAS 3 1 INWALL OPTIONAL IR SENSOR HF HF INPUT LF LF CAS 2 1 CAS 3 1 STRAPPING WIRES STRAPPING WIRES IMPORTANT The high frequency HF and low frequency LF sections are joined by strapping wires The strapping wires must remain in position for proper operation with standard wiring See page 10 for bi wiring instructions STRAPPING WIRES STRAPPING WIRES BLACK RED NO STRIPE ST...

Page 10: ...sonic advantages and considerably more flexibility in power amplifier selection 1 Remove strapping wires 2 Insert the speaker wire for the high frequencies into the HF and HF terminals and tighten 3 Insert the speaker wire for the low frequencies into the LF and LF set of terminals and tighten HF HF LF LF HF HF LF LF CAS 2 1 CAS 3 1 STRAPPING WIRES REMOVED STRAPPING WIRES REMOVED Right Speaker Amp...

Page 11: ... well constructed MDF is recommended The enclosure should be securely mounted to the adjacent wall studs In addition the enclosure should be filled with fiberglass insulation so that the enclosure is full but the insulation is not compressed Thiele Small Parameters CAS 3 1 CAS 2 1 Total Q QTS 0 71 0 72 Compliance Volume VAS 72 3 liters 43 1 liters Free Air Resonance FS 34 8Hz 40Hz Mechanical Q QMS...

Page 12: ...ions Outer including grille 22 1 8 x 14 7 8 x 3 1 2 17 7 8 x 13 x 3 1 2 H x W x D 562mm x 378mm x 89mm 454mm x 330mm x 89mm Wall Cutout 19 1 8 x 12 1 2 14 7 8 x 10 1 2 H x W 486mm x 318mm 378mm x 267mm Weight 15 lb 6 8kg 11 lb 5kg including frame speaker and grille Infinity continually strives to update and improve existing products as well as create new ones The specifications and construction de...

Reviews: