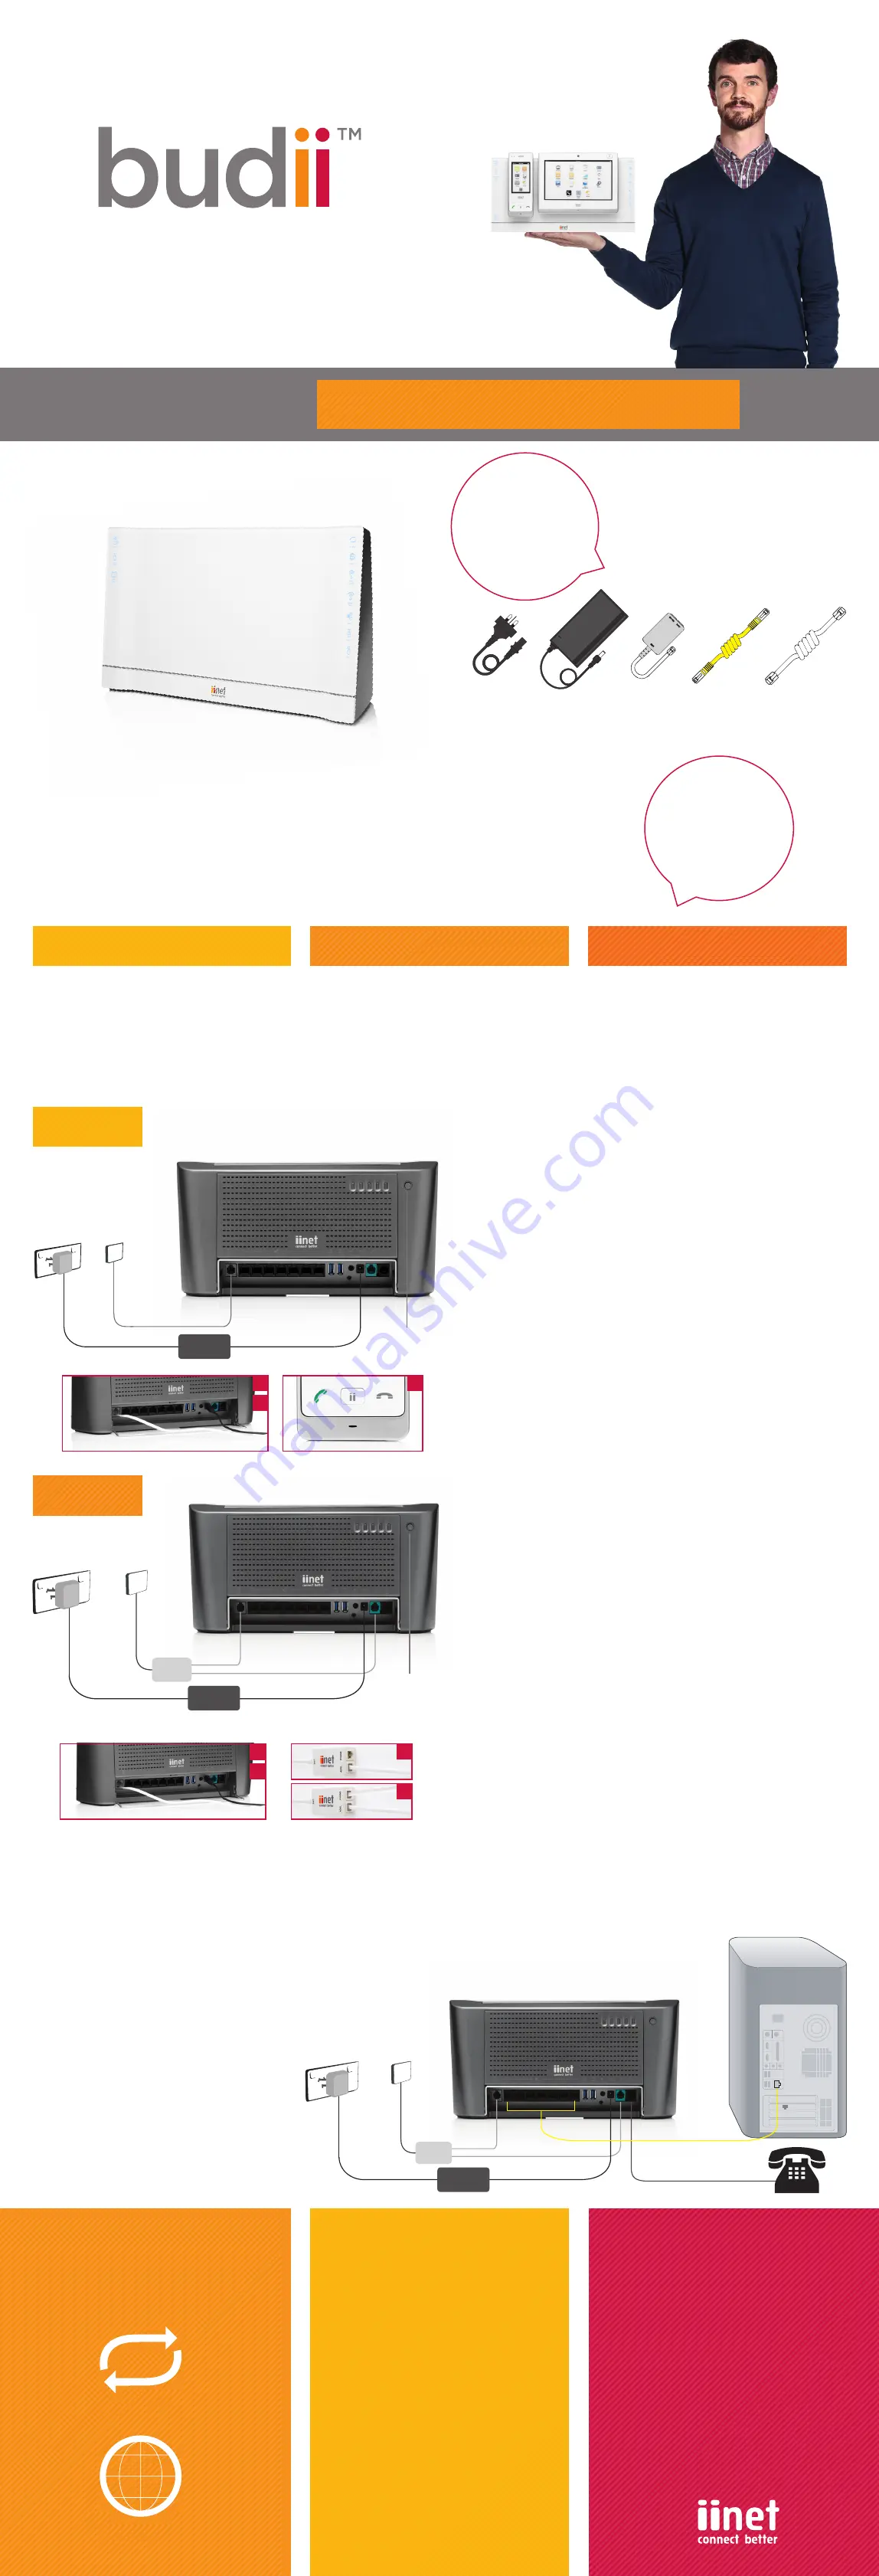
Quick Installation Guide
Welcome to Budii
TM
.
Power
Pack
Line
Filter
Phone
Cable x 2
Ethernet
Cable
Budii
TM
Checklist
First, we need to get the
Budii
TM
phone and power cables plugged in and working.
Budii
TM
must be configured for the Internet before you can connect your computer.
Select one of the three options below depending on your service with iiNet.
Phone Cable
Power
1.
Connect the power cord and adapter to the power port on
Budii
TM
. Plug
the power adapter into the wall socket. Turn the
Budii
TM
power button on
and wait for the green light to illuminate.
2. Plug one of the phone cables (which can be found in your
Budii
TM
box)
into the socket labelled ADSL on the back of
Budii
TM
. Plug the other end
straight into the phone socket on your wall. You don’t need the line filter
provided with
Budii
TM
so store it away somewhere safe.
3. Your setup should look like the image to the left.
4. If you have an active iiNet connection,
Budii
TM
will automatically start
talking to iiNet’s servers.
Budii
TM
will retrieve your login details and other
settings during this time, so please allow time for this to happen. If
you’re waiting for your iiNet service to be activated then
Budii
TM
will be
unable to connect to the Internet.
5. To use your iiTalk phone service, you’ll need to turn on your handset.
Press the ‘ii’ button located on your handset to start making calls.
6. Now go to the section below called “Connecting
Budii
TM
to your
computer.”
The Budii
TM
Quick Installation Guide provides easy, step-by-step instructions
on setting up and connecting your new hardware.
Before we get started,
check the following
items are included in
your
Budii
TM
box.
You’ve signed up for an iiNet Naked
broadband plan (Naked Home) - jump to
option 1 below.
OPTION
1
OPTION
2
OPTION
3
You’ve signed up for an ADSL broadband plan
with iiNet (ADSL2+ Home or ADSL1 Home
plan). You still have a traditional landline in
place to make and receive calls - jump to
option 2 below.
Manual setup: You have the Internet connected
through another provider or you prefer to do
things the old fashioned way - please visit the
‘How to guide’ in the Budii
TM
manual.
Choose an option that
most suits your setup
and follow the steps to
get connected.
Power Cable
OPTION
1
ADSL
LINE
PHON
E
Phone Cable
Power
Power Cable
OPTION
2
Hooray!
You have successfully set up Budii
TM
and at
least two lights on the front of Budii
TM
are
now illuminated.
Having trouble?
Refer to the user manual for help
setting up your user name and
password manually. If you’re still
experiencing problems please contact
iiNet Support for assistance. iiNet
provides free technical support for
Budii
TM
.
Wireless Setup
If you need help setting up Budii
TM
wirelessly, turn over to visit the
Wireless Setup Guide.
Important
If you have other phones connected
in your house, you’ll need to install
filter devices to each of these phones.
For further information, contact iiNet
Support.
iiNet Support
1300 860 951
iiNet Business Support
13 24 49
Westnet Support
1300 786 068
TransACT Support
13 30 61
Internode Support
13 66 33
iiqigbudii_v001
Wireless
Turn over to view the Wireless Setup Guide
for instructions on connecting your computer
wirelessly. Ensure the computer you use has
wireless inbuilt and is turned on, or has an
external wireless adapter.
Wired
Using the supplied yellow ethernet cable:
1.
Plug the yellow Ethernet cable into one of
the seven black ports on the back of Budii
TM
.
2. Plug the other end into your computer’s
Ethernet port.
3. Wait 15 seconds.
4. Try using a browser to surf to a website.
ADSL
LINE
PHON
E
Power Cable
Phone Cable
Line Filter
Ethernet Cable
Phone Cable
Connecting Budii
TM
to your computer
Before connecting to your computer, make sure the ADSL sync and Internet lights on the front of Budii
TM
are illuminated. If the lights are flashing, wait for up to
five minutes while a connection to the Internet is established. If the lights are not illuminating refer to the troubleshooting section of the Budii
TM
manual or contact
iiNet support using the numbers below. You can connect multiple computers and laptops using one of the following methods.
2
1
5
3
4
2
1
1.
Connect the power adapter to the power port on Budii
TM
. Plug the power
adapter into the wall socket. Turn the Budii
TM
power button on and wait
for the green light to illuminate.
2. Plug one of the phone cables (which can be found in your Budii
TM
box)
into the socket labelled ADSL on the back of Budii
TM
.
3. Take the line filter out of the box. Plug the other end of the phone cable
into the ADSL socket on the line filter. Then, plug the line filter into your
wall phone socket. If your existing home phone is plugged into the wall
socket - you’ll need to remove it first.
4. The next step is to take the second phone cable (which can be found in
your Budii
TM
box). Plug one end into the line filter marked Phone and the
other end into the green socket labelled PSTN on Budii
TM
.
5. Your setup should look like the image to the left. If you have an active
iiNet connection, Budii
TM
will automatically start talking to iiNet’s servers.
Budii
TM
will retrieve your login details and other settings during this time,
so please allow time for this to happen. If you’re waiting for your iiNet
DSL service to be activated then Budii
TM
will be unable to connect to the
Internet. Now go to the section below called “Connecting Budii
TM
to your
computer.”
6. To use your phone service, you’ll need to turn on your handset. Press the
‘ii’ button located on your handset to start making calls.
Line Filter
ADSL Sync
Internet
Power
Cord