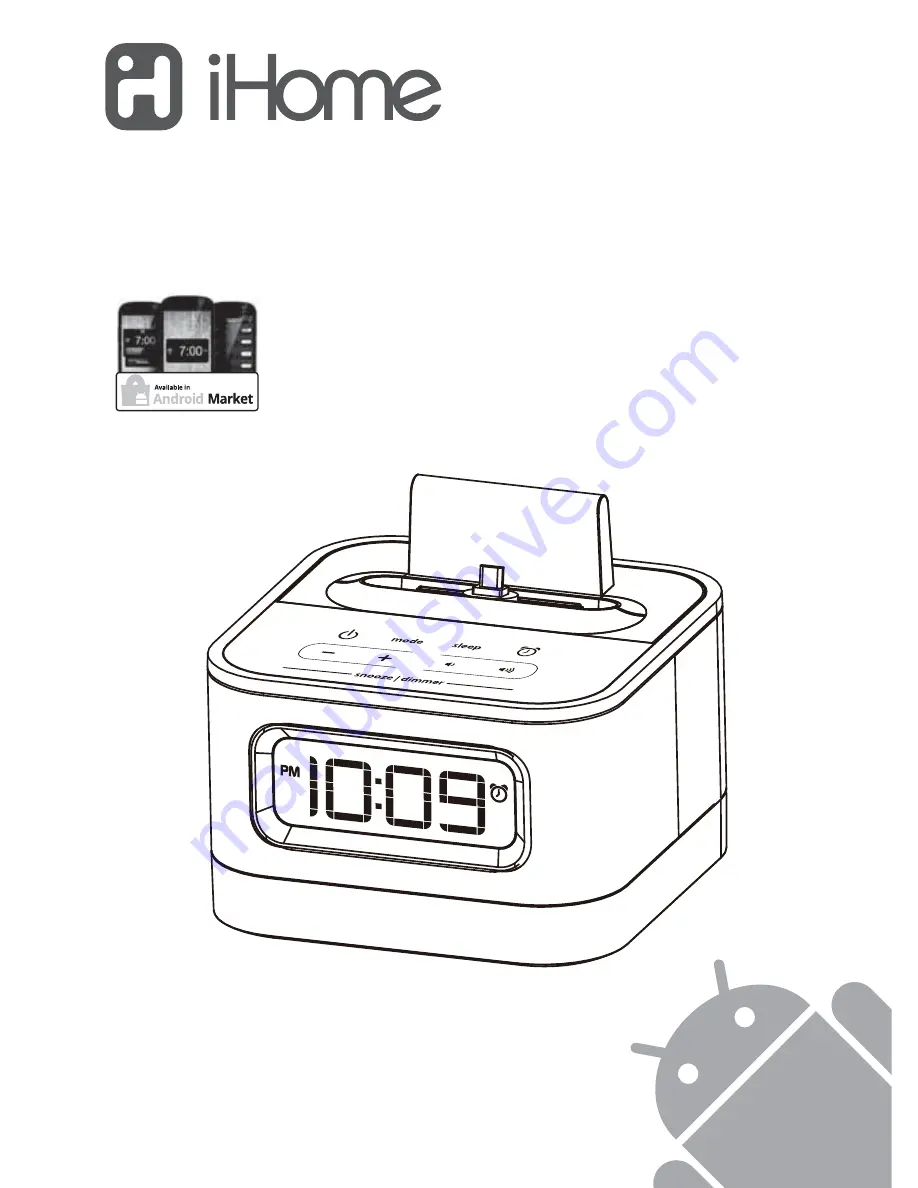
background image

Model: iC50
Instruction manual - US English
Size: 102 x 150 mm
Date: Feb 07, 2011
Mat’l: 128gsm matte finish paper
Color: Black text on white background

Cover

Warranty

Model iC50

Charging alarm clock 

radio speaker for your 

Android™ phone and 

other device

QUESTIONS? Visit www.ihomeaudio.com

SMART

DESIGN

for android™

free alarm app

works with

search “iHome Sleep”

Summary of Contents for SMARTDESIGN Series iC50

Page 1: ...Model iC50 Charging alarm clock radio speaker for your Android phone and other device QUESTIONS Visit www ihomeaudio com SMARTDESIGN for android free alarm app works with search iHome Sleep ...

Page 2: ...ation about this and other iHome products please visit www ihomeaudio com Note that details on using iHome apps for Android with this unit are not covered in this booklet For information on using iHome apps for Android please visit www ihomeaudio com apps G E T T I N G S T A R T E D This unit ships with the following items Please check to see that all items are present 1 iC50 speaker system 2 Smar...

Page 3: ...buttons Charging switch SmartSlide insert USB port Sleep button Alarm button FM antenna Snooze Dimmer button 2 Back panel Display Top panel DST Switch DC Jack Time set button Time Display Buzzer Volume Indicator PM Indicator FM Radio Indicator Buzzer Radio Indicator Alarm Indicator AUX In Indicator Low Backup Battery Indicator Sleep Indicator DST Indicator ...

Page 4: ...y maintained Otherwise you must reset the time and alarm settings Note The Battery Low icon is located at the right side of clock display When the backup battery is low and needs to be replaced the Battery Low icon will flash To replace follow steps below 3 C O N N E C T I N G T O A C P O W E R 7 5V 2 5A RESET RESET TESTT E ST This unit operates on AC power using the included 100V 240V universal A...

Page 5: ...ide marked is facing up Close the compartment door 4 Close the battery compartment door and tighten the battery door screw Note Make sure you dispose of battery properly see your local regulations WARNING Lithium batteries can explode or cause burns if disassembled shorted recharged exposed to water fire or high temperatures Do not place loose batteries in a pocket purse or other container contain...

Page 6: ...d charge your Android device whether the micro USB port is located on the left right or bottom of the Android device 5 2 Drop the micro USB cable through the insert 3 Place the connector at the end of the track Rotate the connector up to 180 to face the same direction as your device 1 Lift the dock insert from unit ...

Page 7: ...he Android device to observe its charging status If it does not appear to be charging move the USB Circuit Switch located in the connection compart ment to the other position or and reconnect the charging device again NOTE unit will only charge while connected to power with AC adaptor 4 Slide the connector onto the track 5 Plug in the micro USB cable and wrap the cord also a good time to insert th...

Page 8: ...ocking insert and connect to your device Press the Power Button on the unit Next press the Mode Button as needed until the audio icon appears on the display Put your audio device in play mode Press the Volume Buttons on the unit to adjust listening level When you are through listening stop or pause play on your audio device In about 3 minutes the icon will disappear and the unit will shut off TIP ...

Page 9: ...dard 12 hour time AM and PM or to 24 hour time sometimes called military time To toggle between 12 and 24 modes press and release the Alarm Button located on top of the unit at any time during time setting mode 3 Press and release the Time Set Button to confirm the hour setting The minutes will begin flashing Press the or Buttons to set the minutes then press and release the Time Set Button to con...

Page 10: ...rom the Android Market to enable your Android music as wake to alarm source Reviewing and Resetting the Alarm Press the Alarm Button at any time to review the current alarm settings To toggle the alarm on or off press the Alarm Button as needed When the alarm icon is displayed the alarm is armed on Press the Power Button or Alarm Button when the alarm is sounding to reset it to come on again at th...

Page 11: ... live in the US you may skip this section 1 Make sure the unit is OFF not playing in any mode Press and hold the Mode Button for about 5 seconds until FM and the region flashes in the display Press the or Buttons as needed to set the display to your region USA EU Europe JPN Japan AUS Australia or CHN China 2 Press and release the Mode Button again or no button within 10 seconds to exit the radio f...

Page 12: ...lume down on your device If the original sound file MP3 is old or of poor quality distortion and noise are easily noticed with high power speakers Try upgrading file from a trusted source such as iTunes Please make sure the unit is connected to a working power outlet The unit will not charge while operating on batteries Move the USB Circuit Switch found next to the USB port to the other position a...

Page 13: ... setting on your device Make sure your device is working properly before connecting Check that the audio cable is firmly connected to both the line in jack and to the headphone audio out jack on your device Make sure the unit is properly connected to AC power source Check that the Power Button is lit up indicating the unit is ON To turn off the unit when done playing audio via the line in jack sto...

Page 14: ...d on the appliance 5 Power Cable Protection Power supply cables should be routed so that they are not likely to be walked on or pinched by items placed upon or against them It is always best to have a clear area from where the cable exits the unit to where it is plugged into an AC socket 6 Cleaning The unit should be cleaned only as recommended See the Maintenance section of this manual for cleani...

Page 15: ...essly approved by the party responsible for compliance could void the user s authority to operate the equipment NOTE This equipment has been tested and found to comply with the limits for a Class B digital device pursuant to Part 15 of the FCC Rules These limits are designed to provide reasonable protection against harmful interference in a residential installation This equipment generates uses an...

Page 16: ...red to the Factory Service Center listed below Consumer Repair Department SDI Technologies Inc 1330 Goodyear Dr El Paso TX 79936 6420 Disclaimer of Warranty NOTE This warranty is valid only if the product is used for the purpose for which it was designed It does not cover i products which have been damaged by negligence or willful actions misuse or accident or which have been modified or repaired ...

Reviews: