manualshive.com logo in svg
background image


PPC-37xxA-N26 Panel PC


Page i 

User Manual 

PPC-37xxA-N26 Panel PC 

MODEL: 

PPC-37xxA-N26 

Panel PC with Intel® Atom™ N2600 CPU, DDR3, 

Touchscreen, USB 3.0, Dual GbE, HDMI, VGA,   

mSATA, SATA 3Gb/s, Audio, RS-232/422/485,   

IP 65 Compliant Front Panel and RoHS Compliant 

Rev. 1.10 – 12 March, 2014 

Содержание PPC-37 A-N26 Series

Страница 1: ... Manual PPC 37xxA N26 Panel PC MODEL PPC 37xxA N26 Panel PC with Intel Atom N2600 CPU DDR3 Touchscreen USB 3 0 Dual GbE HDMI VGA mSATA SATA 3Gb s Audio RS 232 422 485 IP 65 Compliant Front Panel and RoHS Compliant Rev 1 10 12 March 2014 ...

Страница 2: ...age ii Revision Date Version Changes 12 March 2014 1 10 Updated for R11 version Updated Section 6 8 Touchscreen Driver Installation Added touchscreen type selection jumper in Section 3 6 2 24 December 2012 1 00 Initial release ...

Страница 3: ...es arising out of the use or inability to use the product or documentation even if advised of the possibility of such damages This document contains proprietary information protected by copyright All rights are reserved No part of this manual may be reproduced by any mechanical electronic or other means in any form without prior written permission of the manufacturer TRADEMARKS All registered trad...

Страница 4: ...nsions 8 1 5 2 PPC 3710A N26 Dimensions 9 1 5 3 PPC 3712A N26 Dimensions 10 1 6 SPECIFICATIONS 11 2 UNPACKING 13 2 1 UNPACKING 14 2 2 PACKING LIST 15 2 3 OPTIONAL ITEMS 16 3 INSTALLATION 18 3 1 ANTI STATIC PRECAUTIONS 19 3 2 INSTALLATION PRECAUTIONS 19 3 3 PREINSTALLED COMPONENTS 20 3 4 INSTALLATION AND CONFIGURATION STEPS 20 3 5 REMOVING THE BACK COVER 21 3 6 JUMPER SETTINGS 22 3 6 1 Access the J...

Страница 5: ...26 39 3 10 2 2 PPC 3712A N26 41 3 10 3 Cabinet and Rack Installation 43 3 10 3 1 PPC 3708A N26 43 3 10 3 2 PPC 3710A N26 and PPC 3712A N26 45 3 10 4 Arm Mounting 46 3 10 5 Stand Mounting 48 3 11 BOTTOM PANEL CONNECTORS 49 3 11 1 Audio Connectors 49 3 11 2 HDMI Connector 49 3 11 3 Power Input Connector 50 3 11 4 RJ 45 LAN Connectors 50 3 11 5 RS 232 Serial Ports 52 3 11 6 RS 422 485 Serial Port 52 ...

Страница 6: ...3 6 1 Serial Port n Configuration 72 5 3 7 F81866 H W Monitor 76 5 3 7 1 Smart Fan Mode Configuration 78 5 3 8 Serial Port Console Redirection 79 5 3 8 1 Console Redirection Settings 79 5 3 9 iEi Feature 82 5 4 CHIPSET 83 5 4 1 Host Bridge Configuration 84 5 4 1 1 Intel IGD Configuration 84 5 4 2 South Bridge Configuration 85 5 5 BOOT 86 5 6 SECURITY 88 5 7 SAVE EXIT 88 6 DRIVER INSTALLATION 90 6 ...

Страница 7: ...121 7 2 7 Fan Connector CPU_FAN1 122 7 2 8 Front Panel Connector F_PANEL1 122 7 2 9 Keyboard Mouse Connector KB_MS1 122 7 2 10 LVDS Connector LVDS1 123 7 2 11 PCIe Mini Card Slot M_PCIE1 123 7 2 12 Power Connector 9V 28V CN2 124 7 2 13 RS 232 Serial Port Connectors COM1 COM2 COM3 124 7 2 14 RS 422 485 Serial Port Connector COM4 125 7 2 15 SATA 3Gb s Connectors SATA1 SATA2 125 7 2 16 USB 2 0 Connec...

Страница 8: ...60 B 5 4 Manual 161 B 6 RESTORE SYSTEMS FROM A LINUX SERVER THROUGH LAN 162 B 6 1 Configure DHCP Server Settings 163 B 6 2 Configure TFTP Settings 164 B 6 3 Configure One Key Recovery Server Settings 165 B 6 4 Start the DHCP TFTP and HTTP 166 B 6 5 Create Shared Directory 166 B 6 6 Setup a Client System for Auto Recovery 167 B 7 OTHER INFORMATION 170 B 7 1 Using AHCI Mode or ALi M5283 VIA VT6421A ...

Страница 9: ...PPC 37xxA N26 Panel PC Page ix E HAZARDOUS MATERIALS DISCLOSURE 181 E 1 HAZARDOUS MATERIAL DISCLOSURE TABLE FOR IPB PRODUCTS CERTIFIED AS ROHS COMPLIANT UNDER 2002 95 EC WITHOUT MERCURY 182 ...

Страница 10: ...er Selection Jumper Location 25 Figure 3 6 Clear CMOS Jumper Location 25 Figure 3 7 mSATA PCIe Mini Mode Selection Jumper Location 26 Figure 3 8 Hex Nuts on the Bottom Panel 27 Figure 3 9 Retention Screws on the Motherboard 27 Figure 3 10 PCIe Mini Slot Location 27 Figure 3 11 PCIe Mini Card Installation 28 Figure 3 12 PPC 3708A N26 HDD Bracket Retention Screws Tope Panel 29 Figure 3 13 PPC 3708A ...

Страница 11: ...ack Cabinet 45 Figure 3 36 Securing the Rack Cabinet Bracket 46 Figure 3 37 Arm Mounting Retention Screw Holes 47 Figure 3 38 Arm Mounting 48 Figure 3 39 Stand Mounting Retention Screw Holes 48 Figure 3 40 HDMI Connection 50 Figure 3 41 RJ 45 LAN Connector 51 Figure 3 42 LAN Connection 51 Figure 3 43 RS 232 Serial Device Connector 52 Figure 3 44 RS 422 485 Serial Device Connector 53 Figure 3 45 US...

Страница 12: ... 23 USB 3 0 Driver Installation Finish Screen 107 Figure 6 24 Install Now 108 Figure 6 25 Load Driver 108 Figure 6 26 Browse for Folder 109 Figure 6 27 Select the ASMedia XHCI Controller Driver 109 Figure 6 28 Confirm the Driver File 110 Figure 6 29 Select the USB Root Hub Driver 110 Figure 6 30 Welcome Screen 111 Figure 6 31 Touchscreen Driver License Agreement 112 Figure 6 32 Choose Destination ...

Страница 13: ...Confirmation 148 Figure B 19 Image Creation Complete 148 Figure B 20 Image Creation Complete 148 Figure B 21 Press Any Key to Continue 149 Figure B 22 Auto Recovery Utility 150 Figure B 23 Launching the Recovery Tool 150 Figure B 24 Auto Recovery Environment for Windows 150 Figure B 25 Building the Auto Recovery Partition 151 Figure B 26 Factory Default Image Confirmation 151 Figure B 27 Image Cre...

Страница 14: ...PPC 37xxA N26 Panel PC Page xiv Figure B 39 Restore System Backup Complete Window 161 Figure B 40 Symantec Ghost Window 161 ...

Страница 15: ...ors 120 Table 7 2 5 V SATA Power Connectors Pinouts 120 Table 7 3 Audio Connector AUDIO1 Pinouts 120 Table 7 4 Backlight Inverter Connector INV1 Pinouts 121 Table 7 5 Battery Connector BAT1 Pinouts 121 Table 7 6 Buzzer Connector SP1 Pinouts 121 Table 7 7 Digital Input Output Connector DIO1 Pinouts 121 Table 7 8 Fan Connector CPU_FAN1 Pinouts 122 Table 7 9 Front Panel Connector F_PANEL1 Pinouts 122...

Страница 16: ...anel Connectors 126 Table 7 19 HDMI Connector HDMI1 Pinouts 126 Table 7 20 RJ 45 LAN Connector Pinouts 127 Table 7 21 USB 2 0 Connectors USB_CON2 Pinouts 127 Table 7 22 USB 3 0 Connectors USB_CON1 Pinouts 127 Table 7 23 VGA Connector VGA1 Pinouts 128 ...

Страница 17: ...PPC 37xxA N26 Panel PC Page 1 1 Introduction Chapter 1 ...

Страница 18: ... more computing power is needed The PPC 37xxA N26 supports a second monitor for presenting information to customers or extending the display area The second monitor can show different information to the main screen or duplicate the main screen content The PPC 37xxA N26 can be installed in a rack on a VESA clamp or in a custom enclosure with a hole of the correct size Storage options include a 2 5 ...

Страница 19: ...el Atom N2600 2 GB DDR3 12 1 Table 1 1 Model Variations 1 3 Features Some of the features of the PPC 37xxA N26 panel PC include 1 6 GHz Intel Atom N2600 processor Preinstalled 2 GB DDR3 SO DIMM memory module Multiple storage options 2 5 SATA HDD and mSATA SSD Optional PCIe Mini 802 11b g n wireless module Dual video output HDMI and VGA Dual GbE Supports slim type optical disk drive PPC 3712A N26 o...

Страница 20: ...s access to external interface connectors that include GbE USB 3 0 USB 2 0 audio serial port connectors VGA port and HDMI port 1 4 1 Front Panel The front panel of the PPC 37xxA N26 Figure 1 2 is a flat panel TFT LCD screen surrounded by an aluminum frame Figure 1 2 Front View 1 4 2 Rear Panel The rear panel contains some vents for ventilation four VESA standard mounting holes and several retentio...

Страница 21: ...l has the following interfaces 1 x 12 V DC power input connector 1 x Power switch 2 x USB 3 0 connectors 2 x USB 2 0 connectors 2 x RJ 45 GbE connectors 2 x RS 232 connectors 1 x RS 422 485 connector 1 x Line out jack 1 x Line in jack 1 x Mic in jack 1 x VGA connector 1 x HDMI connector ...

Страница 22: ...re 1 4 Bottom View 1 4 4 Side Panels The both sides panel of the panel PC contain some vents for ventilation The left side panel of PPC 3712A N26 provides access to the slim type optical disk drive bay Figure 1 5 PPC 3712A N26 Left View ...

Страница 23: ...he aluminum frames of the PPC 3710A N26 and PPC 3712A N26 have small screw holes that are used when the flat panel PC is mounted into a rack or cabinet These screws are circled in Figure 1 7 and Figure 1 7 Figure 1 6 PPC 3710A N26 Frame Rear View Figure 1 7 PPC 3712A N26 Frame Rear View ...

Страница 24: ...PPC 37xxA N26 Panel PC Page 8 1 5 Dimensions 1 5 1 PPC 3708A N26 Dimensions Figure 1 8 PPC 3708A N26 Dimensions mm ...

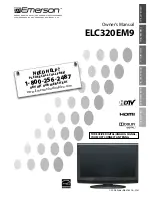
Страница 25: ...PPC 37xxA N26 Panel PC Page 9 1 5 2 PPC 3710A N26 Dimensions Figure 1 9 PPC 3710A N26 Dimensions mm ...

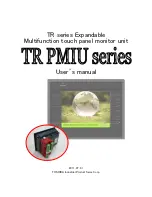
Страница 26: ...PPC 37xxA N26 Panel PC Page 10 1 5 3 PPC 3712A N26 Dimensions Figure 1 10 PPC 3712A N26 Dimensions mm ...

Страница 27: ...odel NANO CV N26001 R10 CPU 1 6 GHz Intel Atom N2600 dual core CPU Chipset Intel NM10 Memory One 204 pin 800 MHz DDR3 SO DIMM slot up to 2 GB Ethernet Two Realtek RTL8111E PCIe GbE controllers LAN1 with ASF 2 0 support Audio Realtek ALC662 HD Audio codec Solid State Drive SSD mSATA optional One 2 5 SATA HDD bay Drive Bays One slim type optical disk drive bay PPC 3712A N26 only Expansion Slots One ...

Страница 28: ...witch 1 x 12 V DC power input connector Chassis Construction Heavy duty steel SECC Front Panel Construction Aluminum die casting Front Panel Color Silver PANTONE 8001C Vibration 5 Hz 17 Hz 0 1 double amplitude displacement 17 Hz 640 Hz 1 5G acceleration peak to peak Shock 10G acceleration part to part 11 ms Humidity 10 95 non condensing Operating Temperature Ambient with air flow 10ºC 50ºC Storage...

Страница 29: ...PPC 37xxA N26 Panel PC Page 13 2 Unpacking Chapter 2 ...

Страница 30: ... installation process Step 1 Use box cutters a knife or a sharp pair of scissors that seals the top side of the external second box Step 2 Open the external second box Step 3 Use box cutters a knife or a sharp pair of scissors that seals the top side of the internal first box Step 4 Lift the monitor out of the boxes Step 5 Remove both polystyrene ends one from each side Step 6 Pull the plastic cov...

Страница 31: ...nts Quantity Item Image 1 PPC 37xxA N26 1 Power adapter P N 63040 010060 050 RS 1 Power cord P N 32702 000200 100 RS 1 Screw kit P N 19600 000205 RS 1 Touch pen P N 43125 0002C0 00 RS 1 Panel mounting kit P N 19Z00 000026 RS 1 Wall mounting kit P N 41020 016102 00 RS 41014 057602 00 RS 1 User manual and driver CD ...

Страница 32: ... or damaged contact the distributor or sales representative immediately 2 3 Optional Items The following items are optional accessories for the PPC 37xxA N26 Item Image Slim type SATA DVD ROM PPC 3712A N26 only P N 73400 AD7760H01 RS Arm P N ARM 11 RS Stand P N STAND 100 RS Rack mounting kit P N RK 084MS R10 RK 104MS R10 RK 121MS R10 ...

Страница 33: ...PPC 37xxA N26 Panel PC Page 17 Item Image Wi Fi module with RF cable and antenna 2T2R 802 11b g n P N PPC WL KIT02 R10 Table 2 2 Optional Items ...

Страница 34: ...PPC 37xxA N26 Panel PC Page 18 3 Installation Chapter 3 ...

Страница 35: ...help to prevent ESD from damaging the board Self grounding Before handling the board touch any grounded conducting material During the time the board is handled frequently touch any conducting materials that are connected to the ground Use an anti static pad When configuring the PPC 37xxA N26 place it on an antic static pad This reduces the possibility of ESD damaging the PPC 37xxA N26 Only handle...

Страница 36: ...odule TFT LCD Touchscreen Preinstalled OEM customizations may include the following HDD Wi Fi module Optical disk drive PPC 3712A N26 only 3 4 Installation and Configuration Steps The following installation steps must be followed Step 1 Unpack the PPC 37xxA N26 Step 2 Set the jumper settings not usually necessary Step 3 Install the mSATA SSD HDD and optical disk drive Step 4 Mount the PPC 37xxA N2...

Страница 37: ...PC Page 21 3 5 Removing the Back Cover Remove all the retention screws on the back cover Lift the cover up to remove Figure 3 1 PPC 3708A N26 Back Cover Retention Screws Figure 3 2 PPC 3710A N26 Back Cover Retention Screws ...

Страница 38: ... cover that slides over the pins to connect them To CLOSE SHORT a jumper means connecting the pins of the jumper with the plastic clip and to OPEN a jumper means removing the plastic clip from a jumper The following jumpers can be found on the motherboard installed in the PPC 37xxA N26 Before the PPC 37xxA N26 is installed the jumpers must be set in accordance with the desired configuration The ju...

Страница 39: ...to Section 73 5 3 6 2 Preconfigured Jumpers WARNING Do not change the settings on the jumpers described here Doing so may disable or damage the system The following jumpers are preconfigured for the PPC 37xxA N26 Users should not change these jumpers Jumper Name Label Type LVDS voltage selection JP5 3 pin header Touchscreen type selection J_WIRE1 Switch Table 3 2 Preconfigured Jumpers Setting Desc...

Страница 40: ... Settings Figure 3 4 Touchscreen Type Selection Jumper Location 3 6 3 AT ATX Power Selection Jumper Jumper Label JP3 Jumper Type 2 pin header Jumper Settings See Table 3 5 Jumper Location See Figure 3 5 The AT ATX power selection jumper specifies the system power mode as AT or ATX Setting Description Short 1 2 Use ATX power Default Off Use AT power Table 3 5 AT ATX Power Selection Jumper Settings ...

Страница 41: ...pin header Jumper Settings See Table 3 6 Jumper Location See Figure 3 6 To reset the BIOS move the jumper to the Clear BIOS position for 3 seconds or more and then move back to the default position Setting Description Short 1 2 Normal Default Short 2 3 Clear BIOS Table 3 6 Clear CMOS Jumper Settings Figure 3 6 Clear CMOS Jumper Location ...

Страница 42: ...bled Setting Description Short 1 2 Auto detect mSATA device Default Off Enable mSATA Table 3 7 mSATA PCIe Mini Mode Selection Jumper Settings Figure 3 7 mSATA PCIe Mini Mode Selection Jumper Location 3 7 mSATA SSD Installation The PPC 37xxA N26 has one PCIe Mini slot on the solder side of the motherboard for mSATA SSD installation To install the mSATA SSD follow the instructions below Step 1 Remov...

Страница 43: ...bles connected to the motherboard Step 4 Release the motherboard from the panel PC by removing the four retention screws Figure 3 9 Figure 3 9 Retention Screws on the Motherboard Step 5 Locate the PCIe Mini slot on the solder side of the motherboard Figure 3 10 Figure 3 10 PCIe Mini Slot Location ...

Страница 44: ... it clips into place on the plastic connector Figure 3 11 Step 8 Reassemble the whole system 3 8 HDD Installation 3 8 1 PPC 3708A N26 HDD Installation To install the HDD into the PPC 3708A N26 please follow the steps below Step 1 Remove the back cover Refer to Section 3 5 Step 2 Remove the HDD bracket from the PPC 3708A N26 The HDD bracket is attached on the PPC 3708A N26 with four retention screw...

Страница 45: ...gure 3 13 PPC 3708A N26 HDD Bracket Retention Screws Inside Step 3 Attach the HDD to the HDD bracket To do this align the four retention screw holes in the HDD bracket with the retention screw holes on the bottom of the HDD Insert four retention screws into the HDD bracket and fasten them Figure 3 14 ...

Страница 46: ...e 3 14 PPC 3708A N26 HDD Retention Screws Step 4 Install the HDD bracket with hard drive and SATA cable attached into the PPC 3708A N26 and fasten the four HDD bracket screws Figure 3 15 Figure 3 15 Replacing the PPC 3708A N26 HDD Bracket ...

Страница 47: ...N26 The HDD bracket is attached on the panel PC with four retention screws inside the chassis Figure 3 16 Remove the four retention screws and lift the bracket off the panel PC Figure 3 16 PPC 3710A N26 HDD Bracket Retention Screws Step 3 Attach the hard drive in the bracket To do this slide the hard drive onto the bracket until it connects with the SATA connector at the back Fasten the four reten...

Страница 48: ...ten the four hard drive bracket screws Step 0 Figure 3 18 Replacing the PPC 3710A N26 HDD Bracket 3 8 3 PPC 3712A N26 HDD Installation To install the HDD into the PPC 3712A N26 please follow the steps below Step 1 Remove the back cover See Section 3 5 Step 2 Remove the optical drive bracket Undo the optical drive bracket screws and remove the optical drive bracket See Figure 3 19 ...

Страница 49: ...al Disk Drive Installation PPC 3712A N26 Only To install an optical disk drive please follow the steps below Step 1 Remove the back cover See Section 3 5 Step 2 Remove the optical drive bracket from the PPC 3712A N26 To do this remove four retention screws two on the side panel and two inside the panel PC Figure 3 19 Figure 3 19 Optical Drive Bracket Retention Screws ...

Страница 50: ... drive plate Figure 3 20 Optical Drive Blank Plate Assembly Step 4 Install the optical drive in the same position as the previously removed blank optical drive plate Fasten the same four screws to attach the optical drive to the bracket Figure 3 21 Optical Drive Screws Step 5 Attach the SATA cable to the back of the optical drive ...

Страница 51: ...6 Panel PC Page 35 Figure 3 22 Optical Drive SATA Cable Step 6 Reinstall the optical drive bracket into the PPC 3712A N26 and fasten the optical bracket screws Step 0 Figure 3 23 Replacing the Optical Drive Bracket ...

Страница 52: ...scribed in the following sections 3 10 1 Wall Mounting To mount the PPC 37xxA N26 panel PC onto a wall please follow the steps below Step 1 Select the location on the wall for the wall mounting bracket Step 2 Carefully mark the locations of the four bracket screw holes on the wall Step 3 Drill four pilot holes at the marked locations on the wall for the bracket retention screws Step 4 Align the wa...

Страница 53: ...against the rear panel Figure 3 25 Step 7 Align the mounting screws on the monitor rear panel with the mounting holes on the bracket Step 8 Carefully insert the screws through the holes and gently pull the monitor downwards until the monitor rests securely in the slotted holes Figure 3 25 Ensure that all four of the mounting screws fit snuggly into their respective slotted holes NOTE In the diagra...

Страница 54: ...all mounting kit on the top panel of the panel PC Carefully mark the location of the wall mounting kit screw holes on the wall Drill a pilot hole at the marked location on the wall Secure the wall mounting kit to the wall by inserting a retention screw into the pilot hole on the wall 7Figure 3 26 This step is to avoid the panel PC being pushed apart from the wall mounting bracket accidentally Step...

Страница 55: ...ount the PPC 3708A N26 or PPC 3710A N26 panel PC into a panel please follow the steps below Step 1 Select the position on the panel to mount the PPC 37xxA N26 Step 2 Cut out a section of the panel that corresponds to the rear panel dimensions of the panel PC The recommended cutout sizes are shown below Figure 3 27 and Figure 3 28 ...

Страница 56: ...ons Step 3 Slide the panel PC through the hole until the aluminum frame is flush against the panel Step 4 Insert the panel mounting clamps into the pre formed holes along the edges of the panel PC behind the aluminum frame Figure 3 29 There are a total of 8 panel mounting clamps for PPC 3708A N26 and 10 clamps for PPC 3710A N26 ...

Страница 57: ...firmly secured to the panel Figure 3 29 Figure 3 29 Tighten the Panel Mounting Clamp Screws 3 10 2 2 PPC 3712A N26 To mount the PPC 3712A N26 panel PC into a panel please follow the steps below Step 1 Install the panel mounting kit onto the real panel Figure 3 30 Figure 3 30 Panel Mounting Kit Step 2 Select the position in the panel to mount the PPC 3712A N26 ...

Страница 58: ...it through Figure 3 31 Figure 3 31 PPC 3712A N26 Panel Cutout Dimensions Step 4 Slide the panel PC through the hole until the aluminum frame is flush against the panel Step 5 Insert the panel mounting clamps into the pre formed holes along the edges of the chassis behind the aluminum frame There are a total of 8 panel mounting clamps Step 6 Tighten the screws that pass through the panel mounting c...

Страница 59: ...7xxA N26 panel PC can be installed into a cabinet or rack To do this please follow the steps below 3 10 3 1 PPC 3708A N26 Step 1 Slide the rear chassis of the PPC 3708A N26 panel PC through the rack cabinet bracket until the aluminum frame is flush against the front of the bracket Figure 3 33 Figure 3 33 The Rack Cabinet Bracket ...

Страница 60: ...r of mounting clamps should be eight Step 3 Tighten the screws that pass through the rack mounting clamps until the plastic caps at the front of all the screws are firmly secured to the bracket Figure 3 34 Figure 3 34 Securing the PPC 3708A N26 Rack Cabinet Bracket Step 4 Slide the PPC 3708A N26 panel PC with the attached rack cabinet bracket into a rack or cabinet Figure 3 35 ...

Страница 61: ...the front of the rack or cabinet Figure 3 35 3 10 3 2 PPC 3710A N26 and PPC 3712A N26 Step 1 The back of the aluminum frame surrounding the LCD screen has retention screw holes PPC 3710A N26 has 10 holes and PPC 3712A N26 has 8 holes for a cabinet rack installation bracket NOTE When purchasing the cabinet rack installation bracket make sure it is compatible with both the panel PC and the rack cabi...

Страница 62: ...igure 3 36 Figure 3 36 Securing the Rack Cabinet Bracket Step 5 Follow Step 4 and Step 5 of the PPC 3708A N26 Cabinet and Rack Installation procedures to complete the whole installation process Step 0 3 10 4 Arm Mounting The PPC 37xxA N26 is VESA Video Electronics Standards Association compliant and can be mounted on an arm with a 100 mm interface pad To mount the PPC 37xxA N26 on an arm please fo...

Страница 63: ...its surface lift the PPC 37xxA N26 panel PC onto the interface pad of the mounting arm Step 3 Align the retention screw holes on the mounting arm interface with those in the PPC 37xxA N26 panel PC The arm mounting retention screw holes of the PPC 37xxA N26 panel PC are shown in Figure 3 37 Figure 3 37 Arm Mounting Retention Screw Holes Step 4 Secure the PPC 37xxA N26 to the interface pad by insert...

Страница 64: ...10 5 Stand Mounting To mount the PPC 37xxA N26 using the stand mounting kit please follow the steps below Step 1 Locate the screw holes on the rear of the PPC 37xxA N26 This is where the bracket will be attached Figure 3 39 Stand Mounting Retention Screw Holes ...

Страница 65: ...cks connect to external audio devices Mic Connects to a microphone Line in Connects to a player or other audio sources Line out Connects to a headphone or a speaker With multi channel configurations this port can also connect to front speakers 3 11 2 HDMI Connector The HDMI connector transmits a digital signal to compatible HDMI display devices such as a TV or computer screen To connect the HDMI c...

Страница 66: ...ector The standard system is shipped with a 90 V to 264 V AC power adapter that has a maximum power output of 60 W The power adapter has a 12 V DC output connector The PPC 37xxA N26 has one 12 V power input connector on the bottom panel The location of the power connector is shown in Figure 1 4 3 11 4 RJ 45 LAN Connectors The RJ 45 LAN connectors allow connections to external networks The pinouts ...

Страница 67: ... 100 Mb s orange 1000 Mb s Table 3 9 RJ 45 LAN Connector LEDs To connect the PPC 37xxA N26 to a network through the RJ 45 LAN connectors follow the steps below Step 1 Locate the RJ 45 connectors The locations of the RJ 45 connectors are shown in 7Figure 1 4 Step 2 Align the connectors Align the RJ 45 connector on the LAN cable with one of the RJ 45 connectors on the PPC 37xxA N26 See 7Figure 3 42 ...

Страница 68: ...e DB 9 connectors are shown in 7Figure 1 4 Step 2 Insert the serial connector Insert the DB 9 connector of a serial device into the DB 9 connector on the external peripheral interface See Figure 3 43 Figure 3 43 RS 232 Serial Device Connector Step 3 Secure the connector Secure the serial device connector to the external interface by tightening the two retention screws on either side of the connect...

Страница 69: ...r to the external interface by tightening the two retention screws on either side of the connector 3 11 7 USB 2 0 Connectors The USB 2 0 ports are for attaching USB 2 0 1 1 peripheral devices to the system To connect a USB 2 0 or USB 1 1 device please follow the instructions below Step 1 Located the USB connectors The locations of the USB connectors are shown in Figure 1 4 Step 2 Align the connect...

Страница 70: ...he system Follow the instructions in the previous section to connect the USB devices to the USB 3 0 ports NOTE If installing the Windows 7 OS by using the USB 3 0 ports loading the USB 3 0 driver during OS installation is necessary Refer to Section 6 7 1 for detailed installation procedure 3 11 9 VGA Connector The VGA connector connects to a monitor that accepts VGA video input To connect the PPC ...

Страница 71: ... VGA connector Align the male DB 15 connector on the VGA screen cable with the female DB 15 connector on the external peripheral interface Step 3 Insert the VGA connector Once the connectors are properly aligned with the insert the male connector from the VGA screen into the female connector on the PPC 37xxA N26 See 7Figure 3 46 Figure 3 46 VGA Connector ...

Страница 72: ...PPC 37xxA N26 Panel PC Page 56 Chapter 4 4 System Maintenance ...

Страница 73: ...e replaced If the system motherboard has failed please contact the system vendor reseller or an IEI sales person directly 4 3 Back Cover Removal WARNING Before removing the back cover make sure all power to the system has been disconnected Failing to do so may cause severe damage to the PPC 37xxA N26 and injury to the user WARNING Please take antistatic precautions when working with the internal c...

Страница 74: ...eplace the SO DIMM modules please follow the steps below Step 1 Remove the back cover Section 73 5 Step 2 Follow Steps 2 4 in Section 3 7 to release the motherboard from the panel PC Step 3 Locate the SO DIMM module on the solder side of the motherboard Figure 4 1 SO DIMM Module Location Step 4 Release the SO DIMM module by pulling both the spring retainer clips outward from the socket Step 5 Gras...

Страница 75: ...4 2 The spring retainer clips clip into place and secure the SO DIMM module in the socket Figure 4 2 SO DIMM Module Installation Step 8 Push the new DIMM module until it engages and the white plastic end clips click into place Make sure the end clips are fully secured after installation Step 0 ...

Страница 76: ...PPC 37xxA N26 Panel PC Page 60 5 BIOS Setup Chapter 5 ...

Страница 77: ...message appears on the screen 0 If the message disappears before the DELETE or F2 key is pressed restart the computer and try again 5 1 2 Using Setup Use the arrow keys to highlight items press ENTER to select use the PageUp and PageDown keys to change entries press F1 for help and press ESC to quit Navigation keys are shown in the following table Key Function Up arrow Move to the item above Down ...

Страница 78: ...5 1 4 Unable to Reboot after Configuration Changes If the computer cannot boot after changes to the system configuration are made press the CMOS button on the bottom panel to clear the CMOS data and reset the system BIOS information The location of the CMOS button is shown in Section 3 6 4 5 1 5 BIOS Menu Bar The menu bar on top of the BIOS screen has the following main items Main Changes the basi...

Страница 79: ...e Use Tab to switch between Data elements ÆÅ Select Screen Select Item Enter Select Change Opt F1 General Help F2 Previous Values F3 Optimized Defaults F4 Save Exit ESC Exit Version 2 14 1219 Copyright C 2011 American Megatrends Inc BIOS Menu 1 Main Î BIOS Information The BIOS Information lists a brief summary of the BIOS The fields in BIOS Information cannot be changed The items shown in the syst...

Страница 80: ...tup Utility Copyright C 2011 American Megatrends Inc Main Advanced Chipset Boot Security Save Exit ACPI Settings RTC Wake Settings CPU Configuration IDE Configuration USB Configuration F81866 Super IO Configuration F81866 H M Monitor Serial Port Console Redirection iEi Feature System ACPI Parameters ÆÅ Select Screen Select Item Enter Select Change Opt F1 General Help F2 Previous Values F3 Optimize...

Страница 81: ...rends Inc BIOS Menu 3 ACPI Settings Î ACPI Sleep State S1 CPU Stop Clock Use the ACPI Sleep State option to specify the sleep state the system enters when it is not being used Î S1 CPU Stop Clock DEFAULT The system enters S1 POS sleep state The system appears off The CPU is stopped RAM is refreshed the system is running in a low power mode Î S3 Suspend to RAM The caches are flushed and the CPU is ...

Страница 82: ...an Megatrends Inc BIOS Menu 4 RTC Wake Settings Î Wake system with Fixed Time Disabled Use the Wake system with Fixed Time option to enable or disable the system wake on alarm event Î Disabled DEFAULT The real time clock RTC cannot generate a wake event Î Enabled If selected the Wake up every day option appears allowing you to enable to disable the system to wake every day at the specified time Be...

Страница 83: ... Threading Technology ÆÅ Select Screen Select Item Enter Select Change Opt F1 General Help F2 Previous Values F3 Optimized Defaults F4 Save Exit ESC Exit Version 2 14 1219 Copyright C 2011 American Megatrends Inc BIOS Menu 5 CPU Configuration The CPU Configuration menu 8BIOS Menu 5 lists the following CPU details Processor Type Lists the brand name of the CPU being used EMT64 Indicates if EMT64 is...

Страница 84: ...m Aptio Setup Utility Copyright C 2011 American Megatrends Inc Advanced SATA Port0 Not Present SATA Port1 Not Present Configure SATA as IDE Select a configuration for SATA Controller ÆÅ Select Screen Select Item Enter Select Change Opt F1 General Help F2 Previous Values F3 Optimized Defaults F4 Save Exit ESC Exit Version 2 14 1219 Copyright C 2011 American Megatrends Inc BIOS Menu 6 SATA Configura...

Страница 85: ...ep USB devices available only for EFI applications ÆÅ Select Screen Select Item Enter Select Change Opt F1 General Help F2 Previous Values F3 Optimized Defaults F4 Save Exit ESC Exit Version 2 14 1219 Copyright C 2011 American Megatrends Inc BIOS Menu 7 USB Configuration Î USB Devices The USB Devices field lists the USB devices that are enabled on the system Î Legacy USB Support Enabled Use the Le...

Страница 86: ... DEFAULT Enables the support for operating systems without an XHCI hand off feature Î Disabled Disables the XHCI hand off support Î EHCI Hand off Disabled Use the EHCI Hand off BIOS option to enable the support for operating systems without an EHCI hand off feature The EHCI ownership change should be claimed by EHCI driver Î Enabled Enables the support for operating systems without an EHCI hand of...

Страница 87: ...ber of seconds that the Power On Self Test will wait for a USB mass storage device to start 10 sec 20 sec DEFAULT 30 sec 40 sec Î Device power up delay Auto Use the Device power up delay BIOS option to set the maximum time a USB device will take before it properly reports itself to the Host Controller Î Auto DEFAULT Uses the default values For a Root port 100 ms delay For a Hub port Uses the delay...

Страница 88: ...p F2 Previous Values F3 Optimized Defaults F4 Save Exit ESC Exit Version 2 14 1219 Copyright C 2011 American Megatrends Inc BIOS Menu 8 F81866 Super IO Configuration 5 3 6 1 Serial Port n Configuration Use the Serial Port n Configuration menu 8BIOS Menu 9 to configure the serial port n Aptio Setup Utility Copyright C 2011 American Megatrends Inc Advanced Serial Port 1 Configuration Serial Port Ena...

Страница 89: ...IO 3F8h IRQ 4 Serial Port I O port address is 3F8h and the interrupt address is IRQ4 Î IO 3F8h IRQ 3 4 Serial Port I O port address is 3F8h and the interrupt address is IRQ3 4 Î IO 2F8h IRQ 3 4 Serial Port I O port address is 2F8h and the interrupt address is IRQ3 4 Î IO 3E8h IRQ 3 4 Serial Port I O port address is 3E8h and the interrupt address is IRQ3 4 Î IO 2E8h IRQ 3 4 Serial Port I O port add...

Страница 90: ...ddress is IRQ3 4 Î IO 2F8h IRQ 3 4 Serial Port I O port address is 2F8h and the interrupt address is IRQ3 4 Î IO 3E8h IRQ 3 4 Serial Port I O port address is 3E8h and the interrupt address is IRQ3 4 Î IO 2E8h IRQ 3 4 Serial Port I O port address is 2E8h and the interrupt address is IRQ3 4 5 3 6 1 3 Serial Port 3 Configuration Î Serial Port Enabled Use the Serial Port option to enable or disable th...

Страница 91: ...ess is 3E8h and the interrupt address is IRQ10 11 Î IO 2E8h IRQ 10 11 Serial Port I O port address is 2E8h and the interrupt address is IRQ10 11 Î IO 250h IRQ 10 11 Serial Port I O port address is 250h and the interrupt address is IRQ10 11 Î IO 2E0h IRQ 10 11 Serial Port I O port address is 2E0h and the interrupt address is IRQ10 11 5 3 6 1 4 Serial Port 4 Configuration Î Serial Port Enabled Use t...

Страница 92: ...he interrupt address is IRQ10 11 Î IO 3E8h IRQ 10 11 Serial Port I O port address is 3E8h and the interrupt address is IRQ10 11 Î IO 2E8h IRQ 10 11 Serial Port I O port address is 2E8h and the interrupt address is IRQ10 11 Î IO 250h IRQ 10 11 Serial Port I O port address is 250h and the interrupt address is IRQ10 11 Î IO 2E0h IRQ 10 11 Serial Port I O port address is 2E0h and the interrupt address...

Страница 93: ... Smart Fan Mode Select ÆÅ Select Screen Select Item Enter Select Change Opt F1 General Help F2 Previous Values F3 Optimized Defaults F4 Save Exit ESC Exit Version 2 14 1219 Copyright C 2011 American Megatrends Inc BIOS Menu 10 F81866 H W Monitor Î PC Health Status The following system parameters and values are shown The system parameters that are monitored are System Temperatures o System Temperat...

Страница 94: ...emperature 4 30 Smart Fan Mode Select Reference System Temperature ÆÅ Select Screen Select Item Enter Select Change Opt F1 General Help F2 Previous Values F3 Optimized Defaults F4 Save Exit ESC Exit Version 2 14 1219 Copyright C 2011 American Megatrends Inc BIOS Menu 11 Smart Fan Mode Configuration Î CPU_FAN1 SYS_FAN1 Smart Fan Control Auto Duty Cycle Mode Use the CPU_FAN1 SYS_FAN1 Smart Fan Contr...

Страница 95: ...e Redirection Settings Console Redirection Enable or Disable ÆÅ Select Screen Select Item Enter Select Change Opt F1 General Help F2 Previous Values F3 Optimized Defaults F4 Save Exit ESC Exit Version 2 14 1219 Copyright C 2011 American Megatrends Inc BIOS Menu 12 Serial Port Console Redirection Î Console Redirection Disabled Use Console Redirection option to enable or disable the console redirect...

Страница 96: ...C Exit Version 2 14 1219 Copyright C 2011 American Megatrends Inc BIOS Menu 13 Console Redirection Settings Î Terminal Type ANSI Use the Terminal Type option to specify the remote terminal type Î VT100 The target terminal type is VT100 Î VT100 The target terminal type is VT100 Î VT UTF8 The target terminal type is VT UTF8 Î ANSI DEFAULT The target terminal type is ANSI Î Bits per second 115200 Use...

Страница 97: ... None DEFAULT No parity bit is sent with the data bits Î Even The parity bit is 0 if the number of ones in the data bits is even Î Odd The parity bit is 0 if the number of ones in the data bits is odd Î Mark The parity bit is always 1 This option does not provide error detection Î Space The parity bit is always 0 This option does not provide error detection Î Stop Bits 1 Use the Stop Bits option t...

Страница 98: ...s Please install Auto Recovery API service before enabling this function ÆÅ Select Screen Select Item Enter Select Change Opt F1 General Help F2 Previous Values F3 Optimized Defaults F4 Save Exit ESC Exit Version 2 14 1219 Copyright C 2011 American Megatrends Inc BIOS Menu 14 iEi Feature Î Auto Recovery Function Disabled Use the Auto Recovery Function BIOS option to enable or disable the auto reco...

Страница 99: ...pset BIOS menu may cause the system to malfunction Aptio Setup Utility Copyright C 2011 American Megatrends Inc Main Advanced Chipset Boot Security Save Exit Host Bridge South Bridge Host Bridge Parameters ÆÅ Select Screen Select Item Enter Select Change Opt F1 General Help F2 Previous Values F3 Optimized Defaults F4 Save Exit ESC Exit Version 2 14 1219 Copyright C 2011 American Megatrends Inc BIO...

Страница 100: ...ave Exit ESC Exit Version 2 14 1219 Copyright C 2011 American Megatrends Inc BIOS Menu 16 Host Bridge Configuration 5 4 1 1 Intel IGD Configuration Use the Intel IGD Configuration submenu BIOS Menu 17 to configure the video device connected to the system Aptio Setup Utility Copyright C 2011 American Megatrends Inc Advanced Intel IGD Configuration IGFX Boot Type LVDS1 LVDS1 Panel Type 1024x768 LVDS...

Страница 101: ...s Inc Chipset Auto Power Button Status Enabled Power Saving Function ERP Disabled Set Spread Spectrum function Disabled Enable to reduce power consumption in system off state ÆÅ Select Screen Select Item Enter Select Change Opt F1 General Help F2 Previous Values F3 Optimized Defaults F4 Save Exit ESC Exit Version 2 14 1219 Copyright C 2011 American Megatrends Inc BIOS Menu 18 Southbridge Configura...

Страница 102: ...ROM Messages Force BIOS UEFI Boot Disabled Boot Option Priorities Select the keyboard NumLock state ÆÅ Select Screen Select Item Enter Select Change Opt F1 General Help F2 Previous Values F3 Optimized Defaults F4 Save Exit ESC Exit Version 2 14 1219 Copyright C 2011 American Megatrends Inc BIOS Menu 19 Boot Î Bootup NumLock State On Use the Bootup NumLock State BIOS option to specify if the number...

Страница 103: ...T OEM Logo displayed instead of POST messages Î Launch PXE OpROM Disabled Use the Launch PXE OpROM option to enable or disable boot option for legacy network devices Î Disabled DEFAULT Ignore all PXE Option ROMs Î Enabled Load PXE Option ROMs Î Option ROM Messages Force BIOS Use the Option ROM Messages option to set the Option ROM display mode Î Force BIOS DEFAULT Sets display mode to force BIOS Î...

Страница 104: ...l have Administrator rights The password length must be in the following range Minimum length 3 Maximum length 20 Administrator Password User Password Set Administrator Password ÆÅ Select Screen Select Item Enter Select Change Opt F1 General Help F2 Previous Values F3 Optimized Defaults F4 Save Exit ESC Exit Version 2 14 1219 Copyright C 2011 American Megatrends Inc BIOS Menu 20 Security Î Adminis...

Страница 105: ... Exit Î Save Changes and Reset Use the Save Changes and Reset option to save the changes made to the BIOS options and reset the system Î Discard Changes and Reset Use the Discard Changes and Reset option to exit the system without saving the changes made to the BIOS configuration setup program Î Restore Defaults Use the Restore Defaults option to load the optimal default values for each of the par...

Страница 106: ...PPC 37xxA N26 Panel PC Page 90 6 Driver Installation Chapter 6 ...

Страница 107: ...nstalled on the system Chipset VGA LAN Audio USB 3 0 Touchscreen Installation instructions for the drivers are given in the following sections 6 2 Starting the Driver Program To access the driver installation programs please do the following Step 1 Insert the CD that came with the system into an optical disk drive connected to the system NOTE If the installation program doesn t start automatically...

Страница 108: ...e following Step 1 Access the driver list See Section 6 2 Step 2 Click CHIPSET Step 3 Go to the 32 bit or 64 bit folder that corresponds to your OS version Step 4 Open the Intel Chipset Software Installation Utility folder Step 5 Double click the infinst_autol icon Step 6 The setup files are extracted as shown in Figure 6 2 ...

Страница 109: ... Panel PC Page 93 Figure 6 2 Chipset Driver Screen Step 7 When the setup files are completely extracted the Welcome Screen in Figure 6 3 appears Figure 6 3 Chipset Driver Welcome Screen Step 8 Click Next to continue ...

Страница 110: ...ep 9 The license agreement in Figure 6 4 appears Step 10 Read the License Agreement Step 11 Click Yes to continue Figure 6 4 Chipset Driver License Agreement Step 12 The Read Me file in Figure 6 5 appears Step 13 Click Next to continue ...

Страница 111: ...6 5 Chipset Driver Read Me File Step 14 Setup Operations are performed as shown in Figure 6 6 Figure 6 6 Chipset Driver Setup Operations Step 15 Once the Setup Operations are complete click Next to continue Step 16 The Finish screen appears ...

Страница 112: ...on NOTE Due to Intel GMA driver limitation the monitor connected to the VGA connector may become extended desktop or not have signal to it after restarting from the graphics driver installation To work out this limitation press the Ctrl Alt F1 hotkey to switch the primary display to CRT mode To install the VGA driver please do the following Step 1 Access the driver list See Section 6 2 Step 2 Clic...

Страница 113: ...nds to your OS version Step 4 Double click the Setup icon Step 5 The Welcome Screen in Figure 6 8 appears Figure 6 8 VGA Driver Welcome Screen Step 6 Click Next to continue Step 7 The license agreement in Figure 6 9 appears Step 8 Read the License Agreement Step 9 Click Yes to continue ...

Страница 114: ...Page 98 Figure 6 9 VGA Driver License Agreement Step 10 The Read Me file in Figure 6 10 appears Step 11 Click Next to continue Figure 6 10 VGA Driver Read Me File Step 12 Setup Operations are performed as shown in Figure 6 11 ...

Страница 115: ...ations Step 13 Once the Setup Operations are complete click the Next icon to continue Step 14 The Finish screen appears Step 15 Select Yes I want to restart the computer now and click the Finish icon See Figure 6 12 Figure 6 12 VGA Driver Installation Finish Screen ...

Страница 116: ...tion 6 2 Step 2 Click LAN Step 3 Go to the Realtek Install_Win7_7048_09162011 folder Step 4 Double click the setup icon Step 5 The Welcome screen in Figure 6 13 appears Figure 6 13 LAN Driver Welcome Screen Step 6 Click Next to continue Step 7 The Ready to Install screen in Figure 6 14 appears Step 8 Click Install to proceed with the installation ...

Страница 117: ...1 Figure 6 14 LAN Driver Installation Step 9 The program begins to install Step 10 When the driver installation is complete the screen in Figure 6 15 appears Step 11 Click Finish to exit Figure 6 15 LAN Driver Installation Complete ...

Страница 118: ...ing Step 1 Access the driver list See Section 6 2 Step 2 Click AUDIO Step 3 Open the Win7 folder Step 4 Double click the Vista_Win7_R263 icon Step 5 The installation files are extracted as shown in Figure 6 16 Figure 6 16 Audio Driver Installation File Extraction Step 6 The Welcome screen in Figure 6 17 appears ...

Страница 119: ...igure 6 17 Audio Driver Welcome Screen Step 7 Click Next to continue Step 8 The program begins to install Step 9 The installation progress can be monitored in the progress bar shown in Figure 6 18 Figure 6 18 Audio Driver Installation ...

Страница 120: ...click Finish Step 12 The system reboots 6 7 USB 3 0 Driver Installation WARNING Do not run this driver s installer Setup exe from a USB storage device ie external USB hard drive or USB thumb drive For proper installation please copy driver files to a local hard drive folder and run from there To install the USB 3 0 driver please follow the steps below Step 1 Access the driver list See Section 6 2 ...

Страница 121: ...4 The Welcome Screen in Figure 6 20 appears Step 5 Click Next to continue Figure 6 20 USB 3 0 Driver Welcome Screen Step 6 The license agreement in Figure 6 21 appears Step 7 Read the License Agreement Step 8 Check I accept the terms in the license agreement and then click Next to continue ...

Страница 122: ...cense Agreement Step 9 The installation progress can be monitored in the progress bar shown in Figure 6 22 Figure 6 22 USB 3 0 Driver Setup Operations Step 10 When the driver installation is complete the screen in Figure 6 23 appears Step 11 Click Finish to exit ...

Страница 123: ... the USB 3 0 ports loading the USB 3 0 driver during the OS installation is necessary Follow the instructions below to complete the task Step 1 Insert the USB flash drive containing the USB 3 0 driver into one of the USB 2 0 ports on the PPC 37xxA N26 Step 2 After clicking the Install now button during the OS installation Figure 6 24 the Load Driver screen appears Figure 6 25 Click Browse ...

Страница 124: ...PPC 37xxA N26 Panel PC Page 108 Figure 6 24 Install Now Figure 6 25 Load Driver Step 3 Locate the USB 3 0 driver folder select Driver and then click OK Figure 6 26 ...

Страница 125: ...PPC 37xxA N26 Panel PC Page 109 Figure 6 26 Browse for Folder Step 4 Make sure the ASMedia XHCI Controller driver is selected and then click Next Figure 6 27 Select the ASMedia XHCI Controller Driver ...

Страница 126: ...Step 6 Make sure the Driver subfolder inside the USB 3 0 driver folder is selected and then click OK Figure 6 26 Step 7 Select the USB Root Hub driver and click Next Figure 6 29 Select the USB Root Hub Driver Step 8 Follow the on screen instructions of the Windows setup wizard to complete the OS installation ...

Страница 127: ...s below Step 1 Access the driver list See Section 6 2 Step 2 Click Touch Step 3 Double click the setup icon Step 4 The Welcome screen in Figure 6 30 appears Click Next to continue Figure 6 30 Welcome Screen Step 5 The license agreement in Figure 6 31 appears Step 6 Read the License Agreement Step 7 Click I Agree to continue ...

Страница 128: ...age 112 Figure 6 31 Touchscreen Driver License Agreement Step 8 Select the destination folder where the setup files will be copied to Figure 6 32 Step 9 Click Install to start installation Figure 6 32 Choose Destination Folder ...

Страница 129: ...0 The installation begins See Figure 6 33 Figure 6 33 Setup Status Step 11 When the installation is complete the screen in Figure 6 34 appears Click Finish to close the setup wizard Figure 6 34 Touchscreen Driver Installation Finish Screen ...

Страница 130: ... touchscreen please follow the steps below Step 1 Click the icon on the Windows taskbar Step 2 Click Control Panel from the menu Figure 6 35 Figure 6 35 Select Control Panel Step 3 The touchscreen control panel appears Figure 6 36 Click Configure Figure 6 36 Touchscreen Control Panel ...

Страница 131: ...or advanced calibration Figure 6 37 Select Calibration Type Step 5 The calibration window in Figure 6 38 appears The user is asked to touch the screen at five specified points if Standard Calibration is selected Follow the screen guide to touch and hold each red square in the calibration window until it shows Lift off to proceed ...

Страница 132: ...PPC 37xxA N26 Panel PC Page 116 Figure 6 38 Calibration Window Step 6 When the calibration is complete the setup returns to the control panel Click OK to exit ...

Страница 133: ...PPC 37xxA N26 Panel PC Page 117 7 Interface Connectors Chapter 7 ...

Страница 134: ... peripheral interface connectors and configuration jumpers The connector locations are shown in Figure 6 1 and Figure 6 2 The Pin 1 locations of the on board connectors are also indicated in the diagrams The connector pinouts for these connectors are listed in the following sections Figure 7 1 Main Board Layout Diagram Front Side ...

Страница 135: ...he table below shows a list of the peripheral interface connectors on the PPC 37xxA N26 motherboard Pinouts of these connectors can be found in the following sections Connector Type Label 5 V SATA power connectors 2 pin wafer SATA_PWR1 SATA_PWR2 Audio connector 10 pin header AUDIO1 Backlight inverter connector 5 pin wafer INV1 Battery connector 2 pin wafer BAT1 Buzzer connector 2 pin wafer SP1 Dig...

Страница 136: ...OM3 RS 422 485 serial port connector 4 pin wafer COM4 Serial ATA SATA drive connectors 7 pin SATA SATA1 SATA2 SO DIMM connector SO DIMM connector DIMM1 USB 2 0 connector 8 pin header USB4 Table 7 1 Peripheral Interface Connectors 7 2 1 5 V SATA Power Connectors SATA_PWR1 SATA_PWR2 7 2 2 Audio Connector AUDIO1 PIN NO DESCRIPTION PIN NO DESCRIPTION 1 SPK_R 2 LINE1_R 3 AUD_GND 4 AUD_GND 5 SPK _L 6 LI...

Страница 137: ... VCC 3 Output 3 4 Output 2 5 Output 1 6 Output 0 7 Input 3 8 Input 2 9 Input 1 10 Input 0 Table 7 7 Digital Input Output Connector DIO1 Pinouts PIN NO DESCRIPTION 1 LCD_BKLTCTL 2 GROUND 3 12V 4 GROUND 5 BACKLIGHT ENABLE Table 7 4 Backlight Inverter Connector INV1 Pinouts PIN NO DESCRIPTION 1 Battery 2 GND Table 7 5 Battery Connector BAT1 Pinouts PIN NO DESCRIPTION 1 V5S 2 GND Table 7 6 Buzzer Conn...

Страница 138: ...utton 3 GND Power LED 8 GND 4 V5S 9 RESET HDD LED 5 HDD_LED Reset Button 10 GND 7 2 9 Keyboard Mouse Connector KB_MS1 PIN NO DESCRIPTION 1 FANIO 2 12V PWM 3 Ground Table 7 8 Fan Connector CPU_FAN1 Pinouts Table 7 9 Front Panel Connector F_PANEL1 Pinouts PIN NO DESCRIPTION 1 VCC 2 Mouse Data 3 Mouse Clock 4 Keyboard Data 5 Keyboard Clock 6 GND Table 7 10 Keyboard Mouse Connector KB_MS1 Pinouts ...

Страница 139: ...ND 14 GND 15 LDDC_DATA 16 LDDC_CLK 17 VCC_LCD 18 VCC_LCD 19 VCC_LCD 20 VCC_LCD Table 7 11 LVDS Connector LVDS1 Pinouts 7 2 11 PCIe Mini Card Slot M_PCIE1 PIN NO DESCRIPTION PIN NO DESCRIPTION 1 PCIE_WAKE 2 VCC3 3 N C 4 GND 5 N C 6 1 5V 7 N C 8 N C 9 GND 10 N C 11 PCIE_CLK 12 N C 13 PCIE_CLK 14 N C 15 GND 16 N C 17 N C 18 GND 19 N C 20 N C 21 GND 22 PCIRST 23 PCIE_RXN 24 VCC3 25 PCIE_RXP 26 GND 27 ...

Страница 140: ... C 50 GND 51 M SATA Detect 52 VCC3 Table 7 12 PCIe Mini Card Slot M_PCIE1 Pinouts 7 2 12 Power Connector 9V 28V CN2 PIN NO DESCRIPTION PIN NO DESCRIPTION 1 GND 2 GND 3 PWR 4 PWR Table 7 13 Power Connector 9V 28V CN2 Pinouts 7 2 13 RS 232 Serial Port Connectors COM1 COM2 COM3 PIN NO DESCRIPTION PIN NO DESCRIPTION 1 DCD 2 DSR 3 RXD 4 RTS 5 TXD 6 CTS 7 DTR 8 RI 9 GND 10 GND Table 7 14 RS 232 Serial P...

Страница 141: ... 7 15 RS 422 485 Serial Port Connector COM4 Pinouts 7 2 15 SATA 3Gb s Connectors SATA1 SATA2 7 2 16 USB 2 0 Connector USB4 PIN NO DESCRIPTION PIN NO DESCRIPTION 1 USB_VCC 2 GND 3 DATA 4 DATA 5 DATA 6 DATA 7 GND 8 USB_VCC Table 7 17 USB 2 0 Connector USB4 Pinouts PIN NO DESCRIPTION 1 GND 2 TX 3 TX 4 GND 5 RX 6 RX 7 GND Table 7 16 SATA 3Gb s Connectors SATA1 SATA2 Pinouts ...

Страница 142: ...N1 LAN2 USB 2 0 connectors USB 2 0 port USB_CON2 USB 3 0 connectors USB 3 0 port USB_CON1 VGA connector 15 pin female VGA1 Table 7 18 Rear Panel Connectors 7 3 1 HDMI Connector HDMI1 PIN NO DESCRIPTION PIN NO DESCRIPTION 1 HDMI_DATA2 13 N C 2 GND 14 N C 3 HDMI_DATA2 15 HDMI_SCL 4 HDMI_DATA1 16 HDMI_SDA 5 GND 17 GND 6 HDMI_DATA1 18 5V 7 HDMI_DATA0 19 HDMI_HPD 8 GND 20 HDMI_GND 9 HDMI_DATA0 21 HDMI_...

Страница 143: ...DI3 4 MDI1 8 MDI3 Table 7 20 RJ 45 LAN Connector Pinouts 7 3 3 USB 2 0 Connectors USB_CON2 Table 7 21 USB 2 0 Connectors USB_CON2 Pinouts 7 3 4 USB 3 0 Connectors USB_CON1 PIN NO DESCRIPTION PIN NO DESCRIPTION 1 VCC 2 D 3 D 4 GND 5 RX 6 RX 7 GND 8 TX 9 TX Table 7 22 USB 3 0 Connectors USB_CON1 Pinouts PIN NO DESCRIPTION 1 VCC 2 DATA 3 DATA 4 GND ...

Страница 144: ...e 128 7 3 5 VGA Connector VGA1 PIN NO DESCRIPTION PIN NO DESCRIPTION 1 RED 9 VCC 2 GREEN 10 GROUND 3 BLUE 11 NC 4 NC 12 DDCDAT 5 GROUND 13 HSYNC 6 GROUND 14 VSYNC 7 GROUND 15 DDCCLK 8 GROUND Table 7 23 VGA Connector VGA1 Pinouts ...

Страница 145: ...PPC 37xxA N26 Panel PC Page 129 A BIOS Configuration Options Appendix A ...

Страница 146: ...led 70 XHCI Hand off Enabled 70 EHCI Hand off Disabled 70 USB Mass Storage Driver Support Enabled 70 USB transfer time out 20 sec 71 Device reset time out 20 sec 71 Device power up delay Auto 71 Serial Port Enabled 73 Change Settings Auto 73 Serial Port Enabled 73 Change Settings Auto 74 Serial Port Enabled 74 Change Settings Auto 74 Serial Port Enabled 75 Change Settings Auto 75 PC Health Status ...

Страница 147: ...RP Disabled 85 Set Spread Spectrum function Disabled 86 Bootup NumLock State On 86 Quiet Boot Enabled 87 Launch PXE OpROM Disabled 87 Option ROM Messages Force BIOS 87 UEFI Boot Disabled 87 Administrator Password 88 User Password 88 Save Changes and Reset 89 Discard Changes and Reset 89 Restore Defaults 89 Save as User Defaults 89 Restore User Defaults 89 ...

Страница 148: ...PPC 37xxA N26 Panel PC Page 132 Appendix B B One Key Recovery ...

Страница 149: ...ore from the factory default image after encountering a Blue Screen of Death BSoD or a hang for around 10 minutes Please refer to Section B 3 for the detailed setup procedure The IEI One Key Recovery tool menu is shown below Figure B 1 IEI One Key Recovery Tool Menu Prior to using the IEI One Key Recovery tool as shown in Figure B 1 to backup or restore Windows system five setup procedures are req...

Страница 150: ...used with IEI products The software will fail to run and a warning message will appear when used on non IEI hardware To create the system backup the main storage device must be split into two partitions three partitions for Linux The first partition will be for the operating system while the second partition will be invisible to the operating system and contain the backup made by the one key recov...

Страница 151: ... the operating system is already installed B 1 2 Supported Operating System The recovery CD is compatible with both Microsoft Windows and Linux operating systems OS The supported OS versions are listed below Microsoft Windows o Windows XP Service Pack 2 or 3 required o Windows Vista o Windows 7 o Windows CE 5 0 o Windows CE 6 0 o Windows XP Embedded Linux o Fedora Core 12 Constantine o Fedora Core...

Страница 152: ... BIOS setup see Section B 2 1 Step 2 Create partitions see Section B 2 2 Step 3 Install operating system drivers and system applications see Section B 2 3 Step 4 Build the recovery partition see Section B 2 4 or build the auto recovery partition see Section B 3 Step 5 Create factory default image see Section B 2 5 The detailed descriptions are described in the following sections NOTE The setup pro...

Страница 153: ...y Æ 1st Boot Device Step 7 Save changes and restart the computer Continue to the next section for instructions on partitioning the internal storage S t e p 0 B 2 2 Create Partitions To create the system backup the main storage device must be split into two partitions three partitions for Linux The first partition will be for the operating system while the second partition will be invisible to the ...

Страница 154: ...PPC 37xxA N26 Panel PC Page 138 Figure B 2 Launching the Recovery Tool Step 3 The recovery tool setup menu is shown as below Figure B 3 Recovery Tool Setup Menu Step 4 Press 6 then Enter ...

Страница 155: ...e other is for saving recovery files and images which will be an invisible partition Press Enter after entering each line below system32 diskpart DISKPART list vol DISKPART sel disk 0 DISKPART create part pri size ___ DISKPART assign letter N DISKPART create part pri size ___ DISKPART assign letter F DISKPART exit system32 format N fs ntfs q y system32 format F fs ntfs q v Recovery y system32 exit...

Страница 156: ...PPC 37xxA N26 Panel PC Page 140 Figure B 5 Partition Creation Commands ...

Страница 157: ...ystem onto the unlabelled partition The partition labeled Recovery is for use by the system recovery tool and should not be used for installing the operating system or any applications NOTE The operating system installation program may offer to reformat the chosen partition DO NOT format the partition again The partition has already been formatted and is ready for installing the new operating syst...

Страница 158: ...e system Step 3 Boot the system from the recovery CD When prompted press any key to boot from the recovery CD It will take a while to launch the recovery tool Please be patient Figure B 6 Launching the Recovery Tool Step 4 When the recovery tool setup menu appears press 2 then Enter Figure B 7 Manual Recovery Environment for Windows ...

Страница 159: ...ocess the partition created for recovery files in Section B 2 2 is hidden and the recovery tool is saved in this partition Figure B 8 Building the Recovery Partition Step 6 After completing the system configuration press any key in the following window to reboot the system Figure B 9 Press Any Key to Continue Step 7 Eject the recovery CD S t e p 0 ...

Страница 160: ...ow the steps below Step 1 Turn on the system When the following screen displays Figure B 10 press the F3 key to access the recovery tool The message will display for 10 seconds please press F3 before the system boots into the operating system Figure B 10 Press F3 to Boot into Recovery Mode Step 2 The recovery tool menu appears Type 4 and press Enter Figure B 11 Figure B 11 Recovery Tool Menu Step ...

Страница 161: ...e 145 Figure B 12 About Symantec Ghost Window Step 4 Use mouse to navigate to the option shown below Figure B 13 Figure B 13 Symantec Ghost Path Step 5 Select the local source drive Drive 1 as shown in Figure B 14 Then click OK ...

Страница 162: ... in Figure B 15 Then click OK Figure B 15 Select a Source Partition from Basic Drive Step 7 Select 1 2 Recovery NTFS drive and enter a file name called iei Figure B 16 Click Save The factory default image will then be saved in the selected recovery drive and named IEI GHO WARNING The file name of the factory default image must be iei GHO ...

Страница 163: ...PPC 37xxA N26 Panel PC Page 147 Figure B 16 File Name to Copy Image to Step 8 When the Compress Image screen in Figure B 17 prompts click High to make the image file smaller Figure B 17 Compress Image ...

Страница 164: ...18 Image Creation Confirmation Step 10 The Symantec Ghost starts to create the factory default image Figure B 19 Figure B 19 Image Creation Complete Step 11 When the image creation completes a screen prompts as shown in Figure B 20 Click Continue and close the Ghost window to exit the program Figure B 20 Image Creation Complete ...

Страница 165: ...e following sections CAUTION The setup procedure may include a step to create a factory default image It is suggested to configure the system to a factory default environment before the configuration including driver and application installations Step 1 Follow the steps described in Section B 2 1 Section B 2 3 to setup BIOS create partitions and install operating system Step 2 Install the auto rec...

Страница 166: ...the recovery CD When prompted press any key to boot from the recovery CD It will take a while to launch the recovery tool Please be patient Figure B 23 Launching the Recovery Tool Step 4 When the recovery tool setup menu appears press 4 then Enter Figure B 24 Auto Recovery Environment for Windows ...

Страница 167: ...y tool is saved in this partition Figure B 25 Building the Auto Recovery Partition Step 6 After completing the system configuration the following message prompts to confirm whether to create a factory default image Type Y to have the system create a factory default image automatically Type N within 6 seconds to skip this process The default option is YES It is suggested to choose YES for this opti...

Страница 168: ...leting the system configuration press any key in the following window to restart the system Figure B 28 Press any key to continue Step 9 Eject the One Key Recovery CD and restart the system Step 10 Press the DELETE key as soon as the system is turned on to enter the BIOS Step 11 Enable the Auto Recovery Function option Advanced Æ iEi Feature Æ Auto Recovery Function ...

Страница 169: ...rt the system If the system encounters a Blue Screen of Death BSoD or a hang for around 10 minutes it will automatically restore from the factory default image Step 0 CAUTION The auto recovery function can only apply on a Microsoft Windows system running the following OS versions Windows XP Windows Vista Windows 7 B 4 Setup Procedure for Linux The initial setup procedure for Linux system is mostly...

Страница 170: ...ec Ghost may not function properly While installing Linux OS please create two partitions Partition 1 Partition 2 SWAP NOTE Please reserve enough space for partition 3 for saving recovery images Figure B 29 Partitions for Linux Step 3 Create a recovery partition Insert the recovery CD into the optical disk drive Follow Step 1 Step 3 described in Section B 2 2 Then type the following commands marke...

Страница 171: ...l setup menu appears type 3 and press Enter Figure B 30 The Symantec Ghost window appears and starts configuring the system to build a recovery partition After completing the system configuration press any key to reboot the system Eject the recovery CD Figure B 30 Manual Recovery Environment for Linux Step 5 Access the recovery tool main menu by modifying the menu lst To first access the recovery ...

Страница 172: ...nux Text Mode Step 6 Modify the menu lst as shown below Step 7 The recovery tool menu appears Figure B 32 Figure B 32 Recovery Tool Menu Step 8 Create a factory default image Follow Step 2 Step 12 described in Section B 2 5 to create a factory default image S t e p 0 ...

Страница 173: ...e F3 key The recovery tool main menu is shown below Figure B 33 Recovery Tool Main Menu The recovery tool has several functions including 1 Factory Restore Restore the factory default image iei GHO created in Section B 2 5 2 Backup system Create a system backup image iei_user GHO which will be saved in the hidden partition 3 Restore your last backup Restore the last system backup image 4 Manual En...

Страница 174: ... Restore To restore the factory default image please follow the steps below Step 1 Type 1 and press Enter in the main menu Step 2 The Symantec Ghost window appears and starts to restore the factory default A factory default image called iei GHO is created in the hidden Recovery partition Figure B 34 Restore Factory Default Step 3 The screen shown in Figure B 35 appears when completed Press any key...

Страница 175: ...w Step 1 Type 2 and press Enter in the main menu Step 2 The Symantec Ghost window appears and starts to backup the system A backup image called iei_user GHO is created in the hidden Recovery partition Figure B 36 Backup System Step 3 The screen shown in Figure B 37 appears when system backup is complete Press any key to reboot the system ...

Страница 176: ...stem backup please follow the steps below Step 1 Type 3 and press Enter in the main menu Step 2 The Symantec Ghost window appears and starts to restore the last backup image iei_user GHO Figure B 38 Restore Backup Step 3 The screen shown in Figure B 39 appears when backup recovery is complete Press any key to reboot the system ...

Страница 177: ...system backup please follow the steps below Step 1 Type 4 and press Enter in the main menu Step 2 The Symantec Ghost window appears Use the Ghost program to backup or recover the system manually Figure B 40 Symantec Ghost Window Step 3 When backup or recovery is completed press any key to reboot the system S t e p 0 ...

Страница 178: ...d client OS includes Windows 2000 Windows 7 Windows XP Windows CE Windows Vista Windows XP Embedded Prior to restoring client systems from a Linux server a few setup procedures are required Step 1 Configure DHCP server settings Step 2 Configure TFTP settings Step 3 Configure One Key Recovery server settings Step 4 Start DHCP TFTP and HTTP Step 5 Create a shared directory Step 6 Setup a client syst...

Страница 179: ...default settings dhcpd conf CentOS Use the following command to show the DHCP server sample location vi etc dhcpd conf The DHCP server sample location is shown as below Use the following command to copy the DHCP server sample to etc dhcpd conf cp usr share doc dhcp 3 0 5 dhcpd conf sample etc dhcpd conf vi etc dhcpd conf Debian vi etc dhcpd conf Edit etc dhcpd conf for your environment For example...

Страница 180: ...entOS apt get install tftpd hpa xinetd syslinux Debian Step 2 Enable the TFTP server by editing the etc xinetd d tftp file and make it use the remap file The vvv is optional but it could definitely help on getting more information while running the remap file For example CentOS vi etc xinetd d tftp Modify disable no server_args s tftpboot m tftpboot tftpd remap vvv ...

Страница 181: ...shown below vi etc xinetd d tftp B 6 3 Configure One Key Recovery Server Settings Step 1 Copy the Utility RECOVERYR10 TAR BZ2 package from the One Key Recovery CD to the system server side Step 2 Extract the recovery package to cp RecoveryR10 tar bz2 cd tar xvjf RecoveryR10 tar bz2 Step 3 Copy pxelinux 0 from syslinux and install to tftboot cp usr lib syslinux pxelinux 0 tftpboot ...

Страница 182: ...etd reload etc init d xinetd restart etc init d dhcp3 server restart B 6 5 Create Shared Directory Step 1 Install the samba yum install samba Step 2 Create a shared directory for the factory default image mkdir share cd share mkdir image cp iei gho image WARNING The file name of the factory default image must be iei gho Step 3 Confirm the operating system default settings smb conf vi etc samba smb...

Страница 183: ...tep 4 Edit etc samba smb conf for your environment For example Step 5 Modify the hostname vi etc hostname Modify RecoveryServer B 6 6 Setup a Client System for Auto Recovery Step 1 Configure the following BIOS options of the client system Advanced iEi Feature Auto Recovery Function Enabled Advanced iEi Feature Recover from PXE Enabled Boot Launch PXE OpROM Enabled ...

Страница 184: ...the auto recovery utility into the system by double clicking the Utility AUTORECOVERY SETUP exe in the One Key Recovery CD This utility MUST be installed in the system otherwise the system will automatically restore from the factory default image every ten 10 minutes Step 5 Restart the client system from LAN If the system encounters a Blue Screen of Death BSoD or a hang for around 10 minutes it wi...

Страница 185: ...xA N26 Panel PC Page 169 NOTE A firewall or a SELinux is not in use in the whole setup process If there is a firewall or a SELinux protecting the system modify the configuration information to accommodate them ...

Страница 186: ...ne key recovery Please follow the steps below to install the SATA RAID AHCI driver Step 1 Copy the SATA RAID AHCI driver to a floppy disk and insert the floppy disk into a USB floppy disk drive The SATA RAID AHCI driver must be especially designed for the on board SATA controller Step 2 Connect the USB floppy disk drive to the system Step 3 Insert the One Key Recovery CD into the system and boot t...

Страница 187: ... 171 Step 5 When the following window appears press S to select Specify Additional Device Step 6 In the following window select a SATA controller mode used in the system Then press Enter The user can now start using the SATA HDD ...

Страница 188: ...p 4 in Section B 2 2 Create Partitions to finish the whole setup process S t e p 0 B 7 2 System Memory Requirement To be able to access the recovery tool by pressing F3 while booting up the system please make sure to have enough system memory The minimum memory requirement is listed below Using Award BIOS 128 MB system memory Using AMI BIOS 512 MB system memory ...

Страница 189: ...PPC 37xxA N26 Panel PC Page 173 C Safety Precautions Appendix C ...

Страница 190: ...nnected whenever the EP series is being installed moved or modified Do not apply voltage levels that exceed the specified voltage range Doing so may cause fire and or an electrical shock Electric shocks can occur if the EP series chassis is opened when the EP series is running Do not drop or insert any objects into the ventilation openings of the EP series If considerable amounts of dust water or ...

Страница 191: ...stband can help to prevent ESD from damaging any electrical component Self grounding Before handling any electrical component touch any grounded conducting material During the time the electrical component is handled frequently touch any conducting materials that are connected to the ground Use an anti static pad When configuring or working with an electrical component place it on an antic static ...

Страница 192: ...States Please follow the national guidelines for electrical and electronic product disposal C 2 Maintenance and Cleaning Precautions When maintaining or cleaning the EP series please follow the guidelines below C 2 1 Maintenance and Cleaning Prior to cleaning any part or component of the EP series please read the details below Except for the LCD panel never spray or squirt liquids directly onto an...

Страница 193: ...g alcohol A cloth moistened with water or rubbing alcohol can be used to clean the EP series Using solvents The use of solvents is not recommended when cleaning the EP series as they may damage the plastic parts Vacuum cleaner Using a vacuum specifically designed for computers is one of the best methods of cleaning the EP series Dust and dirt can restrict the airflow in the EP series and cause its...

Страница 194: ...PPC 37xxA N26 Panel PC Page 178 D Watchdog Timer Appendix D ...

Страница 195: ...BIOS function call INT 15H is used to control the Watchdog Timer INT 15H AH 6FH Sub function AL 2 Sets the Watchdog Timer s period BL Time out value Its unit second is dependent on the item Watchdog Timer unit select in CMOS setup Table D 1 AH 6FH Sub function Call sub function 2 to set the time out period of Watchdog Timer first If the time out value is not zero the Watchdog Timer starts counting...

Страница 196: ...e system resets Example program INITIAL TIMER PERIOD COUNTER W_LOOP MOV AX 6F02H setting the time out value MOV BX 05 time out value is 5 seconds INT 15H ADD THE APPLICATION PROGRAM HERE CMP EXIT_AP 1 is the application over JNE W_LOOP No restart the application MOV AX 6F02H disable Watchdog Timer MOV BX 0 INT 15H EXIT ...

Страница 197: ...PPC 37xxA N26 Panel PC Page 181 E Hazardous Materials Disclosure Appendix E ...

Страница 198: ... presences of small quantities of certain materials in the product and is applicable to China RoHS only A label will be placed on each product to indicate the estimated Environmentally Friendly Use Period EFUP This is an estimate of the number of years that these substances would not leak out or undergo abrupt change This product may contain replaceable sub assemblies components which have a short...

Страница 199: ...it Board O O O O O O Metal Fasteners O O O O O O Cable Assembly O O O O O O Fan Assembly O O O O O O Power Supply Assemblies O O O O O O Battery O O O O O O O This toxic or hazardous substance is contained in all of the homogeneous materials for the part is below the limit requirement in SJ T11363 2006 X This toxic or hazardous substance is contained in at least one of the homogeneous materials fo...

Страница 200: ...包含有较短的环境友好使用期限的可替换元件 像是电池或灯管 这些 元件将会单独标示出来 有毒有害物质或元素 部件名称 铅 Pb 汞 Hg 镉 Cd 六价铬 CR VI 多溴联苯 PBB 多溴二苯醚 PBDE 壳体 O O O O O O 显示 O O O O O O 印刷电路板 O O O O O O 金属螺帽 O O O O O O 电缆组装 O O O O O O 风扇组装 O O O O O O 电力供应组装 O O O O O O 电池 O O O O O O O 表示该有毒有害物质在该部件所有物质材料中的含量均在 SJ T11363 2006 标准规定的限量要求以下 X 表示该有毒有害物质至少在该部件的某一均质材料中的含量超出 SJ T11363 2006 标准规定的限量要求 ...

Отзывы: