background image

AN300 KVM extender Quick Installation Guide 


VGA KVM Extender over Cat 5 - VGA, USB & PS/2 with built-in 2 port KVM switch up to 300mtr, Supports 1920 x 1200


Introduction 

 
The AN300 CAT5 KVM Extender can extend your keyboard monitor and mouse up to 300mtr away from your computer on a 
single Cat 5 or Cat 6 UTP cable. 
 
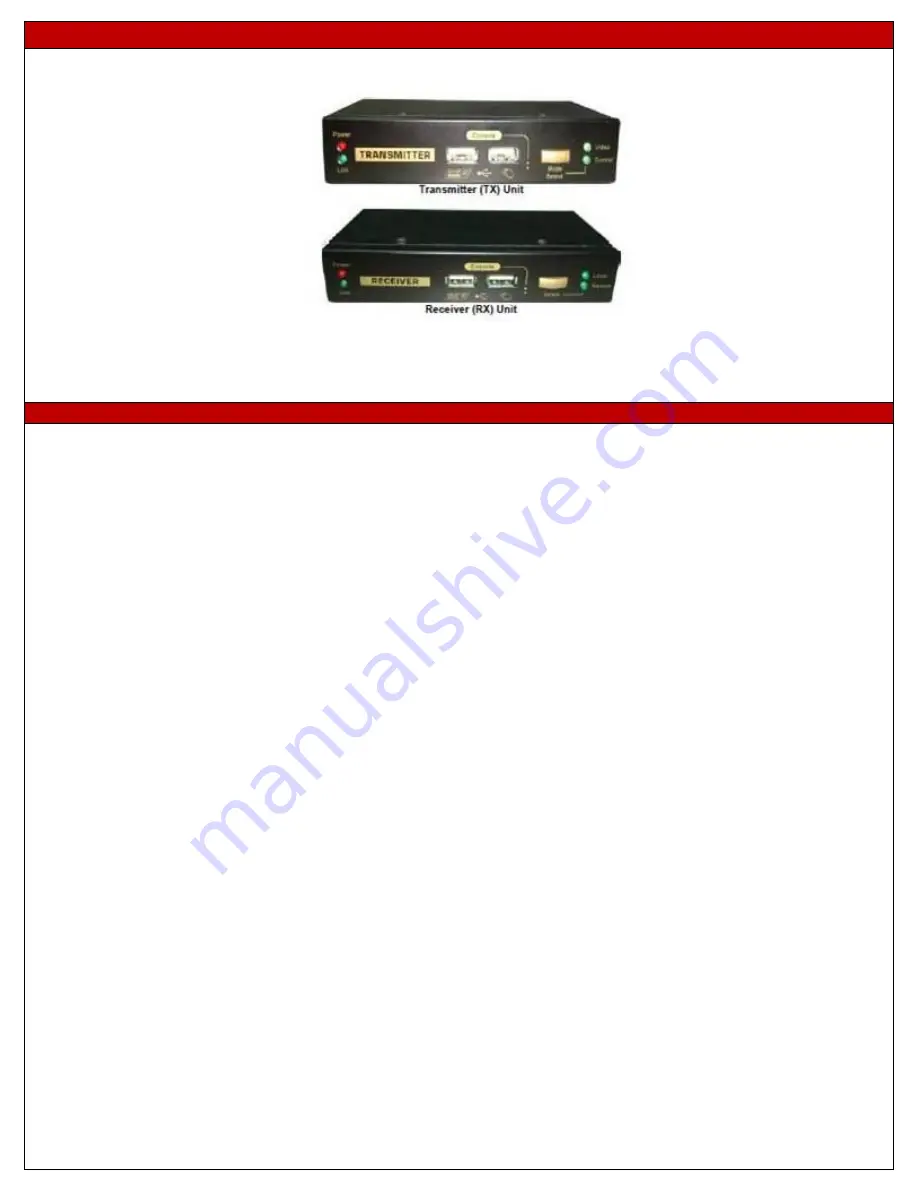
The Cat5 KVM Extender comprises two distinct units – the Receiver (RX) Unit and the Transmitter (TX) Unit. The Transmitter 
includes local console ports and allows a user to access the computer at the local end, while also extending its keyboard, 
mouse and video up to 300mtr to the Receiver unit at the remote end. 
 
The Receiver Unit has a built-in 2 port KVM switch, and therefore can also be connected to another computer at the Receiver 
end and perform switching between the remote computer (connected to the TX) and the local computer (connected to the 
RX). 
 
Applications include remote access of computers or servers for security reasons, factory floors or warehouses not 
environmentally suited to a computer or point of sale applications where space for a computer is limited. It allows the user to 
manage and control the computer at both locations together with the capacity of switching between the original computer 
and a second computer on the Receiver end. 
 

Package Contents


 Transmitter (TX) Unit x 1 

 Receiver (RX) Unit x 1 

 3 in 1 VGA/USB/PS2 KVM Cables X 2 

 USB Type A to Type B Cable for Firmware Upgrade x 1 

 Power Adapters (DC5V) x 2 

 This Quick Installation Guide x 1 

 
The front and back panels are where the various connectors are located on the two pieces of the Cat5 KVM Extender. Before 
you connect these two units to any computer, cabling accessories or peripherals, you should get a glimpse of the main 
connectors you are going to encounter when setting up the system. 


Summary of Contents for AN300

Page 1: ... computer connected to the TX and the local computer connected to the RX Applications include remote access of computers or servers for security reasons factory floors or warehouses not environmentally suited to a computer or point of sale applications where space for a computer is limited It allows the user to manage and control the computer at both locations together with the capacity of switchi...

Page 2: ... Extension Port RJ 45 connected to the Receiver Unit via a CATx UTP cable up to 300mtr max j Computer port HD15 VGA connected to the local computer using included 3 in 1 KVM cable k Upgrade port USB type B dedicated for firmware upgrade l Console Video port HD15 VGA connect to monitor Receiver Unit Local End Connection RX Front Panel a Power LED Lit when power is on b Link LED Lit when link is on ...

Page 3: ...y from any significant electromagnetic interference source Plan the layout path and deploy the UTP cable for extension Step 1 Plan the path through which the CATx UTP cable will be deployed across the distance between the Transmitter and the Receiver You should choose the layout path not only based on the shortest possible length consideration but also on the least electromagnetic interference Ste...

Page 4: ... in the menu option Up Down Cursor Navigate F10 Logout the OSD Menu However if the password protection is not enabled the Logout feature will not be available OSD Main page This is the OSD Main Menu and is the first page you will see when you hit the keyboard hotkey SCROLL SCROLL SPACE Press F1 for System information OSD Menu Video Setting Configure the video settings such as Brightness Sharpness ...

Page 5: ...mize the Video Display on the Remote Console EDID Setting TX EDID You can select the TX EDID emulation data set to adopt either that of the monitor on the RX or the monitor on the TX unit You can use the Left Right Arrow key to select However before you can make the selection for the first time you might need to read the monitor EDID information by the Read Monitor option below Read Monitor Reads ...

Page 6: ...Console Control Disable Enable or adjust the timeout value 0 30 seconds 0 Disable If enabled this function will lock control to the current user either on the TX or RX until there is no activity for the timeout period It will then release control and the other user can gain access When this function is enabled the Transmitter s LED s Video Control will flash until the timeout period has expired Lo...

Page 7: ...he Remote Console To achieve an optimized display output on the remote console i e the Receiver you will need to adjust the various video parameters such as Brightness and Sharpness in an optimized combination that gives you the best video display Please follow the procedure below to achieve an optimized display output on your remote console screen on RX unit Step 1 Choose a video display content ...

Page 8: ...er colour delay the other colour delay will be automatically adjusted to be within the difference range to prevent the video from being perceptibly disoriented With the Blue delay automatically tuned in relation to the other colours and the Red and Green delays limited within a comfortable difference range the AN300 CAT5 KVM extender facilitates an easier and more intuitive way for video optimizat...

Reviews: