REMOTE-CONTROL MICROPHONE
INSTRUCTIONS
q
HM-195B
HM-195SW
Thank you for purchasing the HM-195B/HM-195SW
remote
-
control
microphone
. The COMMANDMIC
IV
™ is
a remote control microphone for use with the IC-M423/
IC-M424, IC-M400BB, and future products.
Carefully read the instruction manual of the transceiver
you will use, before connecting and operating. These in-
structions describe only the remote-control operations.
Accessories included with the HM-195:
Qty.
q
Connection cable (OPC-1540*: 6 m; 20 ft) ....................... 1
w
Mounting base ................................................................. 1
e
Connector cap ................................................................. 1
r
Microphone hanger .......................................................... 1
t
Screws (M3
×
16 mm; self-tapping) ................................. 5
* The OPC-1540 has external speaker leads, as illustrated to the right.
(Yellow: Speaker (+), Black: Speaker (–))
z
Supplied accessories
q
w
e
r
t
Yellow
Black
!8
!4
!6
!7
!5
q
w
i
e
t
r
!0
y
o
u
!1
!2
!3
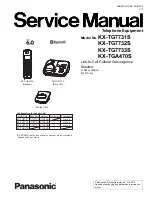
q
BUSY/TRANSMIT ICON (See
n
)
“
➥
” appears when receiving a signal or when the
squelch is open.
“
➥
” appears while transmitting.
w
POWER ICON (See
n
)
“25W” appears when high power is selected.
➥
“1W” appears when low power is selected.
➥
e
RX SPEAKER ICON (See
¤7
)
Appears while in the RX Speaker mode.
r
CHANNEL GROUP ICON (See
b
)
Selected channel group icons, U.S.A. “USA,” Interna-
➥
tional “INT,” Canadian “CAN,” ATIS “ATIS” or DSC “DSC”
appears, depending on the transceiver version.
“WX” appears when the weather channel is selected.
➥
t
CALL CHANNEL ICON (See
b
)
Appears when the Call channel is selected.
y
DUPLEX ICON (See
b
)
Appears when a duplex channel is selected.
u
FAVORITE CHANNEL ICON (See
⁄3
)
Appears when a Favorite (TAG) channel is selected.
i
MAIL ICON (See
¤3
)
Blinks when there is an unread message.
o
GPS ICON
Stays ON when the GPS receiver is activated and valid
➥
position data is received.
Blinks when invalid position data is being received.
➥
!0
SWITCH ICON (See
¤5
)
Appears when the “CH 16 SWITCH” in DSC Settings is set
to ‘OFF.’
!1
LOW BATTERY ICON
Blinks when the battery voltage drops to approximately 10 V
DC or less.
!2
CHANNEL NUMBER READOUT
Shows the selected operating channel number.
• When a simplex channel is selected, “A” appears.
!3
CHANNEL NAME FIELD
The channel name appears, if programmed. (See
,
)
!4
KEY ICONS (See
v
)
Shows the programmed function of the softkeys on the front
panel.
!5
TIME ZONE INDICATOR
Shows the current time when a GPS receiver is connect-
➥
ed, or the time is manually programmed.
• When the GPS current time is invalid, “??” will blink every
2 seconds instead of the current time. After 23.5 hours has
passed, “NO TIME” will appear.
• “??” will blink every 2 seconds
,
instead of the current time, 4
hours after the time was manually programmed. The manually
programmed time is held for only 23.5 hours, and after that,
“NO TIME” will appear.
“LOCAL” appears when the offset time is set.
➥
“MNL” appears when
➥
the time is manually programmed.
“UTC” appears when
➥
the GGA, GLL or GNS GPS sen-
tence format is included in the GPS signal.
The date information appears when
➥
the RMC GPS sen-
tence format is included in the GPS signal.
“NO TIME” appears when no GPS receiver is connected,
➥
and no time is manually input.
!6
POSITION INDICATOR
➥
Shows the current position when a GPS receiver is con-
nected, or the position is manually programmed.
• When the GPS position is invalid, “??” may blink every 2
seconds instead of position. The last position is held for only
23.5 hours, and after that, “NO POSITION” will appear.
• “??” will blink every 2 seconds, instead of position, 4 hours
after the position is manually programmed. The manually pro-
grammed position is held for only 23.5 hours, and after that,
“NO POSITION” will appear.
➥
“NO POSITION” appears when no GPS receiver is con-
nected, and no position is manually input.
!7
SCAN INDICATOR
“SCAN 16” appears during a Priority scan; “SCAN” ap-
➥
pears during a Normal scan. (See
⁄4
)
“DUAL 16” appears during Dualwatch; “TRI 16” appears
➥
during Tri-watch. (See
⁄5
)
!8
LOCAL ICON (See
n
)
Appears when the Attenuator function is turned ON. (Only
U.S.A. and Australian version transceivers.)
x
Function display
The HM-195 remotely controls the transceiver and provides an
Intercom function.
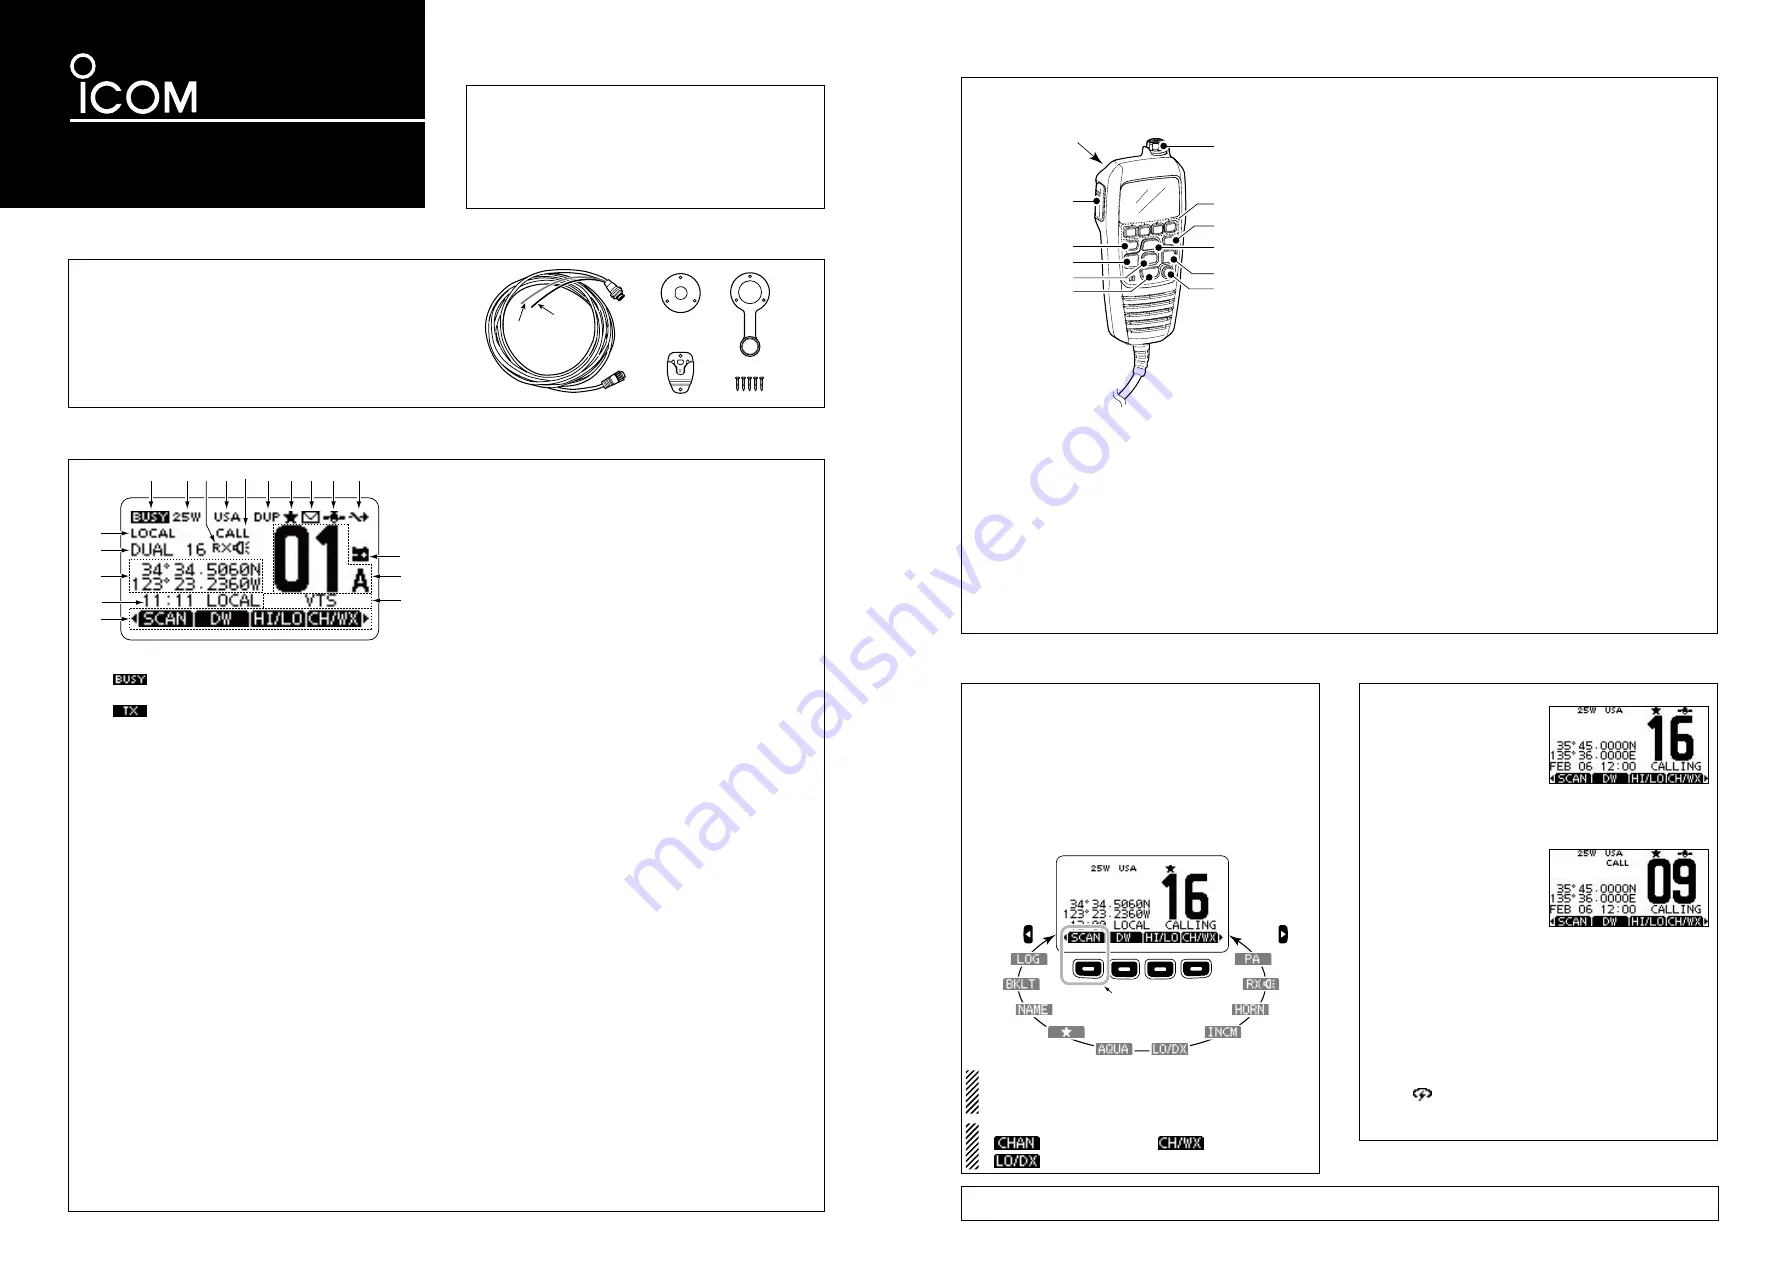
q
DISTRESS KEY [DISTRESS] (See
⁄9
)
Hold down for 3 seconds to transmit a Distress call.
w
PTT SWITCH [PTT]
Hold down to transmit, release to receive. (See
n
)
e
MENU KEY [MENU] (See
‹0
)
Push to enter or exit the Menu screen.
r
LEFT AND RIGHT KEYS [
Ω
]/[
≈
]
Push to switch to the previous or next key function that is
➥
assigned to the softkeys. (See
v
)
Push to select the desired character or number in the
➥
table while in the channel name, position programming
mode, and so on. (See
,
,
⁄6
,
⁄7
)
t
ENTER KEY [ENT] (See
,
,
⁄0
,
⁄6
)
Push to set the input data, selected item, and so on.
y
UP AND DOWN/CHANNEL SELECT KEYS [
∫
•CH]/[
√
•CH]
Push to select the operating channels, Menu items, Menu
➥
settings, and so on. (See
b
,
‹0
)
➥
Push to check Favorite channels, change the scanning
direction or manually resume a scan. (See
⁄4
)
u
CHANNEL 16/CALL CHANNEL KEY [16/C]
Push to select Channel 16. (See
➥
b
)
Hold down for 1 second to select the Call channel. (
➥
See
b
)
• “CALL” appears when the Call channel is selected.
➥
When the Call channel is selected, hold down for 3 sec-
onds to enter Call channel programming mode . (See
m
)
i
CLEAR KEY [CLEAR] (See
,
,
⁄6
,
‹0
)
Push to cancel the entered data, or to exit the Menu screen.
o
SOFTKEYS
Desired functions can be assigned in the Menu screen.See
the transceiver’s manual for details.
!0
VOLUME AND SQUELCH SWITCH/POWER SWITCH
[VOL/SQL•PWR]
When the power is OFF, hold down for 1 second to turn
➥
ON power. (See
n
)
Hold down for 1 second to turn OFF power.
➥
When the power is ON, push to enter the volume level
➥
adjustment mode.* (See
⁄0
)
• Each push of this switch toggles the mode between the vol
-
ume level adjustment, squelch threshold level adjustment,
operating channel selection and the LCD and key backlight
brightness adjustment, if assigned.
Rotate to adjust the volume level.* (See
➥
⁄0
)
*The desired function can be assigned in the Menu screen.
c
Panel description
w
y
t
r
e
q
(Back side)
!0
o
i
y
r
u
Various functions can be assigned to the softkeys.
When a key function is assigned, the key icon is displayed
above the softkey, as shown below.
Consult your Icom dealer for details concerning which func-
tions are preprogrammed into the keys.
Softkey function selection
D
When “
Ω
” or “
≈
” is displayed beside the key icon, pushing [
Ω
]
or [
≈
] sequentially shows the previous or next key function that
is assigned to the softkey.
Push
Push
*
*Push this key to start
and stop scan.
The order of the key icons may differ depending on the pre-
programming, and the contents may differ, depending on
the transceiver version.
Except for a U.S.A. and Australian version transceiver:
• [
] appears instead of [
].
• [
] does not appear.
v
Softkey function
b
Channel selection
Channel 16
D
Push [16/C] to select Chan-
q
nel 16.
Push [CH/WX]* to return to
w
the screen displayed before
you selected Channel 16,
or push [
∫
](CH) or [
√
](CH)
to select an operating channel.
Call channel
D
Hold down [16/C] for 1 sec-
q
ond to select the Call chan-
nel of the selected channel
group.
Push [CH/WX]* to return to
w
the screen displayed before
you selected Call channel, or push [
∫
](CH) or [
√
](CH) to
select an operating channel.
* [CHAN] appears except for a U.S.A. and Australian version trans-
ceiver.
Weather channels
D
(U.S.A. and Australian version transceiver only.)
Push [CH/WX] once or twice to select a weather channel.
q
• “WX” appears when a weather channel is selected.
• “WX
” appears when the Weather Alert function is in turned
ON.
Push [
w
∫
](CH) or [
√
](CH) to select a channel.
Icom, Icom Inc. and the Icom logo are registered trademarks of Icom Incorporated (Japan) in Japan, the United States, the United Kingdom, Germany, France,
Spain, Russia and/or other countries. COMMANDMIC is a registered trademark of Icom Incorporated (Japan) in Japan and the United States.