background image

Welcome. . .

Thank you for buying an IBM
IntelliStation Z Pro computer.

This

contains

information for setting up,
installing options, and configuring
your computer.
This book also contains
information for every day use,
and solving problems.

You can find the most current
information about your
computer on the IBM Web site at:
http://www.ibm.com/pc/support/

Installation Guide

Installation Guide

Type 6223

IntelliStation Z Pro

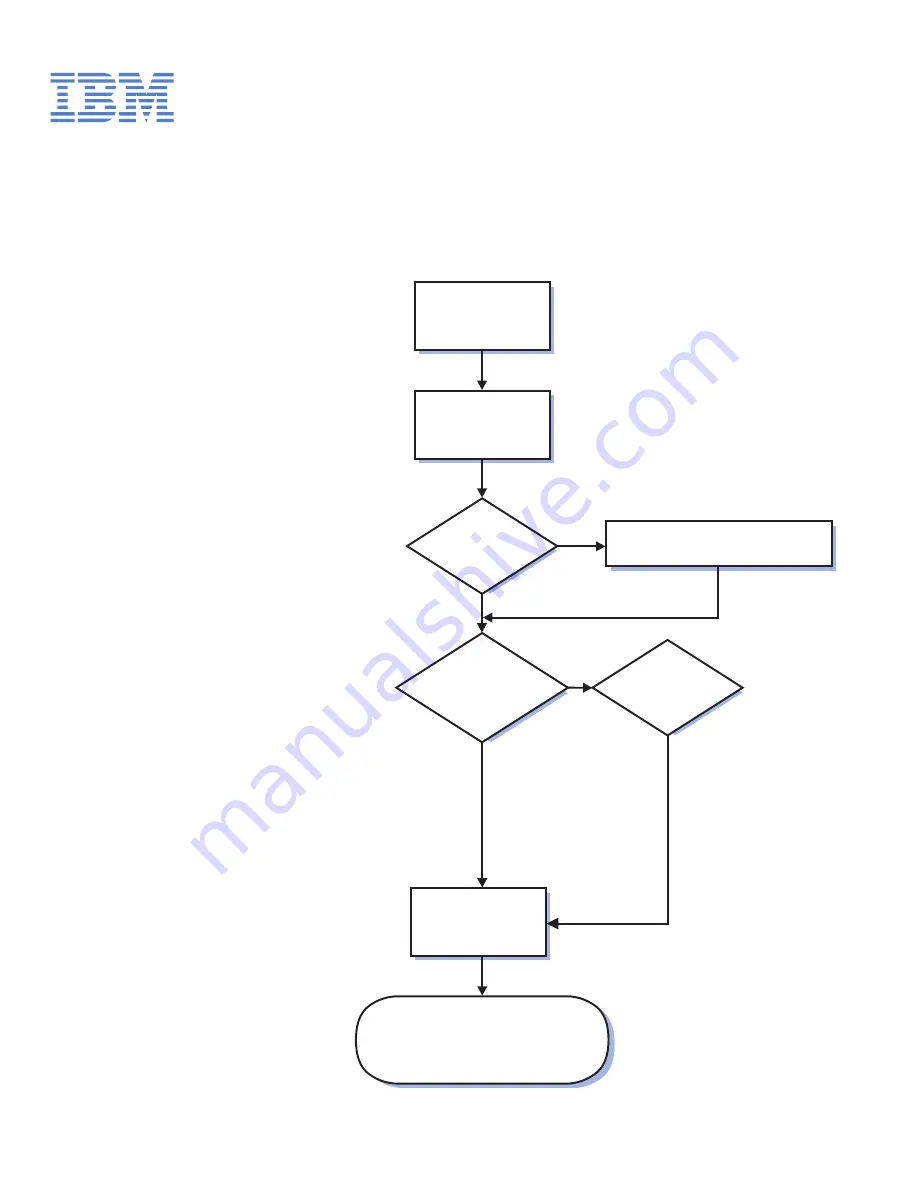
Go to the Computer Support

flow chart

Start the computer

Complete the setup

program

Set up the computer

Did the computer

start correctly?

Do you plan

to use Windows XP or

Red Hat Linux ?

Yes

Yes

No

No

System is ready to use.

• Register your computer:

Go to http://www.ibm.com/pc/register/

• Install options and applications

Install another

operating system

Summary of Contents for IntelliStation Z Pro 6223

Page 1: ...your computer on the IBM Web site at http www ibm com pc support Installation Guide Installation Guide Type 6223 IntelliStation Z Pro Go to the Computer Support flow chart Start the computer Complete...

Page 2: ...No Yes Yes Yes Check all cables for loose connections and verify that all optional devices you installed are on the compatibility matrix You can view the at compatibility matrix http www pc ibm com us...

Page 3: ...IntelliStation Z Pro Type 6223 Installation Guide...

Page 4: ...t of Limited Warranty Z125 4753 07 11 2002 on page 69 and Appendix C Notices on page 85 First Edition September 2004 Copyright International Business Machines Corporation 2004 All rights reserved US G...

Page 5: ...he bezel 17 Installing an adapter 18 Cabling an optional SCSI adapter 21 Installing a drive 22 Installing memory modules 32 Installing a second microprocessor 35 Installing a security rope clip 39 Rep...

Page 6: ...on 67 Getting help and information from the World Wide Web 68 Software service and support 68 Hardware service and support 68 Appendix B IBM Statement of Limited Warranty Z125 4753 07 11 2002 69 Part...

Page 7: ...alleert eerst de veiligheidsvoorschriften Ennen kuin asennat t m n tuotteen lue turvaohjeet kohdasta Safety Information Avant d installer ce produit lisez les consignes de s curit Vor der Installation...

Page 8: ...sconnect signal cables v Never turn on any equipment when there is evidence of fire water or structural damage v Disconnect the attached power cords telecommunications systems networks and modems befo...

Page 9: ...ces or regulations Statement 3 CAUTION When laser products such as CD ROMs DVD drives fiber optic devices or transmitters are installed note the following v Do not remove the covers Removing the cover...

Page 10: ...the device and the power switch on the power supply do not turn off the electrical current supplied to the device The device also might have more than one power cord To remove all electrical current...

Page 11: ...you to lead a chemical known to the State of California to cause cancer and birth defects or other reproductive harm Wash hands after handling ADVERTENCIA El contacto con el cable de este producto o c...

Page 12: ...ety Information document under statement 1 Be sure to read all caution and danger statements in this documentation before performing the instructions Read any additional safety information that comes...

Page 13: ...ion about your computer and other IBM computer products at http www ibm com pc intellistation Packaged with this Installation Guide is the Device Drivers CD which contains device drivers and hardware...

Page 14: ...in the documentation that comes with the operating system and any updates Then follow the instructions in the readme file on the Device Drivers CD to install the support software Note If you install a...

Page 15: ...lable in the language for that region the English version is displayed Use one of the following procedures to start the Documentation Browser v If Autostart is enabled insert the CD into your CD ROM d...

Page 16: ...ation and instructions for installing and configuring small computer system interface SCSI device drivers and devices v Readme files on the Device Drivers CD Several readme files on the CD contain inf...

Page 17: ...nts indicate situations that can be potentially hazardous to you A caution statement is placed just before the description of a potentially hazardous procedure step or situation v Danger These stateme...

Page 18: ...NVS 280 DMS 59 PCI Express x16 with 64 MB DDR synchronous dynamic random access memory SDRAM video memory and dual analog connectors or dual digital monitor capability with the purchase of an addition...

Page 19: ...ED is lit and not flashing it indicates that the computer is turned on When this LED is flashing it indicates that the computer is off and still connected to an ac power source standby mode Power cont...

Page 20: ...Mic connector pink Use this connector to connect a microphone to your computer when you want to record voices or other sounds on the hard disk You can also use this connector and a microphone with spe...

Page 21: ...st independently and provide good support The seat should have a curved front to relieve pressure on the thighs Adjust the seat so that your thighs are parallel to the floor and your feet are either f...

Page 22: ...for users who are experienced with setting up IBM computer hardware If you need more detailed instructions see the User s Guide on the IBM IntelliStation Documentation CD For a list of supported optio...

Page 23: ...ective packages until you are ready to install them To reduce the possibility of damage from electrostatic discharge observe the following precautions v Limit your movement Movement can cause static e...

Page 24: ...the Z Pro Type 6223 computer DIMMs Heat sink Microprocessor Microprocessor baffle assembly Microprocessor air baffle PCI card Adapter retaining bracket Bezel EMC shields System board Hard disk drive...

Page 25: ...the system board connectors for user installable options Slot 6 PCI X Battery Microprocessor 2 Microprocessor 1 Slot 5 PCI X Slot 4 PCI X Slot 3 PCI Slot 2 PCI Slot 1 PCI Express x16 DIMM 5 DIMM 4 DI...

Page 26: ...ower Fan 1 Fan 2 Fan 4 optional SCSI channel A external SCSI SCSI channel B Power Fan 3 Intrusion switch Clear CMOS jumper Diskette drive Primary IDE Wake on LAN Serial ATA connectors SCSI LED Interna...

Page 27: ...owing illustration shows the external input output connectors on the system board Audio Front audio Front USBs Ethernet USBs 3 and 4 USBs 1 and 2 IEEE 1394A Keyboard Serial 2 Parallel port Serial 1 Mo...

Page 28: ...age 44 then disconnect all power cords and external cables 3 Pull down on the cover release handle then pull the cover straight up and lift the side cover off the computer and set it aside Cove releas...

Page 29: ...ove the bezel 1 Unlock the side cover lock 2 Remove the side cover see Removing the side cover on page 16 3 Locate the two bezel clips that are securing the bezel to the computer chassis Gently lift a...

Page 30: ...nstall a variety of PCI adapters that currently do not support sharing of PCI interrupts v If you install an optional ServeRAID 6i adapter it must be installed in PCI X slot 5 v If you install an opti...

Page 31: ...slot Store it in a safe place for future use Attention Expansion slot covers must be installed on all empty slots This maintains the electronic emissions standards of the computer and ensures proper v...

Page 32: ...SI adapter on page 21 for additional information 11 If you have another adapter to install repeat steps 4 through 10 12 If you have installed a full length adapter press down on the top tab of the fro...

Page 33: ...onal SCSI adapter 2 If you install a ServeRAID 6i adapter it must be installed in slot 5 no cabling is required for this adapter Complete the following steps to cable an optional SCSI adapter 1 Instal...

Page 34: ...re that you have all the cables and other equipment specified in the documentation that comes with the drive v Select the bay in which you want to install the drive v Check the instructions that come...

Page 35: ...SCSI For more information about HostRAID see Using the Adaptec HostRAID configuration programs on page 49 v The electromagnetic interference EMI integrity and cooling of the computer are protected by...

Page 36: ...he filler panel and EMC shield away from the computer EMC shield Filler panel Note If you are installing a drive that contains a laser observe the following safety precaution 24 IntelliStation Z Pro T...

Page 37: ...or Class 3B laser diode Note the following Laser radiation when open Do not stare into the beam do not view directly with optical instruments and avoid direct exposure to the beam Class 1 Laser Produ...

Page 38: ...a drive in bay 3 use one of the following procedures Note Only a 3 5 in device can be installed in bay 3 v If you are installing an external media device in bay 3 complete the following steps a Remove...

Page 39: ...read the following information v Read the documentation that comes with the drive for cabling instructions v Route the cable before you install the drive Do not block the airflow from the fans v You...

Page 40: ...move the side cover see Removing the side cover on page 16 5 Disconnect the fan connector for the fan that is attached to the back of the drive cage from the system board 6 Press in on the drive cage...

Page 41: ...nect the power and signal cables from the rear of the drives 9 Remove the empty drive tray from the drive bay in which you want to install the drive 10 Touch the static protective package containing t...

Page 42: ...stem board If there are open connectors on the cables connecting existing Serial ATA or SCSI drives you can use these cables to connect the new drive 16 Route the signal cable so that it does not bloc...

Page 43: ...s three connectors One of these connectors is attached to the drive one is a spare and the third is attached to the primary or secondary IDE connector on the system board The spare connector can be us...

Page 44: ...imum memory capacity using mixed single rank and double rank DIMMs Notes 1 Do not install four 2 GB double rank DIMMs for the computer maximum capacity 8 GB configuration the computer does not support...

Page 45: ...ginning on page v and Handling static sensitive devices on page 11 2 Turn off the computer and all attached devices see Turning off the computer on page 44 then disconnect all power cords and external...

Page 46: ...DIMM is firmly seated in the connector If there is a gap between the DIMM and the retaining clips the DIMM has not been correctly installed Open the retaining clips remove the DIMM and then reinsert...

Page 47: ...irst microprocessor must always be installed in the Microprocessor 1 socket v The microprocessor speeds are automatically set for this computer therefore you do not need to set any microprocessor freq...

Page 48: ...cage from the system board 6 Press in on the drive cage release lever and rotate the drive cage all the way out of the computer until it locks into place over the drive cage retention tab The open end...

Page 49: ...ocket is covered with protective film or a label peel and remove the film or label 12 Install the microprocessor a Touch the static protective package containing the new microprocessor to any unpainte...

Page 50: ...om of the heat sink Attention Do not set the heat sink down after you remove the plastic cover and do not touch the thermal grease on the bottom of the heat sink Touching the thermal grease will conta...

Page 51: ...mputer After you add the security cable make sure that it does not interfere with other cables that are connected to the computer Before you begin obtain the following items v A flat blade screwdriver...

Page 52: ...interfere with other cables that are connected to the computer Rope clip 6 If you have other options to install or remove do so now otherwise go to Completing the installation on page 41 Replacing th...

Page 53: ...e 3 Reconnect the external cables and power cords to the computer 4 Turn on the attached devices then turn on the computer Completing the installation To complete your installation reinstall the bezel...

Page 54: ...cumentation that comes with your monitor for additional information Turning on the computer Note When you connect the power cord to the computer and an ac power source the power supply fan will run an...

Page 55: ...Important 1 After turning on your computer for the first time you must complete the operating system setup procedure before turning off your computer otherwise unexpected results might occur 2 The se...

Page 56: ...computer and leave it connected to ac power the computer can respond to requests such as a remote request to turn on the computer To remove all power from the computer you must disconnect it from the...

Page 57: ...2 Close all open applications 3 Click Start 4 Click Turn Off Computer then click Turn Off to confirm If you are using the preinstalled Red Hat Linux operating system complete the following steps to s...

Page 58: ...46 IntelliStation Z Pro Type 6223 Installation Guide...

Page 59: ...tility see Starting the Configuration Setup Utility program on page 48 For detailed information see the User s Guide v Boot Menu program The Boot Menu program is part of the BIOS code in your computer...

Page 60: ...the instructions for starting the utility programs Starting the Configuration Setup Utility program Complete the following steps to start the Configuration Setup Utility program Note When you use you...

Page 61: ...d RAID level 1 is mirroring where the contents of one drive are copied to the other drive to increase hard drive availability Be sure to use these programs as described in this document Use these prog...

Page 62: ...Enable 5 Select Enabled 6 Press Esc then select Yes to save the changes Using the Serial ATA HostRAID feature The instructions in this section are for using the Array Configuration Utility program to...

Page 63: ...se the arrow keys to select the channel for which you want to change settings and press Enter 4 Select Configure View SCSI Controller Setting then select HostRAID 5 Select Enabled 6 Press Esc then sel...

Page 64: ...tips Configuring the controller By running ServeRAID Manager in Startable CD mode you can configure the controller before you install your operating system The information in this section assumes tha...

Page 65: ...ou want to configure a hot spare drive a Click the Spares tab b Select the physical drive you want to designate as the hot spare drive then click the icon to add the drive 8 Click Next The Configurati...

Page 66: ...nt operating system to enable the operating system to address the controller For device drivers and information about configuring the Gigabit Ethernet controller go to http www ibm com pc support Star...

Page 67: ...n making improvements to IBM computers Use one of the following methods to register your computer in Windows v From the Windows XP desktop click Start All Programs IBM Registration and then follow the...

Page 68: ...next step v If an operating system menu is not displayed continue with the next step 4 From the Product Recovery Main menu use the arrow keys to select System utilities and then press Enter 5 Use the...

Page 69: ...executable file for the Enhanced Diagnostics code to download it be sure to download the file to a hard disk directory and not to a diskette You can click the text file to display the readme file 7 At...

Page 70: ...58 IntelliStation Z Pro Type 6223 Installation Guide...

Page 71: ...ssages on page 60 for information For detailed information see POST Error Log in Advanced Setup in Configuration Setup Utility menu choices in the User s Guide v Diagnostic programs and error messages...

Page 72: ...Continuous beep The startup boot microprocessor has failed or the system board or speaker subsystem might contain a failing component If the computer continues through POST with no errors call for se...

Page 73: ...the problem in the troubleshooting chart run the diagnostic programs If you have run the diagnostic test programs or if running the tests does not detect the problem call for service CD ROM drive prob...

Page 74: ...that you removed with a new one If the problem remains call for service The computer stops responding during the hard disk drive diagnostic test 1 Remove the hard disk drive that was being tested whe...

Page 75: ...rocessor problems Symptom Suggested action The computer emits a continuous tone during POST The startup boot microprocessor is not working correctly Call for service Monitor problems Symptom Suggested...

Page 76: ...thorized reseller If the problem remains call for service Wrong characters appear on the screen If the wrong language is displayed update the BIOS code with the correct language If the problem remains...

Page 77: ...LED DIMM 1 error LED Fan 2 error LED Fan 1 error LED Fan 3 error LED Fan 4 error LED Microprocessor 1 error LED Microprocessor 2 error LED DIMM 6 error LED Product Recovery program The Product Recove...

Page 78: ...66 IntelliStation Z Pro Type 6223 Installation Guide...

Page 79: ...nce by following the troubleshooting procedures that IBM provides in the online help or in the publications that are provided with your system and software The information that comes with your system...

Page 80: ...rmation about which products are supported by Support Line in your country or region go to http www ibm com services sl products For more information about Support Line and other IBM services go to ht...

Page 81: ...e removal of parts and their return to IBM A part that replaces a removed part will assume the warranty service status of the removed part Unless IBM specifies otherwise these warranties apply only in...

Page 82: ...s from an IBM Internet Web site or from other electronic media and following the instructions that IBM provides If your problem can be resolved with a Customer Replaceable Unit CRU e g keyboard mouse...

Page 83: ...sit in those cases where IBM is responsible for the transportation charges Neither IBM nor your reseller are responsible for any of your confidential proprietary or personal information contained in a...

Page 84: ...ies and obligations are subject to the courts of the country in which you acquired the Machine Part 2 Country unique Terms AMERICAS ARGENTINA Governing Law The following is added after the first sente...

Page 85: ...goods are of a kind ordinarily acquired for personal domestic or household use or consumption then none of the limitations in this paragraph apply Governing Law The following replaces laws of the cou...

Page 86: ...is added under this heading Disputes arising out of or in connection with this Statement of Limited Warranty shall be finally settled by arbitration which shall be held in Bangalore India in accordan...

Page 87: ...MAGES MORAL INCIDENTAL OR INDIRECT DAMAGES FOR ANY ECONOMIC CONSEQUENTIAL DAMAGES OR Arbitration The following is added under this heading Disputes arising out of or in connection with this Statement...

Page 88: ...ia or Ukraine you may obtain warranty service for that Machine in any of those countries from either 1 an IBM reseller approved to perform warranty service or 2 from IBM If you purchase a Machine in a...

Page 89: ...registered office and or commercial site location only are competent 4 in France Algeria Benin Burkina Faso Cameroon Cape Verde Central African Republic Chad Comoros Congo Republic Djibouti Democrati...

Page 90: ...Helsinki will appoint the chairman EUROPEAN UNION EU THE FOLLOWING TERMS APPLY TO ALL EU COUNTRIES Consumers have legal rights under applicable national legislation governing the sale of consumer goo...

Page 91: ...nternal Code LIC The above limitation shall not apply to damages for bodily injuries including death and damages to real property and tangible personal property for which IBM is legally liable 2 UNDER...

Page 92: ...sed Internal Code LIC Applicability of suppliers and resellers unchanged FRANCE Limitation of Liability The following replaces the second sentence of the first paragraph of this section In such instan...

Page 93: ...tion Except as expressly provided in these terms and conditions all statutory conditions including all warranties implied but without prejudice to the generality of the foregoing all warranties implie...

Page 94: ...claim from IBM UNITED KINGDOM Limitation of Liability The following replaces the terms of this section in its entirety For the purposes of this section a Default means any act statement omission or n...

Page 95: ...ranty Service Worldwide 3 years 1 and 2 See Types of Warranty Service for the legend and explanations of warranty service types A warranty period of 3 years on parts and 1 year on labor means that IBM...

Page 96: ...M specifies otherwise the failing Machine suitably packaged to a location IBM designates After IBM has repaired or exchanged the Machine IBM will make it available for your collection or for Mail in S...

Page 97: ...TY OF ANY KIND EITHER EXPRESS OR IMPLIED INCLUDING BUT NOT LIMITED TO THE IMPLIED WARRANTIES OF NON INFRINGEMENT MERCHANTABILITY OR FITNESS FOR A PARTICULAR PURPOSE Some states do not allow disclaimer...

Page 98: ...Windows and Windows NT are trademarks of Microsoft Corporation in the United States other countries or both UNIX is a registered trademark of The Open Group in the United States and other countries Ja...

Page 99: ...Maximum internal hard disk drive capacities assume the replacement of any standard hard disk drives and population of all hard disk drive bays with the largest currently supported drives available fro...

Page 100: ...tal hydride and battery packs from IBM equipment For information on proper disposal of these batteries contact IBM at 1 800 426 4333 Have the IBM part number listed on the battery available prior to y...

Page 101: ...J 100003 for indirect connection to public telecommunication systems in the United Kingdom European Union EMC Directive conformance statement This product is in conformity with the protection require...

Page 102: ...certified by the Canadian Standards Association CSA For units intended to be operated at 115 volts Use a UL listed and CSA certified cord set consisting of a minimum 18 AWG Type SVT or SJT three condu...

Page 103: ...ay Poland Portugal Reunion Romania Russian Federation Rwanda Sao Tome and Principe Saudi Arabia Senegal Serbia Slovakia Slovenia Republic of Somalia Spain Suriname Sweden Syrian Arab Republic Tajikist...

Page 104: ...dos Belize Bermuda Bolivia Caicos Islands Canada Cayman Islands Colombia Costa Rica Cuba Dominican Republic Ecuador El Salvador Guam Guatemala Haiti Honduras Jamaica Mexico Micronesia Federal States o...

Page 105: ...n continued fine tuning 53 ServeRAID programs 48 summary window 53 the Ethernet controller 54 configuration programs Adaptec RAID Configuration Utility programs 47 Broadcom NetXtreme Gigabit Ethernet...

Page 106: ...e the SCSI controller 51 I information related publications 4 input output connectors front 7 rear 42 installation sequence memory modules 32 installing bezel 40 drives in bays 4 5 or 6 27 internal dr...

Page 107: ...32 ServeRAID Manager 53 Configuration wizard 52 description 52 overview 52 startable CD mode 52 using 52 ServeRAID programs 48 size 6 startable CD mode 52 starting Adaptec RAID Configuration Utility p...

Page 108: ...96 IntelliStation Z Pro Type 6223 Installation Guide...

Page 109: ......

Page 110: ...Part Number 88P8971 Printed in USA 1P P N 88P8971...

Reviews: