iBell RH26-24, Operator'S Manual
The iBell RH26-24 Operator's Manual is a comprehensive guide that provides detailed instructions and insights on operating and maintaining your iBell RH26-24 device. This essential manual is available for free download at manualshive.com, ensuring you have access to the information you need to optimize your iBell RH26-24 experience.
Share
Download


Reviews:
No comments
Related manuals for RH26-24

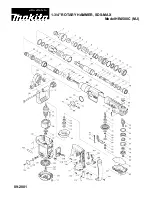
HR5001C
Brand: Makita Pages: 12

HR5001C
Brand: Makita Pages: 4
HR4500C
Brand: Makita Pages: 3

HR4001C
Brand: Makita Pages: 20

PLCT0301
Brand: Cotech Pages: 40

H 45MEY
Brand: Hitachi Pages: 36

H 25PV
Brand: Hitachi Pages: 28

H 41SD
Brand: Hitachi Pages: 28

H 45ME
Brand: Hitachi Pages: 25

H 45MR
Brand: Hitachi Pages: 26

H 55SA
Brand: Hitachi Pages: 44

H 45MR
Brand: Hitachi Pages: 52

H 41MB
Brand: Hitachi Pages: 92

H 45SB2
Brand: Hitachi Pages: 52

H 45M R
Brand: Hitachi Pages: 47

H 45SR
Brand: Hitachi Pages: 28

H 41SC
Brand: Hitachi Pages: 44

Hammer Delta VH 30
Brand: Vogt Pages: 18


