

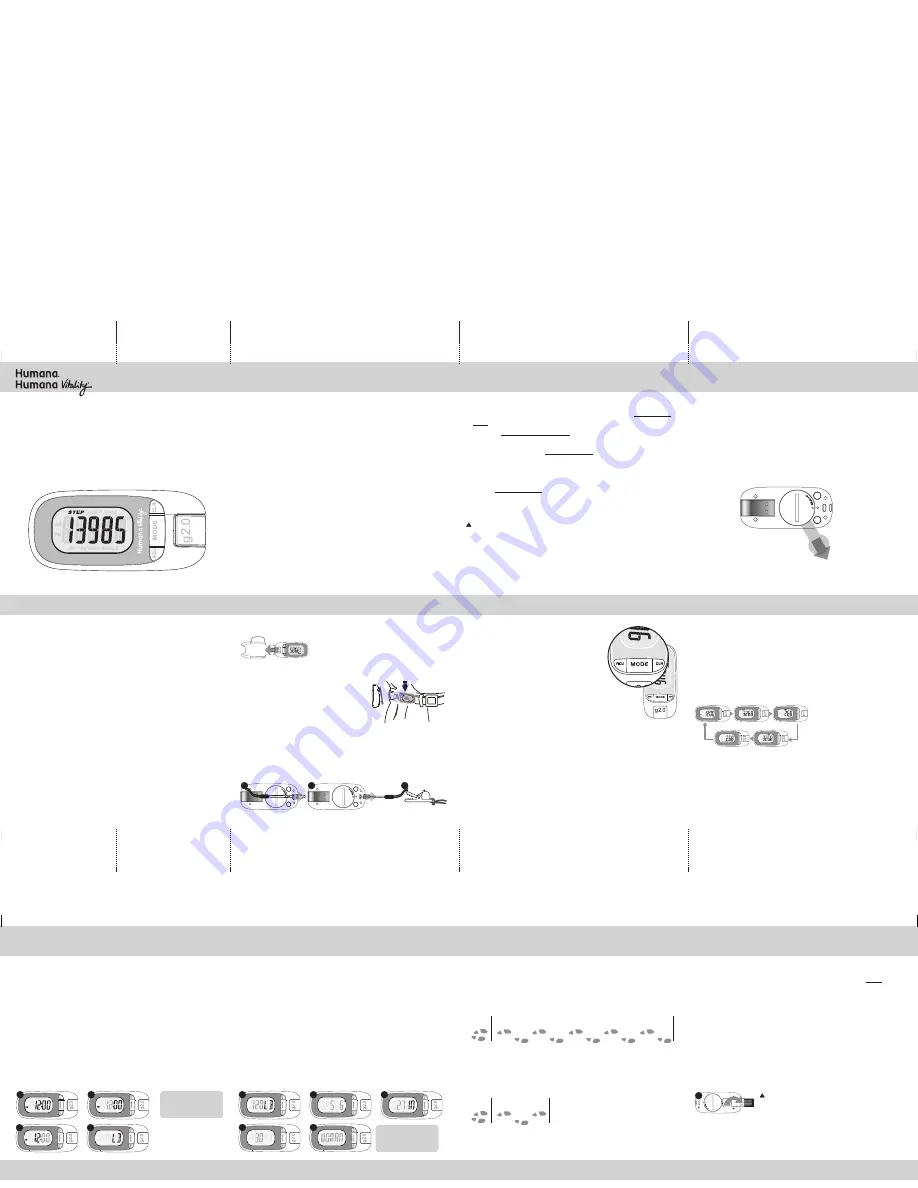
USING THE PEDOMETER’S BELT CLIP
Insert the pedometer into the belt clip USB
port side first. The display’s orientation will
be upside down on your belt; however, it
will be right-side up when turned upward to view.
This pedometer will be most accurate
when you wear it close to your body, on
your waistband or belt. You may choose
to carry it in a tight, secure pocket.
The pedometer is also equipped with a
security leash. To attach the security leash:
1
Thread the end loop through the eyelets on the back of the unit.
2
Pull the lanyard through the loop and pull tight.
3
Place the unit in the belt clip, attach at the waist, and attach the gator
clip to belt or clothing.
g2.0 PEDOMETER
USER GUIDE
/INSTRUCTION MANUAL
1. INTRODUCTION
Your Humana g2.0 pedometer is a small but powerful device. It
lets you track your personal fitness goals like never before.
When you connect your pedometer with your account on Humana
fit you can earn steps by simply walking your dog, taking a morn-
ing jog, or wearing your pedometer while working out on the
treadmill at the gym. If you have a Humana Vitality account, you
can turn your steps into Vitality Points.
At every fitness level, your route to lifelong well-being becomes
more fun and more rewarding. Humanafit.com downloads your
steps from the pedometer and displays your daily progress.
Your pedometer and Humana fit are with you every step of the
way!
g2.0
PEDOMETER
3. GETTING STARTED
REMOVING THE BATTERY INSULATOR TAB
NOTE:
In order to power up your pedometer, you must remove
the battery insulator tab inside the battery compartment.
1
Firmly grab the end of the battery insulator tab and pull to
remove it completely from the unit.
2
Remove the static sticker that appears on the pedometer
display.
ACTIVATING YOUR PEDOMETER
1
From the My Home page, in the right hand column, click on the
“Register” button to download the GearSync software and activate
your pedometer.
NOTE:
if you have already registered a previous Humana pedometer, click on
the “Manage Pedometer” button and follow the prompts to update the system
with your new pedometer.
2
Follow the steps in the browser window to complete download and
installation.
3
Connect the pedometer by extending the USB connector and inserting
into a USB port on your computer.
4
Select the “Start” button to begin your pedometer activation process.
5
When prompted, select “Finish.” You will see a “SUCCESS” notice.
Your pedometer is now activated.
NOTE:
To program your pedometer and personalize settings, see instructions
on opposite side.
SYSTEMS REQUIREMENTS:
• Mac, IBM®, or compatible PC
• OS 10.6, OS 10.7, Windows
®
XP, Vista, Windows
®
7
• USB 1.1 or greater and an Internet Connection
• Microsoft® Internet Explorer 7 and above, Safari (or compatible browser)
4. GETTING STARTED
5. HOW TO WEAR THE PEDOMETER
2. GETTING STARTED
REGISTERING FOR YOUR FREE HUMANAFIT ACCOUNT
1
To sign up, go to www.humanafit.com and click the Sign Up for
Free link (top right of the browser window).
2
Click on Create a New Account.
3
Enter all the requested information (email, username, pass-
word, etc) and click on Agree to Terms. (Make a note of your
username and password for future logins.)
4
Proceed through all the prompts to continue signup.
NOTE:
you may elect to skip several of the “Find Friends” steps.
5
Select Go to My Home to complete the registration.
6
You can now download the GearSync software and activate your
pedometer.
NOTICE: THE g2.0 PEDOMETER WILL NOT RECORD STEPS OR PEDOMETER DATA
UNTIL YOU REGISTER AND ACTIVATE IT.
To register and activate, visit
www.humanafit.com. Follow the instructions to set up your free Humana fit
account.
6. KEYS AND THEIR FUNCTIONS
The Humana g2.0 pedometer has 3 keys lo-
cated adjacent to the display: ADJ (Adjust),
MODE and CLR (Clear).
MODE KEY
• Operating Mode: Scrolls through display
modes.
• Programming Mode: Sets information
being adjusted and advances to next set-
ting.
ADJ (ADJUST) KEY
• Operating Mode: press and hold to enter the Programming
Sequence in Time Mode.
• Programming Mode: Adjusts (decreases) information being
adjusted.
CLR (CLEAR) KEY
• Operating Mode: press and hold to clear current pedometer
data.
• Programming Mode: Adjusts (increases) information being
adjusted.
7. OPERATING THE PEDOMETER
OPERATING THE PEDOMETER
The Humana g2.0 pedometer automatically captures data when
you start moving. There is no Start or Stop button to push.
The g2.0 pedometer has an integrated 10-step delay to ensure
accuracy when you walk. After 10 steps, the unit will begin
counting and retroactively add the 10 steps back into the final
step count.
TO CLEAR ALL CURRENT PEDOMETER DATA:
1
PRESS AND HOLD
the
CLR
key in any pedometer display. Continue
holding as the display reads “CLEAR”.
2
When pedometer data reads zeros (O),
RELEASE
the
CLR
key. The
unit is now ready for a new workout.
NOTE:
Your personal profile settings will be saved.
1
2
3
The pedometer has 5 display
modes: Time of Day, Steps,
Distance, Calories and Average
Speed. Scroll through display
modes by
PRESSING
the
MODE
key.
UPLOADING PEDOMETER DATA TO YOUR HUMANA FIT PROFILE
1
Direct your web browser to www.humanafit.com and click “Login” in the
upper right of your browser window.
2
Enter your user name and password.
3
Connect the pedometer to your computer by extending the USB connec-
tor and inserting into a USB port on your computer.
4
The GearSync application will automatically launch and a status bar
will display progress of your exercise data as it is uploaded to GearSync.
Click “ok” on the Gear Sync application when complete.
5
On the website, if the data did not upload automatically (a “New Workout
Imported” message is displayed at the top), then click the “Upload”
button on the right side of the website.
6
After exercise data has successfully uploaded, you may view exercise
data in a calendar summary or select individual workouts. You can also
add comments and notes to your daily workouts.
14. BATTERY SAFETY INFORMATION
CAUTION – BATTERY SAFETY INFORMATION
• Non-rechargeable batteries are not to be recharged
• Rechargeable batteries must be removed before recharging
• Rechargeable batteries should only be recharged under adult super-
vision
• Do not mix alkaline, standard (carbon-zinc), or rechargeable (nickel-
cadmium) batteries
• Exhausted batteries are to be removed
• Do not mix old and new batteries
• Do not dispose of batteries in fire; batteries may explode or leak
• Do not dispose of product in fire; batteries may explode or leak
• If this product will not be used for an extended period of time, re-
move the batteries from the product
• The supply terminals are not to be short-circuited
• Batteries are to be inserted with correct polarity
• Clean the battery contacts and also those of the product prior to bat-
tery installation
• As always, dispose of batteries in an eco-friendly manner
The purpose of the crossed-out wheelie bin symbol is to remind us that most electrical products,
and batteries, contain trace elements (including Mercury – Hg, Cadmium – Cd and Lead – Pb)
which could be harmful to our environment and therefore our health. We must all be careful to
dispose of them responsibly in a specifically designated way – either using a collection scheme or
into the correctly labeled civic amenity (NOT into general waste) – this will help your local author-
ity to arrange to recycle or dispose of them in the appropriate manner.
15. FREQUENTLY ASKED QUESTIONS
To get answers to frequently asked questions, go to
www.humanafit.com and select “Pedometer FAQs.”
HELPFUL HINTS
These tips will help make sure you use your pedometer correctly.
HINT 1:
Your pedometer’s display will show zeros until you acti-
vate it.
HINT 2:
If you have a firewall on your computer, it may keep you
from uploading your data. If so, please set it to allow access or
contact your network administrator.
HINT 3:
The steps will stop recording once the pedometer memo-
ry becomes 75 percent full. Uploading your steps will fix this. To
keep this from happening, please upload at least once a week.
HINT 4:
You can clear the screen by pressing the “CLR” button.
This will not clear the memory.
Made in China
HV1099IS01SPO
g2.0
PEDOMETER
12. REPLACING THE BATTERY
The Humana g2.0 pedometer uses one CR2032 3V lithium
battery. The pedometer battery may need replacement when:
1
The display is weak or fades out completely.
2
The pedometer function will not activate.
TO REPLACE THE BATTERY:
1
Unscrew the battery compartment door with a coin or flathead
screwdriver.
2
Remove the old battery and replace with a new one. Be sure the bat-
tery’s positive (+) side is visible.
3
Replace the battery compartment door and tighten with a coin or
flathead screwdriver.
NOTE:
You will need to re-enter your personal profile settings to assure
accuracy of pedometer readings. See opposite side for instructions on this
procedure.
1
2
9. PEDOMETER SETUP
5
Adjust Weight (in pounds or kilgrams) by
PRESSING
ADJ
or
CLR
.
PRESS
MODE
to set.
6
Adjust Height (in inches or centimeters) by
PRESSING
ADJ
or
CLR
.
PRESS
MODE
to set.
7
To adjust stride length, first see “How To Measure Your Stride
Length.” When you know your stride length
PRESS ADJ
or
CLR
.
PRESS MODE
to set.
8
Adjust Age by
PRESSING
ADJ
or
CLR
.
PRESS
MODE
to set.
9
Select Gender by
PRESSING
ADJ
or
CLR
.
PRESS
MODE
to set. The
unit is now programmed and ready for use!
To adjust value:
PRESS ADJ or CLR
To accept and advance:
PRESS MODE
5
8
6
9
7
8. PEDOMETER SETUP
To ensure exercise data is as accurate as possible, you must
complete the following steps to enter your personal profile. The
display will show you the information you’re changing. Adjust
information by pressing ADJ (to decrease) or CLR (to increase).
Accept the displayed value and advance to the next setting by
pressing MODE.
1
Enter the Programming Sequence by
PRESSING AND HOLDING
the
ADJ
key in the Time of Day display.
2
Adjust Hour by
PRESSING
ADJ
or
CLR
.
PRESS
MODE
to set.
3
Adjust Minute by
PRESSING
ADJ
or
CLR
.
PRESS
MODE
to set.
4
Select unit of measure (pounds or kilograms) by
PRESSING
ADJ
or
CLR
.
PRESS
MODE
to set.
To adjust value:
PRESS ADJ or CLR
To accept and advance:
PRESS MODE
1
2
3
4
13. WARNINGS AND CAUTIONS
WARNING:
Before you start any exercise program or perform any vigorous physical
activity, we strongly suggest you visit your doctor for a complete physical and discuss
your plans.
CAUTION:
Pedometers are not water resistant.
AVOID
exposing the pedometer to extreme conditions.
AVOID
rough uses or severe impacts to the pedometer.
NEVER
get the pedometer wet. This unit is not water resistant.
NEVER
attempt to service your pedometer or take it apart.
DO NOT
expose the unit to extreme heat, shocks, magnetic fields, electrical noise,
strong vibration or long-term exposure to direct sunlight.
DO NOT
drop or step on the pedometer.
CLEAN
the pedometer occasionally with a soft, dry cloth.
STORE
the unit in a dry place when you are not using it.
FCC COMPLIANCE
“The device complies with Part 15 of the FCC Rules. Operation is subject to the following two conditions: (1) this device
may not cause harmful interference, and (2) this device must accept any interference received, including interference
that may cause undesired operation.”
1. “Changes or modifications not expressly approved by the party responsible for compliance could void the user’s
authority to operate the product.”
2. “NOTE: This product has been tested and found to comply with the limits for a Class B digital device, pursuant to
Part 15 of the FCC Rules. These limits are designed to provide reasonable protection against harmful interfer-
ence in a residential installation. This product generates, uses and can radiate radio frequency energy and, if not
installed and used in accordance with the instructions, may cause harmful interference to radio communications.
However, there is no guarantee that interference will not occur in a particular installation. If the product does
cause harmful interference to radio or television reception, which can be determined by turning the equipment off
and on, the user is encouraged to try to correct the interference by one or more of the following measures:
• Reorient or relocate the receiving antenna.
• Increase the separation between the product and receiver.
• Connect the product into an outlet on a circuit different from that to which the receiver is connected.
• Consult the dealer or an experienced radio/TV technician for help.”
10. MEASURING STRIDE LENGTH
HOW TO MEASURE YOUR STRIDE LENGTH
1
To find out what your stride is, walk or run 10 steps and then measure
the distance with a tape measure from the first step’s toe to the 10th
step’s toe.
2
Divide your total distance by 10 to get your average stride length.
3
For a quick estimate, walk 3 steps, measure the distance, and divide by
3. The more steps you take, the more accurate and realistic your stride
will be. An average walking stride for a female is 2 feet (24 in.), a male
is 2.5 feet (30 in.).
START WALKING/
RUNNING
BASE LINE
DIVIDE TOTAL
DISTANCE BY 3
1
3
2
START WALKING/RUNNING
BASE LINE
DIVIDE TOTAL
DISTANCE BY 10
1
3
5
7
9
2
4
6
8
10
11. CONNECTING TO A COMPUTER
3
WARNING:
The USB connection is designed to fit in
a USB port in the correct orientation. DO NOT force into
the port.
NOTES:
It is recommend that you connect your pedometer once a week to
www.humanafit.com to ensure all steps are recorded.
After uploading your steps to the Humana website, you must manually reset the
steps on your pedometer to 0 by pressing & holding the CLR button. The steps dis-
played on your pedometer will not automatically be reset after uploading is complete.
Back cover
Fold 1
Fold 2
Fold 3
Fold 5
Fold 3
Fold 4
HV1099IS01SPO.ai
5/7/12


